How to deploy Network Slices
In order to illustrate better how network slicing works in OSM, it will be discussed in the context of a running example.
Resources
This example of use network slicing requires a set of resources (VNFs, NSs, NSTs) that are available in the following Gitlab osm-packages repository:
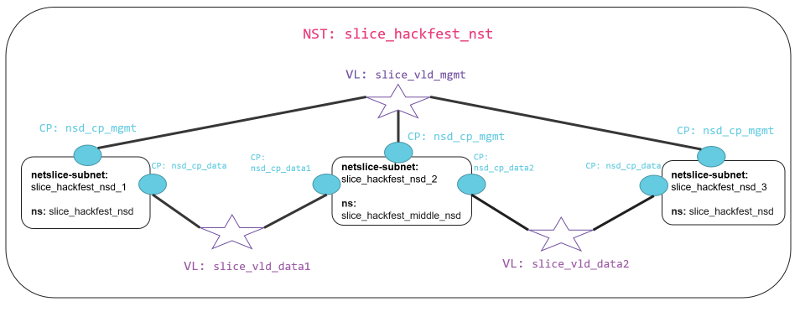
Network Slice Template Diagram
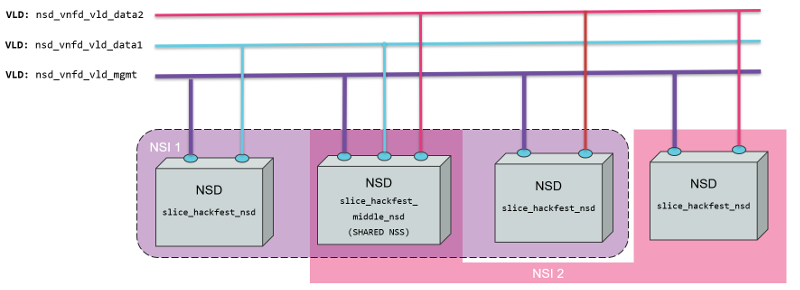
The diagram below shows the Network Slice Template created for the example. As is shown in the picture, three network slice subnets are connected by Virtual Links Descriptors (VLDs) through the connection points of the network services. We have a Virtual Link for management slice_vld_mgmt and two Virtual links for data, slice_vld_data1 and slice_vld_data2. In the middle, we have a network-slice-subnet that interconnects the Netslice subnets we have on both sides.
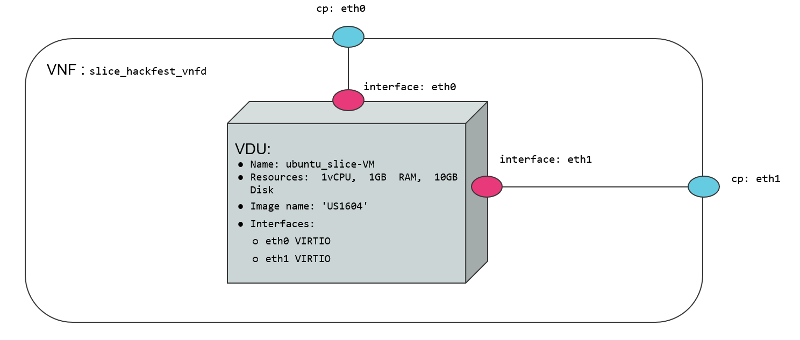
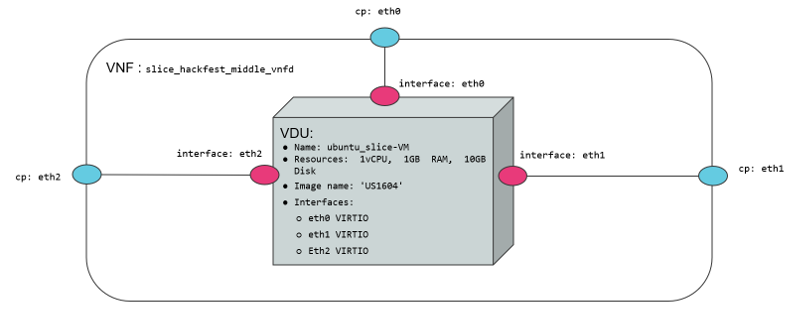
Virtual Network Functions
We use two VNFs for this example. The difference between them is the number of network interfaces to create connections. While the slice_basic_vnf has two interfaces(mgmt, data), the slice_basic_middle_vnf VNF have three interfaces (mgmt, data1, data2). The specifications vCPU (1), RAM (1GB), disk (10GB), and image-name (’ubuntu18.04’) are the same in both VNFs.
Network Services
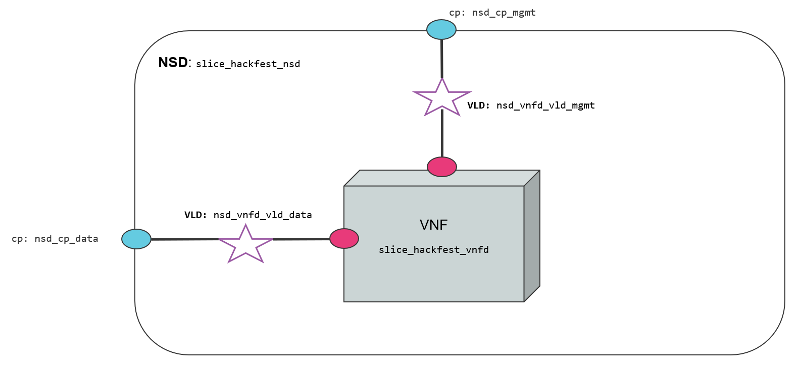
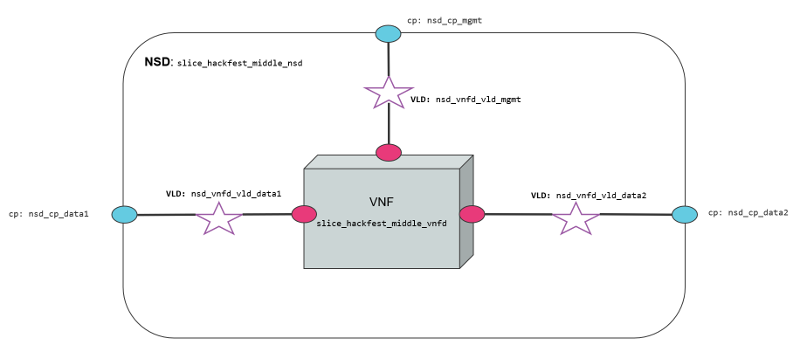
We use two network services in this example. They are differentiated by 1) the number of interfaces that posses, 2) the VNF contained inside the Network service, 3) the NS slice_hackfest_nsd have two VLDs, one for data and other for management 4) the slice_hackfest_middle_nsd has three VLDs, one for management and the other two for data1 and data2.
The slice_basic_middle_ns has inside the slice_basic_middle_vnf and the slice_basic_ns has the vnf slice_basic_vnf.
The diagram below shows the slice_basic_ns and slice_basic_middle_ns, its connection points, VLDs and VNFs.
Creating a Network Slice Template (NST)
Based on the OSM information model for Network slice templates here it is possible to start writing the YAML descriptor for the NST.
nst:
-   id: slice_basic_nst
    name: slice_basic_nst
    SNSSAI-identifier:
        slice-service-type: eMBB
    quality-of-service:
        id: 1
The snippet above contains the mandatory fields for the NST. Additionally, we can find the description below of the netslice-subnet and netslice-vld sections. When we create an NST, the id references the Network Slice Template, and the name is the name set to the NST. Additionally, the required parameter SNSSAI-identifier is a reference to which kind of service is inside this slice. In OSM we have three types of slice-service-type. Enhanced mobile broadband (eMBB), Ultra-reliable low-latency communications (URLLC) or massive machine type communications (mMTC). Moreover, we add a quality-of-service parameter that is related to the 5G QoS Indicator (5QI).
The section netslice-subnet shown below is the place to allocate the network services that compose the slice. Each item of the netslice-subnet list has:
An
idto identify the netslice-subnet.The option
is-shared-nssis a boolean flag to determine if the NSS is shared among Network Slice Instances that use this Netslice Subnet.An optional
description.The
nsd-refis the reference to the Network Service descriptor that forms the netslice subnet.
    netslice-subnet:
    -   id: slice_basic_nsd_1
        is-shared-nss: false
        description: NetSlice Subnet (service) composed by 1 vnf with 2 cp
        nsd-ref: slice_basic_ns
    -   id: slice_basic_nsd_2
        is-shared-nss: true
        description: NetSlice Subnet (service) composed by 1 vnf with 3 cp
        nsd-ref: slice_basic_middle_ns
    -   id: slice_basic_nsd_3
        is-shared-nss: false
        description: NetSlice Subnet (service) composed by 1 vnf with 2 cp
        nsd-ref: slice_basic_ns
Finally, it is defined the connections among the netslice-subnets in section netslice-vld as is shown below:
    netslice-vld:
    -   id: slice_vld_mgmt
        name: slice_vld_mgmt
        type: ELAN
        mgmt-network: true
        nss-connection-point-ref:
        -   nss-ref: slice_basic_nsd_1
            nsd-connection-point-ref: nsd_cp_mgmt
        -   nss-ref: slice_basic_nsd_2
            nsd-connection-point-ref: nsd_cp_mgmt
        -   nss-ref: slice_basic_nsd_3
            nsd-connection-point-ref: nsd_cp_mgmt
    -   id: slice_vld_data1
        name: slice_vld_data1
        type: ELAN
        nss-connection-point-ref:
        -   nss-ref: slice_basic_nsd_1
            nsd-connection-point-ref: nsd_cp_data
        -   nss-ref: slice_basic_nsd_2
            nsd-connection-point-ref: nsd_cp_data1
    -   id: slice_vld_data2
        name: slice_vld_data2
        type: ELAN
        nss-connection-point-ref:
        -   nss-ref: slice_basic_nsd_2
            nsd-connection-point-ref: nsd_cp_data2
        -   nss-ref: slice_basic_nsd_3
            nsd-connection-point-ref: nsd_cp_data
Having the network slice template ready is needed to onboard the resources to the OSM before upload the network slice template. The following commands help you to onboard packages to OSM:
VNF package:
List Virtual Network Functions Descriptors
osm nfpkg-list
Upload the slice_basic_vnf package
osm nfpkg-create slice_basic_vnf
Upload the slice_basic_middle_vnf package
osm nfpkg-create slice_basic_middle_vnf
Show if slice_basic_vnf was uploaded correctly to OSM
osm nfpkg-show slice_basic_vnf
Show if slice_basic_middle_vnf was uploaded correctly to OSM
osm nfpkg-show slice_basic_middle_vnf
NS package:
List Network Service Descriptors
osm nspkg-list
Upload the slice_basic_ns package
osm nspkg-create slice_basic_ns
Upload the slice_basic_middle_ns package
osm nspkg-create slice_basic_middle_ns
Show if slice_basic_ns was uploaded correctly to OSM
osm nsd-show slice_hackfest_nsd
Show if slice_basic_middle_ns was uploaded correctly to OSM
osm nsd-show slice_hackfest_middle_nsd
NST:
List network slice templates
osm nst-list
Upload the slice_basic_nst.yaml template
osm nst-create slice_basic_nst/slice_basic_nst.yaml
Upload the slice_basic_2nd_nst template
osm nst-create slice_basic_nst/slice_basic_2nd_nst.yaml
Show if slice_basic_nst.yaml was uploaded correctly to OSM
osm nst-show slice_basic_nst.yaml
Show if slice_basic_2nd_nst was uploaded correctly to OSM
osm nst-show slice_basic_2nd_nst
With all resources already available in OSM, it is possible to create the Network Slice Instance (NSI) using the slice_hackfest_nst. You can find below the help of the command to create a network slice instance:
osm nsi-create --help
Usage: osm nsi-create [OPTIONS]

  creates a new Network Slice Instance (NSI)

Options:
  --nsi_name TEXT     name of the Network Slice Instance
  --nst_name TEXT     name of the Network Slice Template
  --vim_account TEXT  default VIM account id or name for the deployment
  --ssh_keys TEXT     comma separated list of keys to inject to vnfs
  --config TEXT       Netslice specific yaml configuration:
                      netslice_subnet: [
                      id: TEXT, vim_account: TEXT,
                      vnf: [member-vnf-index: TEXT, vim_account: TEXT]
                      vld: [name: TEXT,
                            vim-network-name: TEXT or DICT with vim_account,
                            vim_net entries]
                      additionalParamsForNsi: {param: value, ...}
                      additionalParamsForsubnet: [{id: SUBNET_ID,
                      additionalParamsForNs: {},
                      additionalParamsForVnf: {}}]
                      ],
                      netslice-vld: [name: TEXT,
                      vim-network-name: TEXT or DICT with vim_account,
                      vim_net entries]
  --config_file TEXT  nsi specific yaml configuration file
  --wait              do not return the control immediately, but keep it
                      until the operation is completed, or timeout
  -h, --help          Show this message and exit.
To instantiate the network slice template use the following command:
osm nsi-create\
--nsi_name my_first_slice \
--nst_name slice_basic_nst \
--vim_account <replace_vim_account_name> \
--config 'netslice-vld: [{ "name": "slice_vld_mgmt", "vim-network-name": <replace_vim_external_network> }]'
Where:
--nsi-nameis the name of the Network Slice Instance:my_first_slice--nst-nameis the name of the Network Slice Template:slice_basic_nst--vim_accountis the default VIM account id or name to be used by the NSI--configis the configuration parameter used for the slice. For example, it is possible to attach the NS management network to an external network of the VIM to have access to the VNF deployed in the slice. In this case,netslice-vldlist, contains the name of the VLDslice_vld_mgmtused to attach the external network of the VIM byvim-network-namekey.
The commands to operate the slice are:
List Network Slice Instances
osm nsi-list
Delete Network Slice Instance
osm nsi-delete <nsi_name> or <nsi_id>
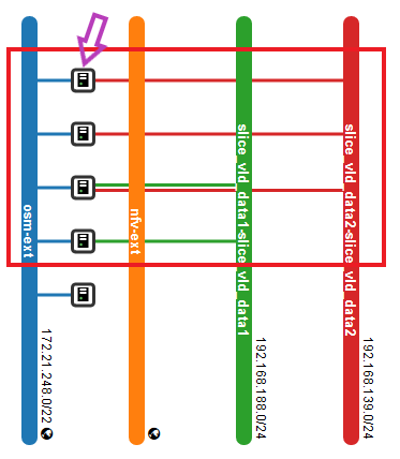
The result of the deployment in Openstack looks like:
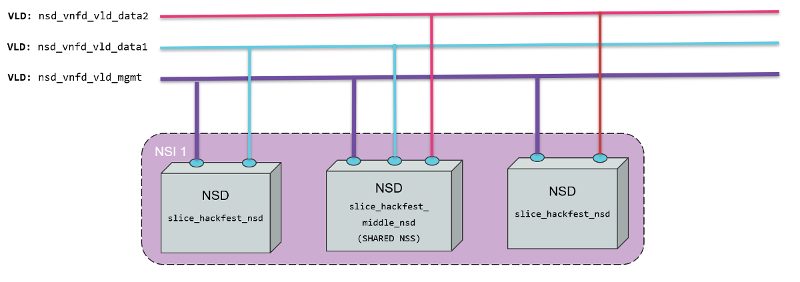
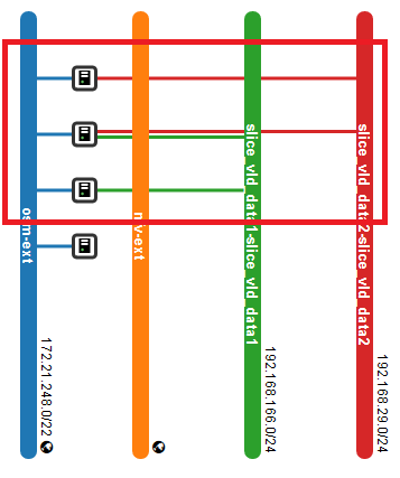
In the picture above, it is shown three VNFs deployed in OpenStack connected to management OpenStack network osm-ext and also connected among them, following the VLDs described in the network slice template.
Sharing a Network Slice Subnet
To test the feature of sharing a network slice subnet, we create a new network slice template that uses the shared netslice subnet from the previous instantiation. The picture below shows the Network Slice Template.
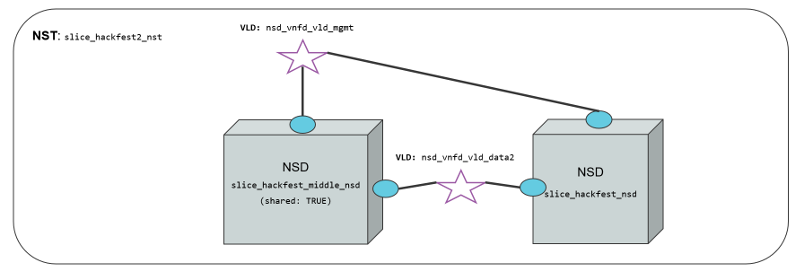
The network slice template used for sharing a network slice subnet is slice_hackfest2_nst.yaml and it is available in the resources section.
nst:
-   id: slice_basic_nst2
    name: slice_basic_nst2
    SNSSAI-identifier:
        slice-service-type: eMBB
    quality-of-service:
        id: 1

    netslice-subnet:
    -   id: slice_basic_nsd_2
        is-shared-nss: true
        description: NetSlice Subnet (service) composed by 1 vnf with 3 cp
        nsd-ref: slice_basic_middle_ns
    -   id: slice_basic_nsd_3
        is-shared-nss: false
        description: NetSlice Subnet (service) composed by 1 vnf with 2 cp
        nsd-ref: slice_basic_ns

    netslice-vld:
    -   id: slice_vld_mgmt
        name: slice_vld_mgmt
        type: ELAN
        mgmt-network: true
        nss-connection-point-ref:
        -   nss-ref: slice_basic_nsd_2
            nsd-connection-point-ref: nsd_cp_mgmt
        -   nss-ref: slice_basic_nsd_3
            nsd-connection-point-ref: nsd_cp_mgmt
    -   id: slice_vld_data2
        name: slice_vld_data2
        type: ELAN
        nss-connection-point-ref:
        -   nss-ref: slice_basic_nsd_2
            nsd-connection-point-ref: nsd_cp_data2
        -   nss-ref: slice_basic_nsd_3
            nsd-connection-point-ref: nsd_cp_data
The YAML above contains two netslice-subnet, one with the flag is-shared-nss as true and the other one with the flag is-shared-nss as false. The netslice-vlds will connect the slice_basic_nsd_2 nss with management interface and data2 with the slice_basic_nsd_3 via nsd_cp_data.
To instantiate this network slice, we will use the same command used previously but changing the nst_name to slice_basic_2nd_nst:
osm nsi-create\
--nsi_name my_shared_slice \
--nst_name slice_basic_2nd_nst \
--vim_account <replace_vim_account_name> \
--config 'netslice-vld: [{ "name": "slice_vld_mgmt", "vim-network-name": <replace_vim_external_network> }]'
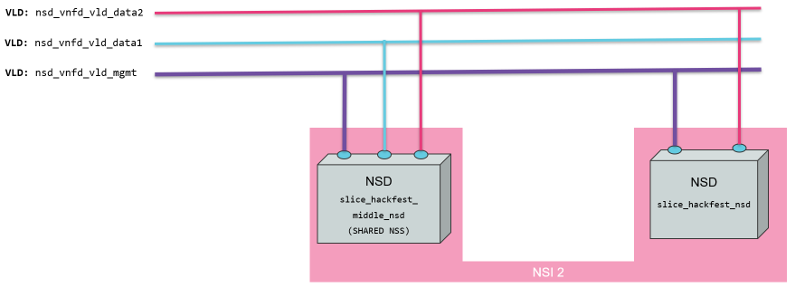
You can see the result of the instantiation in the picture below:
Only one Network Slice Subnet was instantiated since the middle Network Slice Subnet is shared with this second NSI.
Result of deleting the Network Slice Instance 1
What would happens with the shared Network Slice Subnet and the second Network Slice Instance if we delete the first Network Slice Instance?
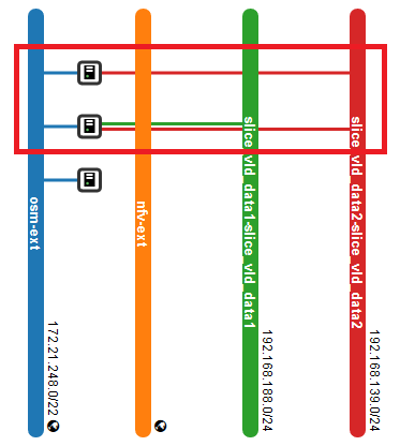
With the command osm nsi-delete my_first_slice we can delete the first Network Slice Instance. The result is that the middle Network Slice Subnet (shared) belongs to the NSI2, and it is not deleted when NSI1 is deleted. All networks and services created for NSS middle are kept. In the picture below, is shown the result in Openstack and the logical result of the deletion of NSI1:
To remove the NSI2 run the command: osm nsi-delete my_shared_slice.