OSM Release THREE: Difference between revisions
No edit summary |
|||
| Line 7: | Line 7: | ||
|dimensions="120" | |dimensions="120" | ||
}} | }} | ||
__TOC__ | __TOC__ | ||
Revision as of 09:01, 16 April 2018
Open Source MANO (OSM) is the open source community that aims to deliver a production-quality MANO stack for NFV, capable of consuming openly published information models, available to everyone, suitable for all VNFs, operationally significant and VIM-independent. OSM is aligned to NFV ISG information models while providing first-hand feedback based on its implementation experience.
Assumptions about interaction with VIMs and VNFs
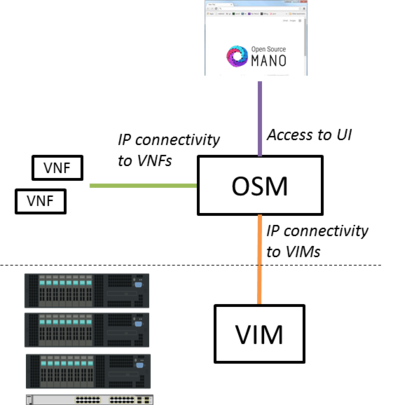
The following figure illustrates OSM interaction with VIM and VNFs:
- OSM talks to the VIM for the deployment of VNFs and VLs connecting them
- OSM talks to the VNFs deployed in a VIM to run day-0, day-1 and day-2 configuration primitives.
In order for OSM to work, it is assumed that:
- Each VIM has an API endpoint reachable from OSM
- Each VIM has a so called management network which provides IP address to VNFs
- That management network is reachable from OSM
Install OSM
Install from binaries (Recommended)
All you need to run OSM Release THREE is a single server or VM with the following requirements:
- MINIMUM: 4 CPUs, 8 GB RAM, 40GB disk and a single interface with Internet access
- RECOMMENDED: 8 CPUs, 16 GB RAM, 80GB disk and a single interface with Internet access
- Ubuntu16.04 (64-bit variant required) as base image (http://releases.ubuntu.com/16.04/), configured to run LXD containers. If you don't have LXD configured, you can follow the instructions here (LXD configuration).
Note: If you wish to install OSM Release THREE from inside a LXD container, you will need to enable nested containers following instructions here (Nested containers).
Once you have prepared the host with the previous requirements, all you need to do is:
wget https://osm-download.etsi.org/ftp/osm-3.0-three/install_osm.sh
chmod +x install_osm.sh
./install_osm.sh
Install from source
To install OSM Release THREE from source, requirements are the following:
- 8 CPUs, 16 GB RAM, 100GB disk and a single interface with Internet access
- Ubuntu16.04 (64-bit variant required) as base image (http://releases.ubuntu.com/16.04/), configured to run LXD containers. If you don't have LXD configured, you can follow the instructions here (LXD configuration).
Note: If you wish to install OSM Release THREE from inside a LXD container, you will need to enable nested containers following instructions here (Nested containers).
Once you have prepared the host with the previous requirements, all you need to do is:
wget https://osm-download.etsi.org/ftp/osm-3.0-three/install_osm.sh
chmod +x install_osm.sh
./install_osm.sh --source
If you need to install from latest master (recommended for advanced users only), please use:
./install_osm.sh -b master --source
Install from LXD images (NEW)
All you need to run OSM Release THREE is a single server or VM with the following requirements:
- MINIMUM: 4 CPUs, 8 GB RAM, 40GB disk and a single interface with Internet access
- RECOMMENDED: 8 CPUs, 16 GB RAM, 80GB disk and a single interface with Internet access
- Ubuntu16.04 (64-bit variant required) as base image (http://releases.ubuntu.com/16.04/), configured to run LXD containers. If you don't have LXD configured, you can follow the instructions here (LXD configuration).
Once you have prepared the host with the previous requirements, all you need to do is:
wget https://osm-download.etsi.org/ftp/osm-3.0-three/install_osm.sh
chmod +x install_osm.sh
./install_osm.sh --lxdimages
Install behind a non-transparent proxy
The recommended procedure is to install OSM from LXD images, after doing some proxy configuration:
- Configure apt-get to use a proxy: https://help.ubuntu.com/community/AptGet/Howto#Setting_up_apt-get_to_use_a_http-proxy (required for installing LXD and for installing OSM client)
- Configure LXD as described in the link: LXD configuration
- Configure wget to use a proxy: https://stackoverflow.com/questions/11211705/setting-proxy-in-wget (required for downloading the LXD images)
- Download the installer and run the installer with the option --lxdimages:
wget https://osm-download.etsi.org/ftp/osm-3.0-three/install_osm.sh
chmod +x install_osm.sh
./install_osm.sh --lxdimages
Checking your installation
Please note that in OSM 3, authentication is performed using OpenIDConnect and OAuth2.0.
An identity provider has been added to the platform and provided as a service in the SO container running on port 8009.
This means both the browser and the UI server components (that run on the SO container) need to be able to access the SO container using identical URIs.
In short, the tuple of scheme://location:port needs to be reachable via both the browser accessing the system and the UI server running on the SO container (e.g. https://10.66.202.206:8009 for a sample deployment).
This means that if your SO container is behind a NAT that cannot reach the public address of the host, authentication and authorization will not be possible and you will not be able to proceed using the UI.
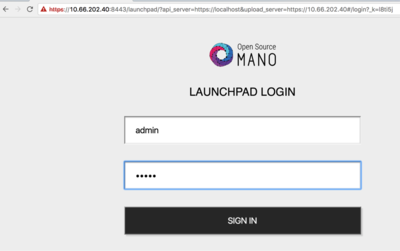
After some time, you will get a fresh OSM Release THREE installation. You can access to the UI in the following URL (user:admin, password: admin):
You can connect to the service via a web browser (Google Chrome version 50 or later is recommended). Open a browser and connect to https://1.2.3.4:8443 , replacing 1.2.3.4 with the IP address of your host. Note that it uses https, not http. Google Chrome is recommended. If you are using Firefox and plan to use the self-signed certificate provided in the installation, please follow instructions at Using untrusted, self-signed certificates Alternatively, you can run Launchpad with trusted CA signed SSL certs as per Using a certificate signed by a trusted CA or, run Launchpad with SSL disabled as per Run Launchpad with SSL Disabled
Make sure that port 8443 is accessible, as well as the following required ports: 8000, 4567, 8008, 80, 9090.
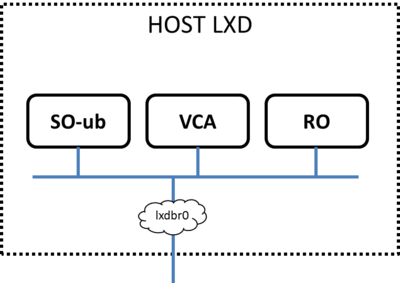
As a result of the installation, three LXD containers are created in the host: RO, VCA, and SO-ub (running the SO and the UI), as shown in the figure below.
Install OSM client
Note: From v3.0.2, the OSM installer installs OSM client by default in your system, so you don't need to install it. Just type "osm" to see if it is installed in your system.
OSM client is a python-based API and CLI for OSM.
To install it:
curl http://osm-download.etsi.org/repository/osm/debian/ReleaseTHREE/OSM%20ETSI%20Release%20Key.gpg | sudo apt-key add -
sudo add-apt-repository -y "deb [arch=amd64] http://osm-download.etsi.org/repository/osm/debian/ReleaseTHREE stable osmclient"
sudo apt-get update
sudo apt-get install -y python-osmclient
Once installed, type “osm” to see a list of commands. At minimum, you will need to specify the OSM host, either via an environment variable or via the osm command line (see “osm --help” for info):
export OSM_HOSTNAME=`lxc list | awk '($2=="SO-ub"){print $6}'`
export OSM_RO_HOSTNAME=`lxc list | awk '($2=="RO"){print $6}'`
Note: The OSM client can run on a different computer than the one actually running OSM. All you need to configure is the variables OSM_HOSTNAME and OSM_RO_HOSTNAME.
Via the OSM client, you can do the following:
 config-agent-add
 config-agent-delete
 config-agent-list
 ns-create
 ns-delete
 ns-list
 ns-monitoring-show
 ns-scale
 ns-scaling-show
 ns-show
 nsd-delete
 nsd-list
 ro-dump
 upload-package
 vcs-list
 vim-create
 vim-delete
 vim-list
 vim-show
 vnf-list
 vnf-monitoring-show
 vnf-show
 vnfd-delete
 vnfd-list
Adding VIM accounts
Before proceeding, make sure that you have a site with a VIM configured to run with OSM. Different kinds of VIMs are currently supported by OSM:
- OpenVIM. Check the following link to know how to install and use openvim for OSM: OpenVIM installation (Release THREE). Openvim must run in 'normal' mode (not test or fake) to have real virtual machines reachable from OSM.
- OpenStack. Check the following link to learn how to configure OpenStack to be used by OSM: Openstack configuration (Release THREE)
- VMware vCloud Director. Check the following link to learn how to configure VMware VCD to be used by OSM: Configuring VMware vCloud Director for OSM Release THREE
- Amazon Web Services (AWS). Check the following link to learn how to configure AWS (EC2 and Virtual Private Cloud) to be used by OSM: Configuring AWS for OSM Release THREE
OSM can manage external SDN controllers to perform the dataplane underlay network connectivity on behalve of the VIM. See EPA and SDN assist
OpenVIM site
- Execute the following command, using the appropriate parameters (e.g. site name: "openvim-site", IP address: 10.10.10.10, VIM tenant: "osm")
osm vim-create --name openvim-site --auth_url http://10.10.10.10:9080/openvim --account_type openvim --description "Openvim site" --tenant osm --user dummy --password dummy
Openstack site
- Execute the following command, using the appropriate parameters (e.g. site name: "openstack-site", IP address: 10.10.10.11, VIM tenant: "admin", user: "admin", password: "userpwd")
osm vim-create --name openstack-site --user admin --password userpwd --auth_url http://10.10.10.11:5000/v2.0 --tenant admin --account_type openstack
VMware vCloud Director site
- Execute the following command, using the appropriate parameters (e.g. site name: "vmware-site", IP address: 10.10.10.12, VIM tenant: "vmware-tenant", user: "osm", password: "osm4u", admin user: "admin", admin password: "adminpwd", organization: "orgVDC")
openmano tenant-create Org1-VDC
export OPENMANO_TENANT=Org1-VDC
openmano datacenter-create --type vmware --config '{"admin_password": "Hive@VMware1!","admin_username":"etsi", "orgname": "Org1", "nsx_user": "etsi", "nsx_password": "Hive@VMware1!", "nsx_manager":"https://172.21.6.14", "vcenter_ip":"172.21.6.13", "vcenter_port":"443","vcenter_user":"etsi@vsphere.local", "vcenter_password":"Hive@VMware1!"}' Org1 https://172.21.6.26
openmano datacenter-attach Org1 --vim-tenant-name=Org1:Org1-VDC --user=org1administrator --password='Hive@VMware1!'
export OPENMANO_DATACENTER=Org1
VMware Integrated Openstack (VIO) site
- Execute the following command, using the appropriate parameters (e.g. site name: "openstack-site-vio4", IP address: 10.10.10.12, VIM tenant: "admin", user: "admin", password: "passwd")
openmano tenant-create admin
export OPENMANO_TENANT=admin
openmano datacenter-create VIO http://172.21.6.31:5000/v3 --type openstack --description "OpenStack site v3" --config='{insecure: true, vim_type: VIO}'
openmano datacenter-attach VIO --user=etsi --password='Hive@VMware1!' --vim-tenant-name=admin --config='{APIversion: v3.3,"dataplane_physical_net":dvs-341,"use_internal_endpoint":true,"dataplane_net_vlan_range":["1-5","7-10"]}'
export OPENMANO_DATACENTER=VIO
With respect to Openstack, the additional configuration for VIO is the following:
- vim_type: Set to "VIO" to use VMware Integrated openstack as VIM
- use_internal_endpoint: When true it allows use of private API endpoints
- dataplane_physical_net: The configured network_vlan_ranges at neutron for the SRIOV (binding direct) and passthrough (binding direct-physical) networks, e.g. 'physnet_sriov' in the above configuration. In case of VMware Integrated Openstack (VIO) provide moref ID of distributed virtual switch, e.g 'dvs-46' in above configuration.
- dataplane_net_vlan_range: In case of VMware Integrated Openstack (VIO) provide vlan ranges for the SRIOV (binding direct) networks in format ['start_ID - end_ID']
Amazon Web Services (AWS) site
- Execute the following command, using the appropriate parameters (e.g. site name: "aws-site", VIM tenant: "admin", user: "XXX", password: "YYY")
osm vim-create --name aws-site --user XXX --password YYY --auth_url https://aws.amazon.com --tenant admin --account_type aws --config '{region_name: eu-central-1, flavor_info: {t2.nano: {cpus: 1, disk: 100, ram: 512}, t2.micro: {cpus: 1, disk: 100, ram: 1024}, t2.small: {cpus: 1, disk: 100, ram: 2048}, m1.small: {cpus: 1, disk: 160, ram: 1741}}}'
Deploying your first Network Service
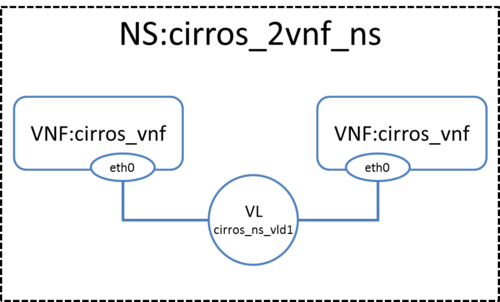
In this example we will deploy the following Network Service, consisting of two simple VNFs based on CirrOS connected by a simple VLD.
Before going on, download the required VNF and NS packages from this URL: https://osm-download.etsi.org/ftp/osm-3.0-three/examples/cirros_2vnf_ns/
Uploading VNF image to the VIM
Get the cirros 0.3.4 image from the following link: http://download.cirros-cloud.net/0.3.4/cirros-0.3.4-x86_64-disk.img
Then, onboard the image into the VIM. The instruction differs from one VIM to another:
- In Openstack:
openstack image create --file="./cirros-0.3.4-x86_64-disk.img" --container-format=bare --disk-format=qcow2 cirros034
- In openvim:
#copy your image to the NFS shared folder (e.g. /mnt/openvim-nfs)
cp ./cirros-0.3.4-x86_64-disk.img /mnt/openvim-nfs/
openvim image-create --name cirros034 --path /mnt/openvim-nfs/cirros-0.3.4-x86_64-disk.img
Onboarding a VNF
- From the UI:
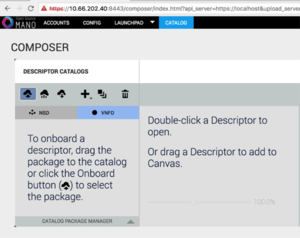
- Go to Catalog
- Click on the import button, then VNFD
- Drag and drop the VNF package file cirros_vnf.tar.gz in the importing area.
- From OSM client:
osm upload-package cirros_vnf.tar.gz
osm vnfd-list
Onboarding a NS
- From the UI:
- Go to Catalog
- Click on the import button, then NSD
- Drag and drop the NS package file cirros_2vnf_ns.tar.gz in the importing area.
- From OSM client:
osm upload-package cirros_2vnf_ns.tar.gz
osm nsd-list
Instantiating the NS
- From the UI:
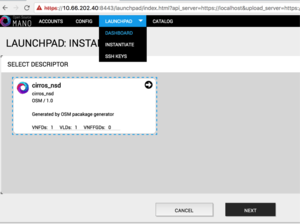
- Go to Launchpad > Instantiate
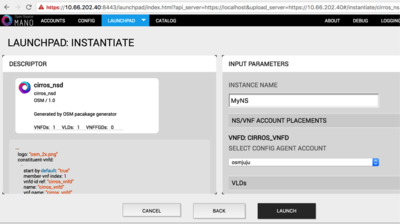
- Select the NS descriptor to be instantiated, and click on Next
- Add a name to the NS instance, and click on Launch.
- From OSM client:
osm ns-create --nsd_name cirros_2vnf_ns --ns_name <ns-instance-name> --vim_account <data-center-name>
osm ns-list
Using OSM to view instantiated NS details
OSM client can be used to manage the NSD and VNF catalog, as well as deploying and undeploying NS instances:
osm vnfd-list             # show the vnfd catalog
osm nsd-list              # show the nsd catalog
osm ns-list               # show ns instances
osm ns-show <id|name>     # show the details of a running ns instance
osm vnf-list              # show vnf instances
osm vnf-show <id|name>    # show the details of a running vnf instance
Using old descriptors from Release TWO
Beware that old Release TWO descriptors cannot be directly used by OSM Release THREE.
You should use this conversion tool to convert them to Release THREE format and create the corresponding package.
Additional information
- Deploy advanced Network Services
- Create your own VNF package
- Reference VNF and NS Descriptors
- Creating your own VNF charm
- Example VNF Charms
- More information about OSM's Information Model
- VIM emulator
- Have you detected any bug? Check this guide to see how to report issues
- Life Cycle Management of VNFs from the RO
- OSM White Paper - Release THREE Technical Overview
- Technical and demonstration videos
- EPA and SDN assist
- OSM Multi-tenancy
- Software upgrade
- OSM MON Module Installation Guide
- OSM MON Usage Guide
- Logs and troubleshooting
- E2E tests
- Videos from workshops and events
- Technical FAQ
Your feedback is most welcome!
You can send us your comments and questions to OSM_TECH@list.etsi.org
Or join the OpenSourceMANO Slack Workplace
See hereafter some best practices to report issues on OSM

