OSM Release ONE: Difference between revisions
Garciadeblas (talk | contribs) |
Garciadeblas (talk | contribs) No edit summary |
||
| Line 3: | Line 3: | ||
__TOC__ | __TOC__ | ||
=Interaction with VIMs and VNFs= | |||
The following figure shows OSM interaction with VIM and VNFs. | The following figure shows OSM interaction with VIM and VNFs. | ||
| Line 13: | Line 13: | ||
[[File:OSMconnectivity2.png|400px|OSM Release 1 connectivity 2]] | [[File:OSMconnectivity2.png|400px|OSM Release 1 connectivity 2]] | ||
=Install OSM= | |||
==Install from source== | |||
All you need to run OSM Release One is a single server or VM with the following requirements: | All you need to run OSM Release One is a single server or VM with the following requirements: | ||
| Line 37: | Line 37: | ||
[[File:OSMcontainers.png|400px|OSM Release ONE installation result]] | [[File:OSMcontainers.png|400px|OSM Release ONE installation result]] | ||
=Adding a VIM account= | |||
Before proceeding, make sure that you have a site with a VIM configured to run with OSM. Three different kinds of VIMs are currently supported by OSM: | Before proceeding, make sure that you have a site with a VIM configured to run with OSM. Three different kinds of VIMs are currently supported by OSM: | ||
*OpenVIM. Check the following link to know how to install and use openvim for OSM: [[OpenVIM installation (Release One)]] | *OpenVIM. Check the following link to know how to install and use openvim for OSM: [[OpenVIM installation (Release One)]] | ||
| Line 43: | Line 43: | ||
*VMware vCloud Director. Check the following link to learn how to configure VMware VCD to be used by OSM: [[Configuring VMware vCloud Director for OSM Release One]] | *VMware vCloud Director. Check the following link to learn how to configure VMware VCD to be used by OSM: [[Configuring VMware vCloud Director for OSM Release One]] | ||
==OpenVIM site== | |||
*Go into the RO container: | *Go into the RO container: | ||
lxc exec RO -- bash | lxc exec RO -- bash | ||
| Line 53: | Line 53: | ||
exit #or Ctrl+D to get out of the RO container | exit #or Ctrl+D to get out of the RO container | ||
==Openstack site== | |||
*Go into the RO container: | *Go into the RO container: | ||
lxc exec RO -- bash | lxc exec RO -- bash | ||
| Line 63: | Line 63: | ||
exit #or Ctrl+D to get out of the RO container | exit #or Ctrl+D to get out of the RO container | ||
==VMware site== | |||
*Go into the RO container: | *Go into the RO container: | ||
lxc exec RO -- bash | lxc exec RO -- bash | ||
| Line 74: | Line 74: | ||
Note: The name of the site/datacenter "vmware-site" has to match the name of the organization of "vCloud Director". Inside this organization the tenant "vmware-tenant" must exist | Note: The name of the site/datacenter "vmware-site" has to match the name of the organization of "vCloud Director". Inside this organization the tenant "vmware-tenant" must exist | ||
=Deploying your first Network Service= | |||
In this example we will deploy the following Network Service, consisting of two simple VNFs based on CirrOS connected by a simple VLD. | In this example we will deploy the following Network Service, consisting of two simple VNFs based on CirrOS connected by a simple VLD. | ||
| Line 81: | Line 81: | ||
Before going on, download the required VNF and NS packages from this URL: https://osm-download.etsi.org/ftp/examples/cirros_2vnf_ns/ | Before going on, download the required VNF and NS packages from this URL: https://osm-download.etsi.org/ftp/examples/cirros_2vnf_ns/ | ||
==Uploading VNF image to the VIM== | |||
Get the cirros 0.3.4 image from the following link: http://download.cirros-cloud.net/0.3.4/cirros-0.3.4-x86_64-disk.img | Get the cirros 0.3.4 image from the following link: http://download.cirros-cloud.net/0.3.4/cirros-0.3.4-x86_64-disk.img | ||
| Line 90: | Line 90: | ||
openvim image-create --name cirros034 --path /mnt/powervault/virtualization/osm/CirrOS/cirros-0.3.4-x86_64-disk.img | openvim image-create --name cirros034 --path /mnt/powervault/virtualization/osm/CirrOS/cirros-0.3.4-x86_64-disk.img | ||
==Onboarding a VNF== | |||
*From the UI: | *From the UI: | ||
**Go to Catalog | **Go to Catalog | ||
| Line 99: | Line 99: | ||
**''Step by step instructions TBC'' | **''Step by step instructions TBC'' | ||
==Onboarding a NS== | |||
*From the UI: | *From the UI: | ||
**Go to Catalog | **Go to Catalog | ||
| Line 107: | Line 107: | ||
**''Step by step instructions TBC'' | **''Step by step instructions TBC'' | ||
==Instantiating the NS== | |||
*From the UI: | *From the UI: | ||
**Go to Launchpad > Instantiate | **Go to Launchpad > Instantiate | ||
| Line 118: | Line 118: | ||
Wait for the message that the NS has been successfully deployed, and that's all! | Wait for the message that the NS has been successfully deployed, and that's all! | ||
=Additional information= | |||
*[[Deploying advanced Network Services (Release ONE)|Deploying advanced Network Services]] | *[[Deploying advanced Network Services (Release ONE)|Deploying advanced Network Services]] | ||
Revision as of 10:46, 3 November 2016
Open Source MANO (OSM) is the open source community that aims to deliver a production-quality MANO stack for NFV, capable of consuming openly published information models, available to everyone, suitable for all VNFs, operationally significant and VIM-independent. OSM is aligned to NFV ISG information models while providing first-hand feedback based on its implementation experience.
Interaction with VIMs and VNFs
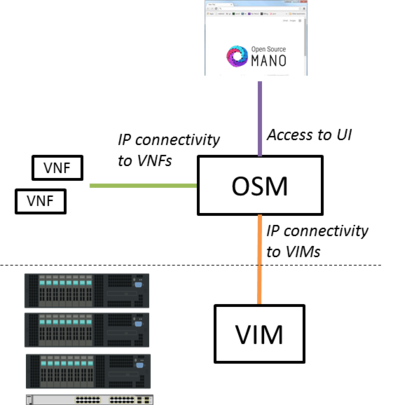
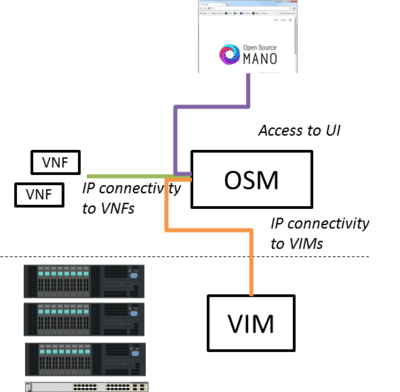
The following figure shows OSM interaction with VIM and VNFs.
In simpler setups, OSM only requires a single interface as long as both VIM and VNF IP addresses are reachable
Install OSM
Install from source
All you need to run OSM Release One is a single server or VM with the following requirements:
- 8 CPUs, 16 GB RAM, 100GB disk and a single interface with Internet access
- Ubuntu16.04 as base image (http://releases.ubuntu.com/16.04/), configured to run LXD containers. If you don't have LXD configured, you can follow the instructions here (LXD configuration)
Once you have prepared the host with the previous requirements, all you need to do is:
wget https://osm-download.etsi.org/ftp/osm-1.0-one/install_from_source.sh
chmod +x install_from_source.sh
./install_from_source.sh
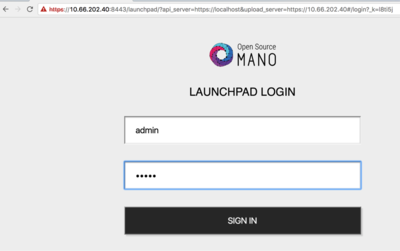
After some time, you will get a fresh OSM Release One installation. You can access to the UI in the following URL (user:admin, password: admin):
https://your_local_ip:8443
Make sure that port 8443 is accessible, as well as the following required ports: 8000, 4567, 8008, 80, 9090.
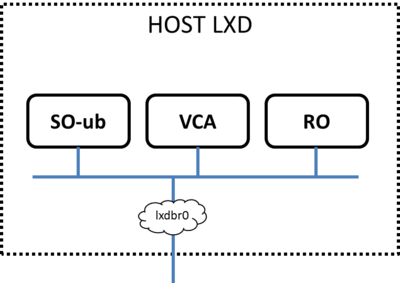
As a result of the installation, three LXD containers are created in the host: RO, VCA, and SO-ub (running the SO and the UI), as shown in the figure below.
Adding a VIM account
Before proceeding, make sure that you have a site with a VIM configured to run with OSM. Three different kinds of VIMs are currently supported by OSM:
- OpenVIM. Check the following link to know how to install and use openvim for OSM: OpenVIM installation (Release One)
- OpenStack. Check the following link to learn how to configure OpenStack to be used by OSM: Openstack configuration (Release ONE)
- VMware vCloud Director. Check the following link to learn how to configure VMware VCD to be used by OSM: Configuring VMware vCloud Director for OSM Release One
OpenVIM site
- Go into the RO container:
lxc exec RO -- bash
- Execute the following commands, using the appropriate parameters (e.g. site name: "openvim-site", IP address: 10.10.10.10, VIM tenant: "osm")
export OPENMANO_TENANT=osm
openmano datacenter-create openvim-site http://10.10.10.10:9080/openvim --type openvim --description "Openvim site"
openmano datacenter-attach openvim-site --vim-tenant-name=osm
openmano datacenter-list
exit     #or Ctrl+D to get out of the RO container
Openstack site
- Go into the RO container:
lxc exec RO -- bash
- Execute the following commands, using the appropriate parameters (e.g. site name: "openstack-site", IP address: 10.10.10.11, VIM tenant: "admin", user: "admin", password: "userpwd")
export OPENMANO_TENANT=osm
openmano datacenter-create openstack-site http://10.10.10.11:5000/v2.0 --type openstack --description "OpenStack site"
openmano datacenter-attach openstack-site --user=admin --password=userpwd --vim-tenant-name=admin
openmano datacenter-list
exit     #or Ctrl+D to get out of the RO container
VMware site
- Go into the RO container:
lxc exec RO -- bash
- Execute the following commands, using the appropriate parameters (e.g. site name: "vmware-site", IP address: 10.10.10.12, VIM tenant: "vmware-tenant", user: "osm", password: "osm4u", admin user: "admin", admin password: "adminpwd")
openmano datacenter-create vmware-site https://10.10.10.12" --type vmware --description "VMware site" --config '{admin_password: adminpwd, admin_username: admin}'
openmano datacenter-attach vmware-site --user=osm --password=osm4u --vim-tenant-name=vmware-tenant
openmano datacenter-list
exit     #or Ctrl+D to get out of the RO container
Note: The name of the site/datacenter "vmware-site" has to match the name of the organization of "vCloud Director". Inside this organization the tenant "vmware-tenant" must exist
Deploying your first Network Service
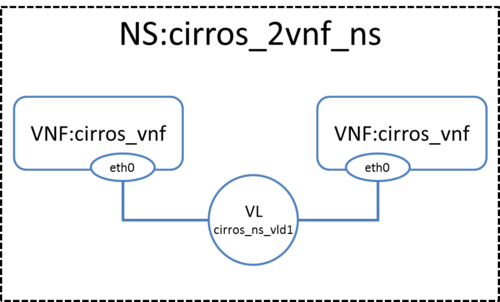
In this example we will deploy the following Network Service, consisting of two simple VNFs based on CirrOS connected by a simple VLD.
Before going on, download the required VNF and NS packages from this URL: https://osm-download.etsi.org/ftp/examples/cirros_2vnf_ns/
Uploading VNF image to the VIM
Get the cirros 0.3.4 image from the following link: http://download.cirros-cloud.net/0.3.4/cirros-0.3.4-x86_64-disk.img
Then, onboard the image into the VIM. The instruction differs from one VIM to another:
- In Openstack:
openstack image create --file="./cirros-0.3.4-x86_64-disk.img" --container-format=bare --disk-format=qcow2 --public --property location="/mnt/powervault/virtualization/osm/CirrOS/cirros-0.3.4-x86_64-disk.img" cirros034
- In openvim:
openvim image-create --name cirros034 --path /mnt/powervault/virtualization/osm/CirrOS/cirros-0.3.4-x86_64-disk.img
Onboarding a VNF
- From the UI:
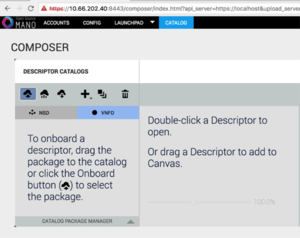
- Go to Catalog
- Click on the import button, then VNFD
- Drag and drop the VNF package file cirros_vnf.tar.gz in the importing area.
- From the SO CLI:
- Step by step instructions TBC
Onboarding a NS
- From the UI:
- Go to Catalog
- Click on the import button, then NSD
- Drag and drop the NS package file cirros_2vnf_ns.tar.gz in the importing area.
- From the SO CLI:
- Step by step instructions TBC
Instantiating the NS
- From the UI:
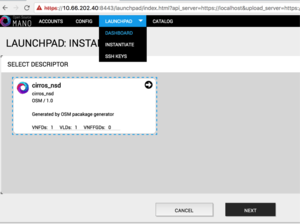
- Go to Launchpad > Instantiate
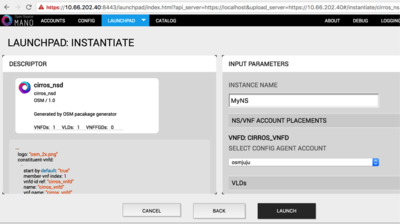
- Select the NS descriptor to be instantiated, and click on Next
- Add a name to the NS instance, and click on Launch.
- From the SO CLI:
- Step by step instructions TBC
Wait for the message that the NS has been successfully deployed, and that's all!
Additional information
- Deploying advanced Network Services
- Creating your own VNF package
- How to report issues
- Logs and troubleshooting
- Data Model Details
- OSM White Paper - Release ONE Technical Overview
- Technical FAQ
Your feedback is most welcome!
You can send us your comments and questions to OSM_TECH@list.etsi.org
Or join the OpenSourceMANO Slack Workplace
See hereafter some best practices to report issues on OSM
