1. OSM Quickstart

Open Source MANO (OSM) is an ETSI-hosted open source community delivering a production-quality MANO stack for NFV, capable of consuming openly published information models, available to everyone, suitable for all VNFs, operationally significant and VIM-independent. OSM is aligned to NFV ISG information models while providing first-hand feedback based on its implementation experience.
Release TEN brings a number of improvements over previous releases. For the full list of new features, please refer to the Release Notes. For a comprehensive overview of OSM functionalities, you can also refer to the OSM White Papers and Release Notes of previous releases.
OSM in Practice:
1.1. Assumptions about interaction with VIMs and VNFs
The following figure illustrates OSM interaction with VIMs and VNFs:
OSM talks to the VIM for the deployment of VNFs and VLs connecting them
OSM talks to the VNFs deployed in a VIM to run day-0, day-1 and day-2 configuration primitives.

In order for OSM to work, it is assumed that:
Each VIM has an API endpoint reachable from OSM
Each VIM has a so called management network which provides IP address to VNFs
That management network is reachable from OSM
1.2. Installing OSM
1.2.1. Default installation procedure
All you need to run OSM is a single server or VM with the following requirements:
MINIMUM: 2 CPUs, 6 GB RAM, 40GB disk and a single interface with Internet access
RECOMMENDED: 2 CPUs, 8 GB RAM, 40GB disk and a single interface with Internet access
Base image: Ubuntu18.04 (64-bit variant required)
Once you have prepared the host with the previous requirements, all you need to do is:
wget https://osm-download.etsi.org/ftp/osm-10.0-ten/install_osm.sh
chmod +x install_osm.sh
./install_osm.sh
This will install a standalone Kubernetes on a single host, and OSM on top of it.
TIP: In order to facilitate potential trobleshooting later, it is recommended to save the full log of your installation process:
wget https://osm-download.etsi.org/ftp/osm-10.0-ten/install_osm.sh
chmod +x install_osm.sh
./install_osm.sh 2>&1 | tee osm_install_log.txt
You will be asked if you want to proceed with the installation and configuration of LXD, juju, docker CE and the initialization of a local docker swarm, as pre-requirements. Please answer “y”.
1.2.1.1. Installation including optional components
You can include optional components in your installation by adding the following flags:
Kubernetes Monitor::
--k8s_monitor(install an add-on to monitor the Kubernetes cluster and OSM running on top of it, through prometheus and grafana)PLA:
--pla(install the PLA module for placement support)VIM Emulator:
--vimemu(more information here)Fault Management features with ELK:
--elk_stack(only available with docker stack, more information here)
Example:
./install_osm.sh --k8s_monitor
1.2.1.2. Installation on a docker swarm environment
Although the default option is to use Kubernetes, you can optionally tell the installer to use docker swarm as the container framework. The installer will install the required packages to run a single-node docker swarm and will deploy the different objects on it.
./install_osm.sh -c swarm
1.2.1.3. Other installation options
An additional installation option is the Charmed Installation which will install OSM on Kubernetes with charms.
You can also run OSM using a pre-built vagrant image. You can find here detailed instruction on how to install OSM in Vagrant
For other special installation options, please refer to the specific chapter on installation options.
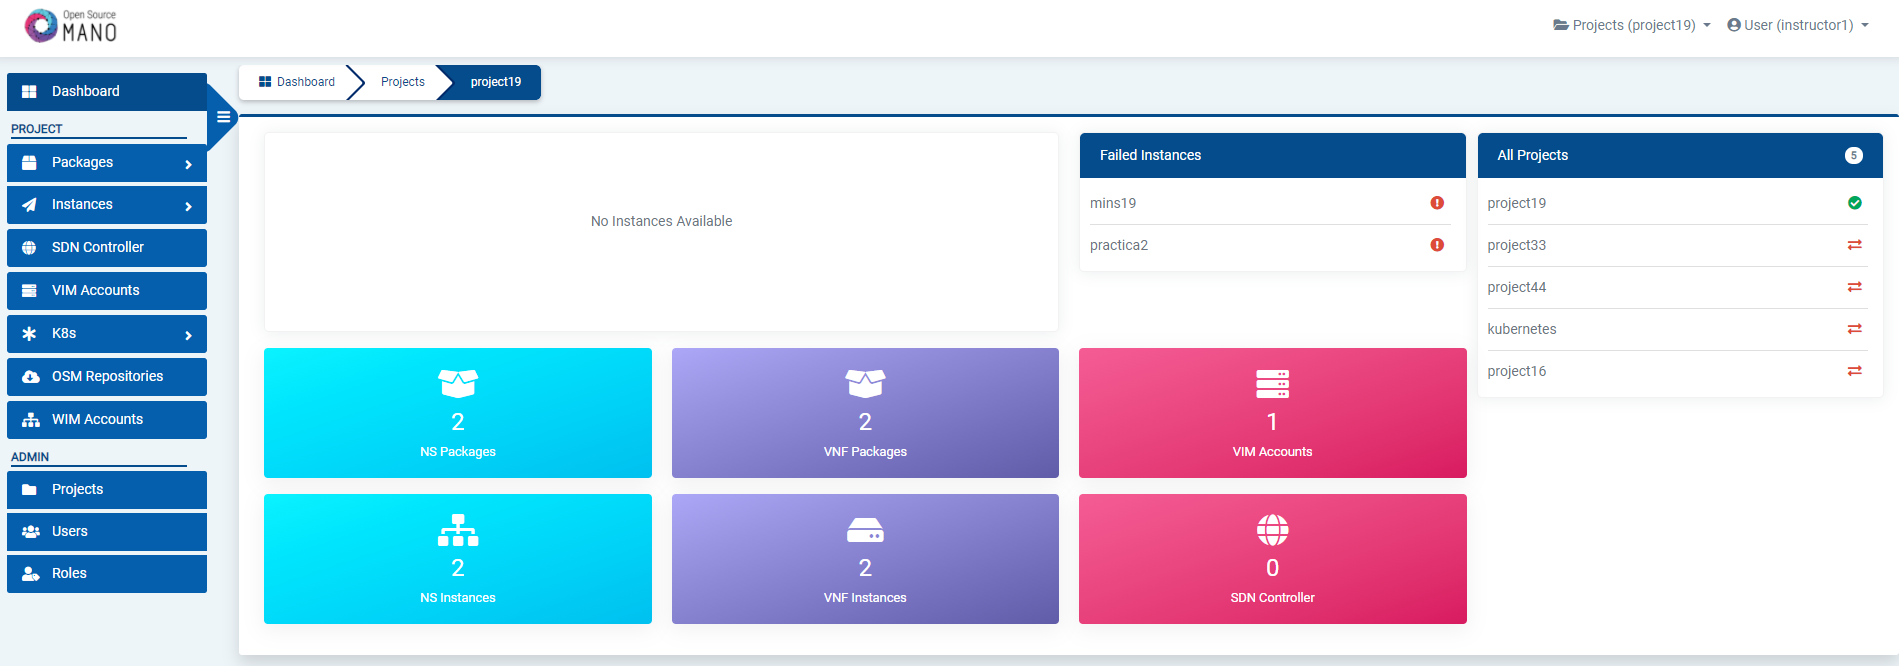
1.2.2. Checking your installation
After some time, you will get a fresh OSM installation with its latest, pre-built docker images which are built daily. You can access to the UI in the following URL (user:admin, password: admin): http://1.2.3.4, replacing 1.2.3.4 by the IP address of your host.

As a result of the installation, different K8s objects (deployments, statefulsets, etc.) created in the host. You can check the status by running the following commands:
kubectl get all -n osm
To check the logs of any container:
kubectl logs -n osm deployments/lcm           # for LCM
kubectl logs -n osm deployments/ng-ui         # for NG-UI
kubectl logs -n osm deployments/mon           # for MON
kubectl logs -n osm deployments/nbi           # for NBI
kubectl logs -n osm deployments/pol           # for POL
kubectl logs -n osm deployments/ro            # for RO
kubectl logs -n osm deployments/keystone      # for Keystone
kubectl logs -n osm statefulset/kafka         # for Kafka
kubectl logs -n osm statefulset/mongo         # for Mongo
kubectl logs -n osm statefulset/mysql         # for Mysql
kubectl logs -n osm statefulset/prometheus    # for Prometheus
kubectl logs -n osm statefulset/zookeeper     # for Zookeeper
Finally, if you used the option --k8s_monitor to install an add-on to monitor the K8s cluster and OSM, you can check the status in this way.
kubectl get all -n monitoring
OSM client, a python-based CLI for OSM, will be available as well in the host machine. Via the OSM client, you can manage descriptors, NS and VIM complete lifecycle.
osm --help
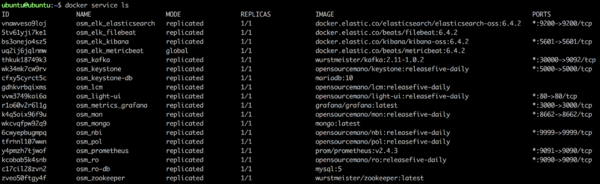
1.2.2.1. Checking your installation when installing on docker swarm
As a result of the installation, fourteen docker containers are created in the host (without considering optional stacks). You can check they are running by issuing the following commands:
docker stack ps osm |grep -i running
docker service ls
If the previous docker commands do not work, you might need to either reload the shell (logout and login) or run the following command to add your user to the ‘docker’ group in the running shell:
newgrp docker
At any time, you can quickly relaunch your deployment by using the pre-built docker images, like this:
docker stack rm osm
docker stack deploy -c /etc/osm/docker/docker-compose.yaml osm
To check the logs of any container:
docker service logs osm_lcm     # shows the logs of all containers (included dead containers) associated with LCM component.
docker logs $(docker ps -aqf "name=osm_lcm" -n 1)  # shows the logs of the last existant LCM container
1.3. Adding VIM accounts
Before proceeding, make sure that you have a site with a VIM configured to run with OSM. Different kinds of VIMs are currently supported by OSM:
OpenVIM. Check the following link to know how to install and use openvim for OSM: OpenVIM installation. OpenVIM must run in ‘normal’ mode (not test or fake) to have real virtual machines reachable from OSM.
OpenStack. Check the following link to learn how to configure OpenStack to be used by OSM: Openstack configuration
VMware vCloud Director. Check the following link to learn how to configure VMware VCD to be used by OSM: Configuring VMware vCloud Director
Amazon Web Services (AWS). Check the following link to learn how to configure AWS (EC2 and Virtual Private Cloud) to be used by OSM: Configuring AWS for OSM
Microsoft Azure Check the following link to learn how to configure Microsoft Azure to be used by OSM: Configuring Microsoft Azure for OSM
Eclipse fog05 Check the following link to learn how to configure Eclipse fog05 to be used by OSM: Configuring Eclipse fog05 for OSM
OSM can manage external SDN controllers to perform the dataplane underlay network connectivity on behalf of the VIM. See EPA and SDN assist
1.3.1. Adding VIMs through OSM client
1.3.1.1. OpenVIM site
Execute the following command, using the appropriate parameters (e.g. site name: “openvim-site”, IP address: 10.10.10.10, VIM tenant: “osm”)
osm vim-create --name openvim-site --auth_url http://10.10.10.10:9080/openvim --account_type openvim \
   --description "Openvim site" --tenant osm --user dummy --password dummy
1.3.1.2. Openstack site
Execute the following command, using the appropriate parameters (e.g. site name: “openstack-site”, IP address: 10.10.10.11, VIM tenant: “admin”, user: “admin”, password: “userpwd”)
osm vim-create --name openstack-site --user admin --password userpwd \
    --auth_url http://10.10.10.11:5000/v2.0 --tenant admin --account_type openstack
For advanced options, please refer to the OpenStack Setup Guide.
1.3.1.3. VMware vCloud Director site
Execute the following command, using the appropriate parameters (e.g. site name: “vmware-site”, IP address: 10.10.10.12, VIM tenant: “vmware-tenant”, user: “osm”, password: “osm4u”, admin user: “admin”, admin password: “adminpwd”, organization: “orgVDC”)
osm vim-create --name vmware-site --user osm --password osm4u --auth_url https://10.10.10.12 \
    --tenant vmware-tenant  --account_type vmware \
    --config '{admin_username: user, admin_password: passwd, orgname: organization, nsx_manager: "http://10.10.10.12",
    nsx_user: user, nsx_password: userpwd,"vcenter_port": port, "vcenter_user":user, "vcenter_password":password,
    "vcenter_ip": 10.10.10.14}'
For advanced options, please refer to the Configuring VMware vCloud Director.
1.3.1.4. VMware Integrated Openstack (VIO) site
Execute the following command, using the appropriate parameters (e.g. site name: “openstack-site-vio4”, IP address: 10.10.10.12, VIM tenant: admin, user: admin, password: passwd)
osm vim-create --name VIO --user admin --password passwd --auth_url https://10.10.10.12:5000/v3 --tenant admin \
    --account_type openstack --config '{use_floating_ip: True, insecure: true, vim_type: VIO, APIversion: v3.3,
    dataplane_physical_net: dvs-46, "use_internal_endpoint":true,"dataplane_net_vlan_range":["31-35","37-39"]}'
With respect to Openstack, the additional configuration for VIO is the following:
vim_type: Set to “VIO” to use VMware Integrated openstack as VIM
use_internal_endpoint: When true it allows use of private API endpoints
dataplane_physical_net: The configured network_vlan_ranges at neutron for the SRIOV (binding direct) and passthrough (binding direct-physical) networks, e.g. ‘physnet_sriov’ in the above configuration. In case of VMware Integrated Openstack (VIO) provide moref ID of distributed virtual switch, e.g ‘dvs-46’ in above configuration.
dataplane_net_vlan_range: In case of VMware Integrated Openstack (VIO) provide vlan ranges for the SRIOV (binding direct) networks in format [’start_ID - end_ID’]
For common options, you may refer to the general OpenStack Setup Guide.
1.3.1.5. Amazon Web Services (AWS) site
Execute the following command, using the appropriate parameters (e.g. site name: “aws-site”, VIM tenant: “admin”, user: “XXX”, password: “YYY”)
osm vim-create --name aws-site --user XXX --password YYY --auth_url https://aws.amazon.com --tenant admin \
    --account_type aws --config '{region_name: eu-central-1, flavor_info: {t2.nano: {cpus: 1, disk: 100, ram: 512},
    t2.micro: {cpus: 1, disk: 100, ram: 1024}, t2.small: {cpus: 1, disk: 100, ram: 2048},
    m1.small: {cpus: 1, disk: 160, ram: 1741}}}'
For advanced options, please refer to the Configuring AWS for OSM.
1.3.1.6. Microsoft Azure
Execute the following command, using the appropiate parameters (e.g
azure_client_id: ‘XXX’,azure_secret: ‘YYY’,azure_tenant: ‘tenantid’,azure_subscription_id: ‘ZZZ’, regular expression of the flavors that will be used:flavors_pattern:’^Basic’)
osm vim-create --name azure --account_type azure --auth_url http://www.azure.com --tenant "tenantid"
    --user "XXX" --password "azurepwd" --description "AZURE site"
    --config "{region_name: westeurope, resource_group: 'osmRG', subscription_id: 'azuresubs',
     vnet_name: 'osm_vnet', flavors_pattern: 'flavors_regex'}"
For advanced options, please refer to the Microsoft Azure setup guide.
1.3.1.7. Eclipse fog05 site
Execute the following command, using the appropriate parameters (e.g. runtime supported: “hypervisor”, cpu architecture: “arch”, user: “XXX”, password: “YYY”)
osm vim-create --name fos --auth_url <rest proxy ip>:8080 --account_type fos --tenant osm --user dummy --password dummy --config '{hypervisor: LXD}'
For advanced options, please refer to the Configuring Eclipse fog05 for OSM.
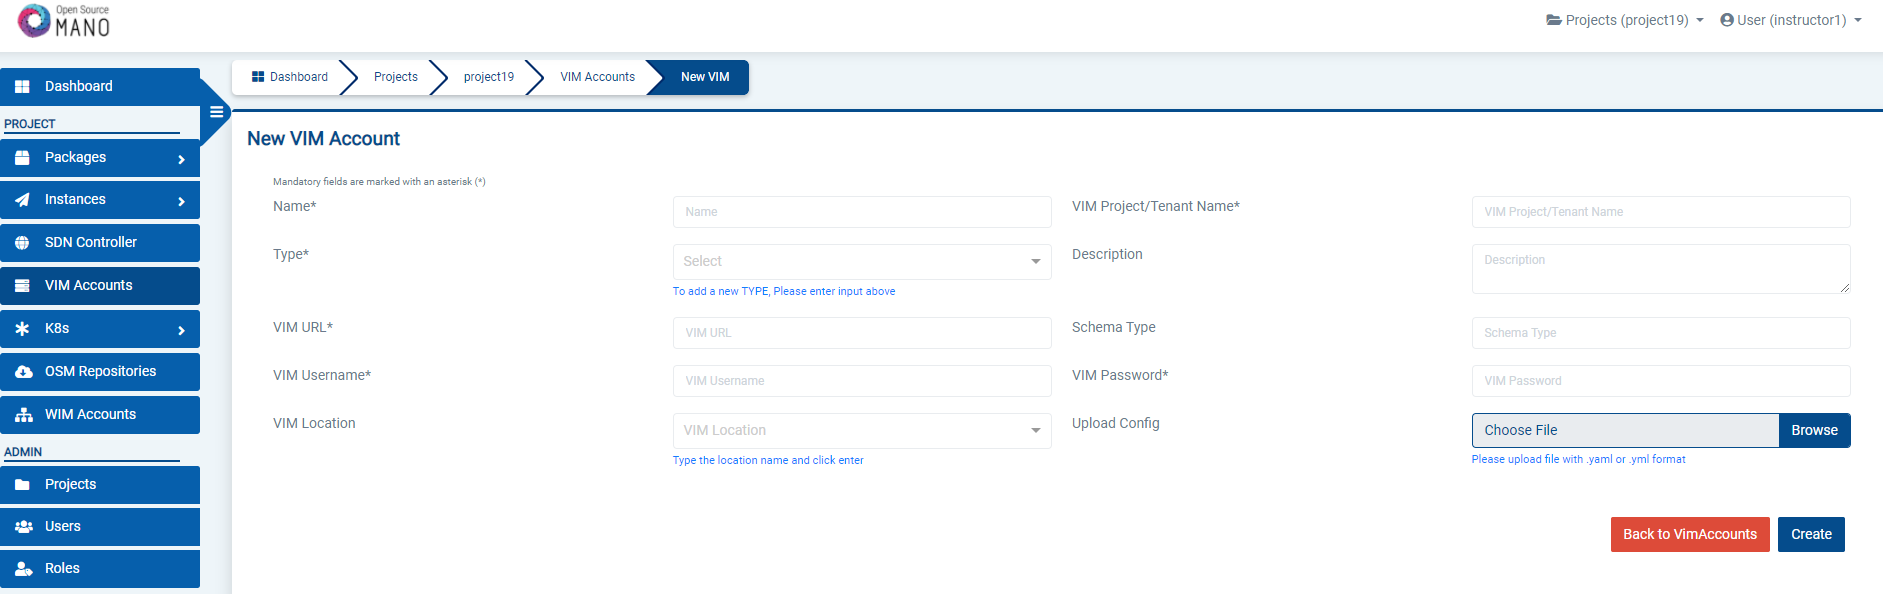
1.3.2. Adding VIMs through GUI
Just access the VIM Accounts tab, click the New VIM button and fill the parameters accordingly.
1.4. Deploying your first Network Service
Before going on, download the required VNF and NS packages from this URL: https://osm-download.etsi.org/ftp/Packages/examples/
1.4.1. Onboarding a VNF
The onboarding of a VNF in OSM involves preparing and adding the corresponding VNF package to the system. This process also assumes, as a pre-condition, that the corresponding VM images are available in the VIM(s) where it will be instantiated.
1.4.1.1. Uploading VM image(s) to the VIM(s)
In this example, only a vanilla Ubuntu16.04 image is needed. It can be obtained from the following link: https://cloud-images.ubuntu.com/xenial/current/xenial-server-cloudimg-amd64-disk1.img
It will be required to upload the image into the VIM. Instructions differ from one VIM to another (please check the reference of your type of VIM).
For instance, this is the OpenStack command for uploading images:
openstack image create --file="./xenial-server-cloudimg-amd64-disk1.img" --container-format=bare --disk-format=qcow2 ubuntu16.04
And this one is the appropriate command in OpenVIM:
#copy your image to the NFS shared folder (e.g. /mnt/openvim-nfs)
cp ./xenial-server-cloudimg-amd64-disk1.img /mnt/openvim-nfs/
openvim image-create --name cirros034 --path /mnt/openvim-nfs/xenial-server-cloudimg-amd64-disk1.img
1.4.1.2. Onboarding a VNF Package
From the UI:
Go to ‘VNF Packages’ on the ‘Packages’ menu to the left
Drag and drop the VNF package file
hackfest_basic_vnf.tar.gzin the importing area.

From OSM client:
osm nfpkg-create hackfest_basic_vnf.tar.gz
osm nfpkg-list
1.4.2. Onboarding a NS Package
From the UI:
Go to ‘NS Packages’ on the ‘Packages’ menu to the left
Drag and drop the NS package file
hackfest_basic_ns.tar.gzin the importing area.

From OSM client:
osm nspkg-create hackfest_basic_ns.tar.gz
osm nspkg-list
1.4.3. Instantiating the NS
1.4.3.1. Instantiating a NS from the UI
Go to ‘NS Packages’ on the ‘Packages’ menu to the left
Next the NS descriptor to be instantiated, click on the ‘Instantiate NS’ button.

Fill in the form, adding at least a name, description and selecting the VIM:
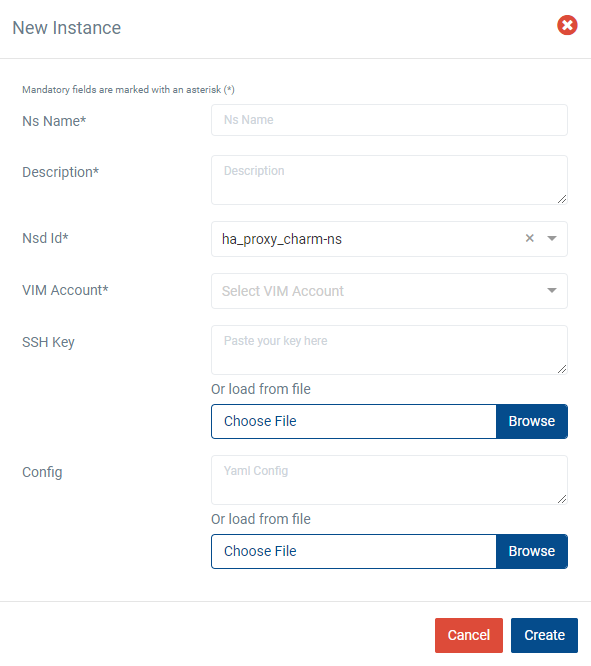
Instantiation parameters can be specified using both CLI and UI. You can find a thorough explanation with examples in this page: OSM instantiation parameters.
1.4.3.2. Instantiating a NS from the OSM client
osm ns-create --ns_name <ns-instance-name> --nsd_name hackfest_basic-ns --vim_account <vim-target-name>
osm ns-list
1.5. What’s next?
If you want to learn more, you can refer to the rest of OSM documentation.