3. Installing OSM
3.1. Pre-requirements
In order to install OSM, you will need, at least, a single server or VM with the following requirements:
MINIMUM: 2 CPUs, 6 GB RAM, 40GB disk and a single interface with Internet access
RECOMMENDED: 2 CPUs, 8 GB RAM, 40GB disk and a single interface with Internet access
Base image: Ubuntu18.04 (64-bit variant required) (http://releases.ubuntu.com/18.04/)
In addition, you will need a Virtual Infrastructure Manager available so that OSM can orchestrate workloads on it. The following figure illustrates OSM interaction with VIMs and the VNFs to be deployed there:
OSM communicates with the VIM for the deployment of VNFs.
OSM communicates with the VNFs deployed in a VIM to run day-0, day-1 and day-2 configuration primitives.

Hence, it is assumed that:
Each VIM has an API endpoint reachable from OSM.
Each VIM has a so-called management network, which provides IP addresses to VNFs.
That management network is reachable from OSM.
3.2. Installation options
3.2.1. Installation based on kubernetes (default)
Once you have one host available with the characteristics above, you just need to trigger the OSM installation by:
wget https://osm-download.etsi.org/ftp/osm-10.0-ten/install_osm.sh
chmod +x install_osm.sh
./install_osm.sh
This will install a standalone Kubernetes on a single host, and OSM on top of it.
TIP: In order to facilitate potential troubleshooting later, it is recommended to save the full log of your installation process:
wget https://osm-download.etsi.org/ftp/osm-10.0-ten/install_osm.sh
chmod +x install_osm.sh
./install_osm.sh 2>&1 | tee osm_install_log.txt
You will be asked if you want to proceed with the installation and configuration of LXD, juju, docker CE and the initialization of a local Kubernetes cluster, as pre-requirements. Please answer y.
Optionally, you can use the option --k8s_monitor to install an add-on to monitor the K8s cluster and OSM running on top of it.
./install_osm.sh --k8s_monitor
3.2.2. Installation based on docker swarm
Although the default option is to use Kubernetes, you can optionally tell the installer to use docker swarm as the container framework. The installer will install the required packages to run a single-node docker swarm and will deploy the different objects on it.
./install_osm.sh -c swarm
3.2.3. Remote installation to an OpenStack infrastructure
OSM could be installed to a remote OpenStack infrastructure from the OSM standard installer. It is based on Ansible and it takes care of configuring the OpenStack infrastructure before deploying a VM with OSM. The Ansible playbook performs the following steps:
Creation of a new VM flavour (4 CPUs, 8 GB RAM, 40 GB disk)
Download of Ubuntu 18.04 image and upload it to OpenStack Glance
Generation of a new SSH private and public key pair
Setup of a new security group to allow external SSH and HTTP access
Deployment of a clean Ubuntu 18.04 VM and installation of OSM to it
Important note: The OpenStack user needs Admin rights or similar to perform those operations.
The installation can be performed with the following command:
wget https://osm-download.etsi.org/ftp/osm-10.0-ten/install_osm.sh
chmod +x install_osm.sh
./install_osm.sh -O <openrc file/cloud name> -N <OpenStack public network name/ID> [--volume] [OSM installer options]
The options -O and -N are mandatory. The -O accepts both a path to an OpenStack openrc file or a cloud name. If a cloud name is used, the clouds.yaml file should be under ~/.config/openstack/ or /etc/openstack/. More information about the clouds.yaml file can be found here
The -N requires an external network name or ID. This is going to be the OpenStack network where the OSM VM is going to be attached.
The --volume option is used to instruct OpenStack to create an external volume attached to the VM instead of using a local one. This may be suitable for production environments. It requires OpenStack Cinder configured on the OpenStack infrastructure.
Some OSM installer options are supported, in particular the following: -r -k -u -R -t. Other options will be supported in the future.
3.2.4. Other installer options
You can include optional components in your installation by adding the following flags:
Fault Management features with ELK:
--elk_stack(more information here
Example:
./install_osm.sh --elk_stack --pm_stack
OSM installer includes a larger number of install options. The general usage is the following:
./install_osm.sh [OPTIONS]
With no options, it will install OSM from binaries.
Options:
    --uninstall:    uninstall OSM: remove the containers and delete NAT rules
    -r <repo>:      use specified repository name for osm packages
    -R <release>:   use specified release for osm binaries (deb packages, lxd images, ...)
    -u <repo base>: use specified repository url for osm packages
    -k <repo key>:  use specified repository public key url
    -c <orchestrator> deploy osm services using container <orchestrator>. Valid values are <k8s> or <swarm>.  If -c is not used then osm will be deployed using default orchestrator. When used with --uninstall, osm services deployed by the orchestrator will be uninstalled
    -s <stack name> or <namespace>  user defined stack name when installed using swarm or namespace when installed using k8s, default is osm
    --vimemu:       additionally deploy the VIM emulator as a docker container
    --elk_stack:    additionally deploy an ELK docker stack for event logging
    -m <MODULE>:    install OSM but only rebuild the specified docker images (NG-UI, NBI, LCM, RO, MON, POL, KAFKA, MONGO, PROMETHEUS, PROMETHEUS-CADVISOR, KEYSTONE-DB, NONE)
    -o <ADDON>:     do not install OSM, but ONLY one of the addons (vimemu, elk_stack) (assumes OSM is already installed)
    --showopts:     print chosen options and exit (only for debugging)
    -y:             do not prompt for confirmation, assumes yes
    -D <devops path> use local devops installation path
    -h / --help:    prints help
3.2.5. Vagrant installation
Pre-built OSM Vagrant images are available here: https://app.vagrantup.com/osm
The pre-built image requires 4GB of memory and 2 vCPUs.
3.2.5.1. 1) Install Vagrant and VirtualBox
Follow the instructions to install them in their respective sites:
3.2.5.2. 2) Create the initial Vagrantfile in a predefined directory of your choice
vagrant init osm/releaseeight
NOTE: to ensure the latest version is downloaded, destroy any previous existing OSM boxes (i.e. using
vagrant box listand, if needed,vagrant box remove)
3.2.5.3. 3) Edit the generated Vagrantfile
Editing the Vagrantfile is required if you need to customize the image for opened ports, assigned memory, etc.
For Release EIGHT, these are the recommended contents for the Vagrantfile:
Vagrant.configure("2") do |config|
  required_plugins = %w( vagrant-vbguest vagrant-disksize )
  _retry = false
  required_plugins.each do |plugin|
      unless Vagrant.has_plugin? plugin
          system "vagrant plugin install #{plugin}"
          _retry=true
      end
  end
  if (_retry)
      exec "vagrant " + ARGV.join(' ')
  end
  config.disksize.size = "40GB"
  config.vm.box = "osm/releaseeight"
  config.vm.network "forwarded_port", guest: 80, host: 8080
  config.vm.provider "virtualbox" do |vb|
    vb.memory = "6144"
    vb.cpus = 2
  end
  config.vm.provision "shell", name: "Post-provisión", privileged: false, inline: <<-SHELL
    /etc/osm/update_osm_info_docker.sh  # Updates IP address for Docker Swarm
  SHELL
end
This configuration guarantees that:
The resources are appropriate (6 GB memory, 2 vCPUs, 40 GB HDD).
VirtualBox plugins are installed if not already available.
Port 80 is mapped to 8080 at your host, so that the OSM’s GUI is directly accessible.
The IP address of the Docker Swarm running inside is properly updated.
3.2.5.4. 4) Start OSM
vagrant up
NOTE: Warnings related to
Vagrant unable to mount VirtualBox shared folderscan be safely ignored.
3.2.5.5. 5) ssh to OSM
vagrant ssh
3.2.5.6. Additional notes
If at any time you need to change something from the Vagrantfile, you can apply the changes by reloading the VM:
vagrant reload
If you need to copy a file to your Vagrant machine, just run vagrant ssh-config and copy the private key path, then:
scp -P 2222 -i /path/to/private_key someFileName.txt vagrant@127.0.0.1:
To use an image downloaded manually, add the box to Vagrant and create a matching Vagrantfile:
vagrant box add osm/releaseeight /path/to/vagrant.box
vagrant init osm/releaseeight
If at any point you need to add the optional components (elk_stack, vimemu, …) you can do so by downloading the installer from inside your VM and executing it with the -o option, for example:
wget https://osm-download.etsi.org/ftp/osm-10.0-ten/install_osm.sh
chmod +x install_osm.sh
./install_osm.sh -o elk_stack
Please note that you may need to add more forwarded ports, for example, to access Kibana after adding the elk_stack, you would need to add a line like this one to your Vagrantfile, then run vagrant reload:
config.vm.network "forwarded_port", guest: 5601, host: 5601
3.2.5.7. Including VIM Emulator in a Vagrant installation of OSM
vagrant init osm/releaseeight
vagrant up
vagrant ssh
# startup VIM-EMU
# new version of installer will have the vim-emu start by default
sudo docker run --name vim-emu -t -d --restart always --privileged --pid='host' --network=netOSM -v /var/run/docker.sock:/var/run/docker.sock vim-emu-img python examples/osm_default_daemon_topology_2_pop.py
export OSM_HOSTNAME=127.0.0.1
export OSM_SOL005=True
export VIMEMU_HOSTNAME=$(sudo docker inspect -f '{{range .NetworkSettings.Networks}}{{.IPAddress}}{{end}}' vim-emu)
osm vim-create --name emu-vim1 --user username --password password --auth_url http://$VIMEMU_HOSTNAME:6001/v2.0 --tenant tenantName --account_type openstack
git clone https://osm.etsi.org/gerrit/osm/vim-emu.git
osm vnfd-create vim-emu/examples/vnfs/ping.tar.gz
osm vnfd-create vim-emu/examples/vnfs/pong.tar.gz
osm nsd-create vim-emu/examples/services/pingpong_nsd.tar.gz
osm ns-create --nsd_name pingpong --ns_name test --vim_account emu-vim1
vagrant@vagrant:~$ osm ns-list
+------------------+--------------------------------------+--------------------+---------------+---------------------------------------------------------------------------------------------+
| ns instance name | id                                   | operational status | config status | detailed status                                                                             |
+------------------+--------------------------------------+--------------------+---------------+---------------------------------------------------------------------------------------------+
| test             | 05a363b0-4ac1-49a1-a4b1-9680e39b1ade | init               | init          | Waiting ns ready at RO. RO_id=2c569b2a-b21f-495b-9837-6a469f565044; VMs: 0/2, networks: 0/1 |
+------------------+--------------------------------------+--------------------+---------------+---------------------------------------------------------------------------------------------+
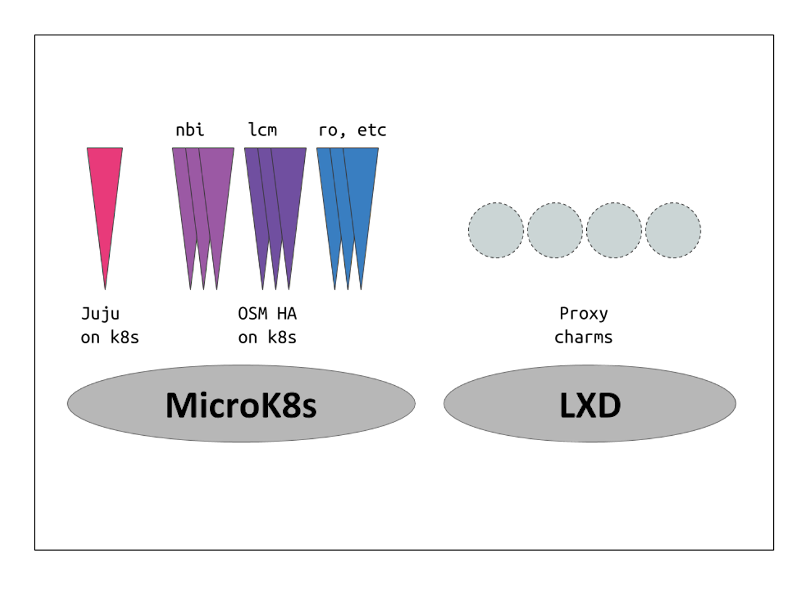
3.2.6. Charmed Installation
Some cases where the Charmed installer might be more suitable:
Production ready: HA, backups, upgrades…
Lifecycle management: Configuration of OSM Charms, scaling…
Integration with other components: Via relations.
Pluggable: Do you want to use an existing Kubernetes? Or an existing Juju controller? Or an existing LXD cluster? You can.
3.2.6.1. Standalone
wget https://osm-download.etsi.org/ftp/osm-10.0-ten/install_osm.sh
chmod +x install_osm.sh
./install_osm.sh --charmed
This will install OSM on microk8s using Charms.
3.2.6.2. External
For the installation using external components the following parameters can be added:
wget https://osm-download.etsi.org/ftp/osm-10.0-ten/install_osm.sh
chmod +x install_osm.sh
./install_osm.sh --charmed --k8s ~/.kube/config --vca <name> --lxd <lxd-cloud.yaml> --lxd-cred <lxd-credentials.yaml>
The values for the parameters are the following:
k8s: This will be the path of the kubeconfig file of your external Kubernetes.vca: This will be the name of the controller already added to your Juju CLI.lxd: This will be the path to thecloud.yamlfile of your external LXD Cluster.lxd-cred: This will be the path to thecredential.yamlfile of your external LXD Cluster.
For more information on the LXD cloud.yaml and credential.yaml files consult here
3.2.6.3. OSM client in Charmed installations
Once the installation is over, follow these instructions to use the osmclient:
NBI_IP=juju status --format yaml | yq r - applications.nbi-k8s.address
export OSM_HOSTNAME=$NBI_IP
To have the osm client always available include it in your .bashrc:
NBI_IP=juju status --format yaml | yq r - applications.nbi-k8s.address
echo "export OSM_HOSTNAME=$NBI_IP" >> ~/.bashrc
3.2.6.4. Scaling OSM Components
3.2.6.4.1. Scaling OSM Charms
Scaling or replicating the amount of containers each OSM component has can help both with distributing the workloads (in the case of some components) and also with high availability in case of one of the replicas failing.
For the High Availability scenario Charms will automatically apply anti-affinity rules to distribute the component pods between different Kubernetes worker nodes. Therefore for real High Availability a Kubernetes with multiple Worker Nodes will be needed.
To scale a charm the following command needs to be executed:
juju scale-application lcm-k8s 3 # 3 being the amount of replicas
If the application is already scaled to the number stated in the scale-application command nothing will change. If the number is lower, the application will scale down.
3.2.6.4.2. Scaling OSM VCA
For more detailed information about setting up a highly available controller please consult the official documentation.
Nevertheless, one way of setting up a manual HA Juju Controller which will act as VCA will be demonstrated.
First of all, the set up of 3 machines with the latest LTS of Ubuntu and at least 4GB of RAM will be needed. The machine from which the controller will be created will need SSH access to the previously mentioned 3 machines.
Afterwards, the manual cloud will be added, executing the first command and following the steps shown in the screenshot.
juju add-cloud

Once the add-cloud command is finished. The following commands will be executed to create the controller, add the remaining machines and enable HA.
juju bootstrap my-manual manual-controller
juju switch controller
juju add-machine ssh:ubuntu@<ip-second-machine>
juju add-machine ssh:ubuntu@<ip-third-machine>
juju enable-ha --to 1,2
Once the juju status shows all machines in a “started” state, the HA controller is initialized.
To install Charmed OSM with the HA controller the following argument will be passed:
./install_osm.sh --charmed --vca manual-controller
3.2.6.5. Using external DBs
Charmed OSM supports the usage of external DBs. For this purpose, relations to the DBs should be removed:
juju remove-relation nbi mongodb-k8s
juju remove-relation lcm mongodb-k8s
juju remove-relation ro mongodb-k8s
juju remove-relation mon mongodb-k8s
juju remove-relation pol mariadb-k8s
juju remove-relation pol mongodb-k8s
juju remove-relation pla mongodb-k8s
juju remove-relation keystone mariadb-k8s
juju remove-application mongodb-k8s
juju remove-application mariadb-k8s
Now, add the configuration to access the external DBs:
juju config nbi mongodb_uri="<MongoDB URI>"
juju config lcm mongodb_uri="<MongoDB URI>"
juju config ro mongodb_uri="<MongoDB URI>"
juju config mon mongodb_uri="<MongoDB URI>"
juju config pol mysql_uri="<MySQL URI>"
juju config pol mongodb_uri="<MongoDB URI>"
juju config pla mongodb_uri="<MongoDB URI>"
juju config keystone mysql_host="<MySQL Host>"
juju config keystone mysql_port="<MySQL Port>"
juju config keystone mysql_root_password="<MySQL Root Password>"
3.2.7. Installation from source
TODO: Under elaboration.
3.3. PM and FM dashboards (optional)
TODO: Under elaboration.
3.4. Checking your installation
After some time of downloading and processing, you will get a fresh OSM installation with its latest pre-built docker images. You can access to the UI in the following URL (user:admin, password: admin): http://1.2.3.4, replacing 1.2.3.4 by the IP address of your host.


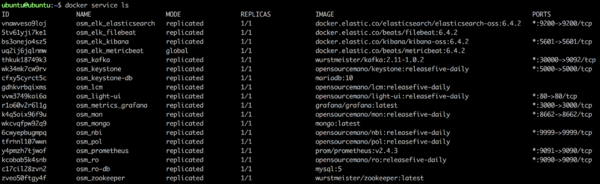
As a result of the installation, 13 docker containers are created in the host (without considering optional stacks). You can check they are running by issuing the following commands:
docker stack ps osm |grep -i running
docker service ls
At any time, you can quickly relaunch your deployment by using the pre-built docker images, like this:
docker stack rm osm && sleep 60 # The sleep is for making sure the stack removal finishes before redeploying
docker stack deploy -c /etc/osm/docker/docker-compose.yaml osm
To check the logs of any container:
docker service logs osm_lcm     # shows the logs of all containers (included dead containers) associated with LCM component.
docker logs $(docker ps -aqf "name=osm_lcm" -n 1)  # shows the logs of the last existing LCM container
3.5. Installing standalone OSM Client
The OSM Client is a client library and a command-line tool (based on Python) to operate OSM, which accesses OSM’s Northbound Interface (NBI) and lets you manage descriptors, VIMs, Network Services, Slices, etc. along with their whole lifecycle. In other words, the OSM Client is a sort of Swiss knife that provides a convenient access to all the functionality that OSM’s NBI offers.
Although the OSM Client is always available in the host machine after installation, it is sometimes convenient installing an OSM Client in another location, different from the OSM host, so that the access to the OSM services does not require OS-level/SSH credentials. Thus, in those cases where you have an OSM already installed in a remote server, you can still operate it from your local computer using the OSM Client.
In order to install the OSM Client in your local Linux machine, you should follow this procedure:
# Clean the previous repos that might exist
sudo sed -i "/osm-download.etsi.org/d" /etc/apt/sources.list
wget -qO - https://osm-download.etsi.org/repository/osm/debian/ReleaseTEN/OSM%20ETSI%20Release%20Key.gpg | sudo apt-key add -
sudo add-apt-repository -y "deb [arch=amd64] https://osm-download.etsi.org/repository/osm/debian/ReleaseTEN stable devops IM osmclient"
sudo apt-get update
sudo apt-get install -y python3-pip
sudo -H python3 -m pip install -U pip
sudo -H python3 -m pip install python-magic pyangbind verboselogs
sudo apt-get install python3-osmclient
Once installed, you can type osm to see a list of commands.
Since we are installing the OSM Client in a host different from OSM’s at a minimum you will need to specify the OSM host, either via an environment variable or via the osm command line. For instance, you can set your client to access an OSM host running at 10.80.80.5 by using:
export OSM_HOSTNAME="10.80.80.5"
For additional options, see osm --help for more info, and check our OSM client reference guide here
3.6. How to upgrade OSM
3.6.1. How to upgrade OSM when using K8s as container framework (default)
3.6.1.1. Upgrading the complete OSM platform in K8s
Upgrading to the latest minor version is as simple as running again the installer:
wget https://osm-download.etsi.org/ftp/osm-10.0-ten/install_osm.sh
chmod +x install_osm.sh
./install_osm.sh -c k8s
You will be asked if you want to proceed with the installation and configuration of LXD, juju, docker CE, kubelet, kubectl and the initialization of a local single-node K8s cluster, as pre-requirements. Please answer y.
That’s all. You will have the newest OSM version installed.
3.6.1.2. Upgrading the OSM platform from docker images in K8s (advanced users)
Upgrading to the latest daily docker image might lead to potential issues. Moreover, every new re-deployment of the stack will involve a download of a new docker daily image if it exists. Unless you are really sure about what you are doing, please use this procedure with caution.
The commonest reason for this procedure is using the latest daily testing docker image or a specific tag.
You can use option -t in the installer to specify a specific docker tag to be used by the installer.
To install the latest daily images:
./install_osm.sh -c k8s -t releaseten-daily
To install a previous version e.g. v6.0.3:
./install_osm.sh -c k8s -t v6.0.3
The previous commands will do the installation and deployment of the whole platform in the namespace osm.
Another option is to change directly the K8s Manifest YAML files located in /etc/osm/docker/osm_pods. Below an example to update them to use releaseten-daily tag:
sudo sed -i "s/opensourcemano\/ro:.*/opensourcemano\/ro:releaseten-daily/g" /etc/osm/docker/osm_pods/ro.yaml
sudo sed -i "s/opensourcemano\/lcm:.*/opensourcemano\/lcm:releaseten-daily/g" /etc/osm/docker/osm_pods/lcm.yaml
sudo sed -i "s/opensourcemano\/mon:.*/opensourcemano\/mon:releaseten-daily/g" /etc/osm/docker/osm_pods/mon.yaml
sudo sed -i "s/opensourcemano\/pol:.*/opensourcemano\/pol:releaseten-daily/g" /etc/osm/docker/osm_pods/pol.yaml
sudo sed -i "s/opensourcemano\/nbi:.*/opensourcemano\/nbi:releaseten-daily/g" /etc/osm/docker/osm_pods/nbi.yaml
sudo sed -i "s/opensourcemano\/ng-ui:.*/opensourcemano\/ng-ui:releaseten-daily/g" /etc/osm/docker/osm_pods/ng-ui.yaml
sudo sed -i "s/opensourcemano\/keystone:.*/opensourcemano\/keystone:releaseten-daily/g" /etc/osm/docker/osm_pods/keystone.yaml
kubectl -n osm apply -f /etc/osm/docker/osm_pods
The OSM Client will have to be updated independently. In order to use the latest “testing” OSM Client, you will have to update the debian repo to use the testing repo, remove the previous debian package and install the one from the new repo as follows:
sudo apt-get remove python-osmclient
sudo apt-get remove pytho3-osmclient
# Clean the previous repos that might exist
sudo sed -i "/osm-download.etsi.org/d" /etc/apt/sources.list
sudo add-apt-repository -y "deb [arch=amd64] https://osm-download.etsi.org/repository/osm/debian/ReleaseEIGHT-daily testing osmclient"
sudo apt-get update
sudo apt-get install python3-osmclient
dpkg -l |grep python3-osmclient   #to check the installed version
3.6.1.3. Upgrading only a specific component in K8s (advanced users)
Upgrading a specific OSM component without upgrading the others accordingly may lead to potential inconsistencies. Unless you are really sure about what you are doing, please use this procedure with caution.
One of the commonest reasons for this type of upgrade is using your own cloned repo of a module for development purposes.
3.6.1.3.1. Upgrading RO in K8s
This involves upgrading (ro and ro-db):
docker pull mysql:5
git clone https://osm.etsi.org/gerrit/osm/RO
#you can then work in the cloned repo, apply patches with git pull, etc.
docker build RO -f RO/Dockerfile.local -t opensourcemano/ro:develop --no-cache
kubectl -n osm patch deployment ro --patch '{"spec": {"template": {"spec": {"containers": [{"name": "ro", "image": "opensourcemano/ro:develop"}]}}}}'
kubectl -n osm scale deployment ro --replicas=0
kubectl -n osm scale deployment ro --replicas=1
# In order to make this change persistent after reboots,
# you will have to update the file /etc/osm/docker/osm_pods/ro.yaml to reflect the change
# in the docker image, for instance:
# sudo sed -i "s/opensourcemano\/ro:.*/opensourcemano\/ro:develop/g" /etc/osm/docker/osm_pods/ro.yaml
# kubectl -n osm apply -f /etc/osm/docker/osm_pods/ro.yaml
3.6.1.3.2. Upgrading LCM in K8s
git clone https://osm.etsi.org/gerrit/osm/LCM
#you can then work in the cloned repo, apply patches with git pull, etc.
docker build LCM -f LCM/Dockerfile.local -t opensourcemano/lcm:develop --no-cache
kubectl -n osm patch deployment lcm --patch '{"spec": {"template": {"spec": {"containers": [{"name": "lcm", "image": "opensourcemano/lcm:develop"}]}}}}'
kubectl -n osm scale deployment lcm --replicas=0
kubectl -n osm scale deployment lcm --replicas=1
# In order to make this change persistent after reboots,
# you will have to update the file /etc/osm/docker/osm_pods/lcm.yaml to reflect the change
# in the docker image, for instance:
# sudo sed -i "s/opensourcemano\/lcm:.*/opensourcemano\/lcm:develop/g" /etc/osm/docker/osm_pods/lcm.yaml
# kubectl -n osm apply -f /etc/osm/docker/osm_pods/lcm.yaml
3.6.1.3.3. Upgrading MON in K8s
git clone https://osm.etsi.org/gerrit/osm/MON
#you can then work in the cloned repo, apply patches with git pull, etc.
docker build MON -f MON/docker/Dockerfile -t opensourcemano/mon:develop --no-cache
kubectl -n osm patch deployment mon --patch '{"spec": {"template": {"spec": {"containers": [{"name": "mon", "image": "opensourcemano/mon:develop"}]}}}}'
kubectl -n osm scale deployment mon --replicas=0
kubectl -n osm scale deployment mon --replicas=1
# In order to make this change persistent after reboots,
# you will have to update the file /etc/osm/docker/osm_pods/mon.yaml to reflect the change
# in the docker image, for instance:
# sudo sed -i "s/opensourcemano\/mon:.*/opensourcemano\/mon:develop/g" /etc/osm/docker/osm_pods/mon.yaml
# kubectl -n osm apply -f /etc/osm/docker/osm_pods/mon.yaml
3.6.1.3.4. Upgrading POL in K8s
git clone https://osm.etsi.org/gerrit/osm/POL
#you can then work in the cloned repo, apply patches with git pull, etc.
docker build POL -f POL/docker/Dockerfile -t opensourcemano/pol:develop --no-cache
kubectl -n osm patch deployment pol --patch '{"spec": {"template": {"spec": {"containers": [{"name": "pol", "image": "opensourcemano/pol:develop"}]}}}}'
kubectl -n osm scale deployment pol --replicas=0
kubectl -n osm scale deployment pol --replicas=1
# In order to make this change persistent after reboots,
# you will have to update the file /etc/osm/docker/osm_pods/pol.yaml to reflect the change
# in the docker image, for instance:
# sudo sed -i "s/opensourcemano\/pol:.*/opensourcemano\/pol:develop/g" /etc/osm/docker/osm_pods/pol.yaml
# kubectl -n osm apply -f /etc/osm/docker/osm_pods/pol.yaml
3.6.1.3.5. Upgrading NBI in K8s
git clone https://osm.etsi.org/gerrit/osm/NBI
#you can then work in the cloned repo, apply patches with git pull, etc.
docker build NBI -f NBI/Dockerfile.local -t opensourcemano/nbi:develop --no-cache
kubectl -n osm patch deployment nbi --patch '{"spec": {"template": {"spec": {"containers": [{"name": "nbi", "image": "opensourcemano/nbi:develop"}]}}}}'
kubectl -n osm scale deployment nbi --replicas=0
kubectl -n osm scale deployment nbi --replicas=1
# In order to make this change persistent after reboots,
# you will have to update the file /etc/osm/docker/osm_pods/nbi.yaml to reflect the change
# in the docker image, for instance:
# sudo sed -i "s/opensourcemano\/nbi:.*/opensourcemano\/nbi:develop/g" /etc/osm/docker/osm_pods/nbi.yaml
# kubectl -n osm apply -f /etc/osm/docker/osm_pods/nbi.yaml
3.6.1.3.6. Upgrading Next Generation UI in K8s
git clone https://osm.etsi.org/gerrit/osm/NG-UI
#you can then work in the cloned repo, apply patches with git pull, etc.
docker build NG-UI -f NG-UI/docker/Dockerfile -t opensourcemano/ng-ui:develop --no-cache
kubectl -n osm patch deployment ng-ui --patch '{"spec": {"template": {"spec": {"containers": [{"name": "ng-ui", "image": "opensourcemano/ng-ui:develop"}]}}}}'
kubectl -n osm scale deployment ng-ui --replicas=0
kubectl -n osm scale deployment ng-ui --replicas=1
# In order to make this change persistent after reboots,
# you will have to update the file /etc/osm/docker/osm_pods/ng-ui.yaml to reflect the change
# in the docker image, for instance:
# sudo sed -i "s/opensourcemano\/ng-ui:.*/opensourcemano\/ng-ui:develop/g" /etc/osm/docker/osm_pods/ng-ui.yaml
# kubectl -n osm apply -f /etc/osm/docker/osm_pods/ng-ui.yaml
3.6.1.4. Upgrading only a specific component from source code in K8s (advanced users)
FIXME: The procedure described here needs revision, as it may work differently in the latest OSM release.
Upgrading a specific OSM component without upgrading the others accordingly may lead to potential inconsistencies. Unless you are really sure about what you are doing, please use this procedure with caution.
This procedure is useful to use the master branch or an old version for development purposes.
For this purpose, you can use options -b and -m in the installer:
./install_osm.sh --help
usage: ./install_osm.sh [OPTIONS]
Install OSM from binaries or source code (by default, from binaries)
 OPTIONS
...
    -b <refspec>:   install OSM from source code using a specific branch (master, v2.0, ...) or tag
                    -b master          (main dev branch)
                    -b v2.0            (v2.0 branch)
                    -b tags/v1.1.0     (a specific tag)
                    ...
    -m <MODULE>:    install OSM but only rebuild the specified docker images (NG-UI, NBI, LCM, RO, MON, POL, KAFKA, MONGO, PROMETHEUS, PROMETHEUS-CADVISOR, KEYSTONE-DB, NONE)
Or to use master branch in LCM:
./install_osm.sh -c k8s -m LCM -b master
Or to use an old version of MON:
./install_osm.sh -c k8s -m MON -b tags/v6.0.3
3.6.2. How to upgrade OSM when using docker swarm as container framework
3.6.2.1. Upgrading the complete OSM platform
Due to the new architecture and dockerized components introduced in OSM since Release FOUR, OSM platform upgrade is quite easy. Upgrading to the latest minor version is as simple as running again the installer:
wget https://osm-download.etsi.org/ftp/osm-10.0-ten/install_osm.sh
chmod +x install_osm.sh
./install_osm.sh
You will be asked if you want to proceed with the installation and configuration of LXD, juju, docker CE and the initialization of a local docker swarm, as pre-requirements. Please answer y.
That’s all. You will have the newest OSM version installed.
3.6.2.2. Upgrading the OSM platform from docker images (advanced users)
Upgrading to the latest daily docker image might lead to potential issues. Moreover, every new re-deployment of the stack will involve a download of a new docker daily image if it exists. Unless you are really sure about what you are doing, please use this procedure with caution.
The commonest reason for this procedure is using the latest daily testing docker image or a specific tag.
You can use option -t in the installer to specify a specific docker tag to be used by the installer.
To install the latest daily images:
./install_osm.sh -t releaseten-daily
To install a previous version e.g. 8.0.4:
./install_osm.sh -t 8.0.4
The previous commands will do the installation and deployment of the stack, but will not make it persistent after re-deployments of the stack (or reboots). In order to make it persistent, you will have to update the file docker-compose.yaml. Below an example to update it to use releaseten-daily tag:
sudo sed -i "s/ro\:\${TAG\:-8}/ro\:\${TAG\:-releaseten-daily}/" /etc/osm/docker/docker-compose.yaml
sudo sed -i "s/lcm\:\${TAG\:-8}/lcm\:\${TAG\:-releaseten-daily}/" /etc/osm/docker/docker-compose.yaml
sudo sed -i "s/mon\:\${TAG\:-8}/mon\:\${TAG\:-releaseten-daily}/" /etc/osm/docker/docker-compose.yaml
sudo sed -i "s/pol\:\${TAG\:-8}/pol\:\${TAG\:-releaseten-daily}/" /etc/osm/docker/docker-compose.yaml
sudo sed -i "s/nbi\:\${TAG\:-8}/nbi\:\${TAG\:-releaseten-daily}/" /etc/osm/docker/docker-compose.yaml
sudo sed -i "s/ng-ui\:\${TAG\:-8}/ng-ui\:\${TAG\:-releaseten-daily}/" /etc/osm/docker/docker-compose.yaml
sudo sed -i "s/ng-ui\:\${TAG\:-8}/ng-ui\:\${TAG\:-releaseten-daily}/" /etc/osm/docker/docker-compose.yaml
sudo sed -i "s/keystone\:\${TAG\:-8}/keystone\:\${TAG\:-releaseten-daily}/" /etc/osm/docker/docker-compose.yaml
docker stack rm osm
docker stack deploy -c /etc/osm/docker/docker-compose.yaml osm
The OSM Client will have to be updated independently. In order to use the latest “testing” OSM Client, you will have to update the debian repo to use the testing repo, remove the previous debian package and install the one from the new repo as follows:
sudo apt-get remove python-osmclient
sudo apt-get remove pytho3-osmclient
# Clean the previous repos that might exist
sudo sed -i "/osm-download.etsi.org/d" /etc/apt/sources.list
sudo add-apt-repository -y "deb [arch=amd64] https://osm-download.etsi.org/repository/osm/debian/ReleaseEIGHT-daily testing osmclient"
sudo apt-get update
sudo apt-get install python3-osmclient
dpkg -l |grep python3-osmclient   #to check the installed version
3.6.2.3. Upgrading only a specific component (advanced users)
Upgrading a specific OSM component without upgrading the others accordingly may lead to potential inconsistencies. Unless you are really sure about what you are doing, please use this procedure with caution.
One of the commonest reasons for this type of upgrade is using your own cloned repo of a module for development purposes.
The procedure below involves building manually some docker images. The developer environment might require updating manually the MTU of the docker default “bridge” network following the procedure in this link: https://docs.docker.com/network/bridge/
3.6.2.3.1. Upgrading RO
This involves upgrading (ro and ro-db):
docker pull mysql:5
git clone https://osm.etsi.org/gerrit/osm/RO
#you can then work in the cloned repo, apply patches with git pull, etc.
docker build RO -f RO/Dockerfile.local -t opensourcemano/ro:develop --no-cache
docker service update osm_ro --force --image opensourcemano/ro:develop
# In order to make this change persistent after reboots or restart of the docker stack
# you will have to update the file /etc/osm/docker/docker-compose.yaml to reflect the change
# in the docker image, for instance:
# sudo sed -i "s/ro\:\${TAG\:-8}/ro\:\${TAG\:-develop}/" /etc/osm/docker/docker-compose.yaml
# docker stack rm osm
# docker stack deploy -c /etc/osm/docker/docker-compose.yaml osm
3.6.2.3.2. Upgrading LCM
git clone https://osm.etsi.org/gerrit/osm/LCM
#you can then work in the cloned repo, apply patches with git pull, etc.
docker build LCM -f LCM/Dockerfile.local -t opensourcemano/lcm:develop --no-cache
docker service update osm_lcm --force --image opensourcemano/lcm:develop
# In order to make this change persistent after reboots or restart of the docker stack
# you will have to update the file /etc/osm/docker/docker-compose.yaml to reflect the change
# in the docker image, for instance:
# sudo sed -i "s/lcm\:\${TAG\:-8}/lcm\:\${TAG\:-develop}/" /etc/osm/docker/docker-compose.yaml
# docker stack rm osm
# docker stack deploy -c /etc/osm/docker/docker-compose.yaml osm
3.6.2.3.3. Upgrading MON
git clone https://osm.etsi.org/gerrit/osm/MON
#you can then work in the cloned repo, apply patches with git pull, etc.
docker build MON -f MON/docker/Dockerfile -t opensourcemano/mon:develop --no-cache
docker service update osm_mon --force --image opensourcemano/mon:develop
# In order to make this change persistent after reboots or restart of the docker stack
# you will have to update the file /etc/osm/docker/docker-compose.yaml to reflect the change
# in the docker image, for instance:
# sudo sed -i "s/mon\:\${TAG\:-8}/mon\:\${TAG\:-develop}/" /etc/osm/docker/docker-compose.yaml
# docker stack rm osm
# docker stack deploy -c /etc/osm/docker/docker-compose.yaml osm
3.6.2.3.4. Upgrading POL
git clone https://osm.etsi.org/gerrit/osm/POL
#you can then work in the cloned repo, apply patches with git pull, etc.
docker build POL -f POL/docker/Dockerfile -t opensourcemano/pol:develop --no-cache
docker service update osm_pol --force --image opensourcemano/pol:develop
# In order to make this change persistent after reboots or restart of the docker stack
# you will have to update the file /etc/osm/docker/docker-compose.yaml to reflect the change
# in the docker image, for instance:
# sudo sed -i "s/pol\:\${TAG\:-8}/pol\:\${TAG\:-develop}/" /etc/osm/docker/docker-compose.yaml
# docker stack rm osm
# docker stack deploy -c /etc/osm/docker/docker-compose.yaml osm
3.6.2.3.5. Upgrading NBI
git clone https://osm.etsi.org/gerrit/osm/NBI
#you can then work in the cloned repo, apply patches with git pull, etc.
docker build NBI -f NBI/Dockerfile.local -t opensourcemano/nbi:develop --no-cache
docker service update osm_nbi --force --image opensourcemano/nbi:develop
# In order to make this change persistent after reboots or restart of the docker stack
# you will have to update the file /etc/osm/docker/docker-compose.yaml to reflect the change
# in the docker image, for instance:
# sudo sed -i "s/nbi\:\${TAG\:-8}/nbi\:\${TAG\:-develop}/" /etc/osm/docker/docker-compose.yaml
# docker stack rm osm
# docker stack deploy -c /etc/osm/docker/docker-compose.yaml osm
3.6.2.3.6. Upgrading light UI
git clone https://osm.etsi.org/gerrit/osm/NG-UI
#you can then work in the cloned repo, apply patches with git pull, etc.
docker build NG-UI -f NG-UI/docker/Dockerfile -t opensourcemano/ng-ui:develop --no-cache
docker service update osm_ng-ui --force --image opensourcemano/ng-ui:develop
# In order to make this change persistent after reboots or restart of the docker stack
# you will have to update the file /etc/osm/docker/docker-compose.yaml to reflect the change
# in the docker image, for instance:
# sudo sed -i "s/ng-ui\:\${TAG\:-8}/ng-ui\:\${TAG\:-develop}/" /etc/osm/docker/docker-compose.yaml
# docker stack rm osm
# docker stack deploy -c /etc/osm/docker/docker-compose.yaml osm
3.6.2.4. Upgrading only a specific component from source code (advanced users)
FIXME: The procedure described here needs revision, as it may work differently in the latest OSM release.
Upgrading a specific OSM component without upgrading the others accordingly may lead to potential inconsistencies. Unless you are really sure about what you are doing, please use this procedure with caution.
This procedure is useful to use the master branch or an old version for development purposes.
For this purpose, you can use options -b and -m in the installer:
./install_osm.sh --help
usage: ./install_osm.sh [OPTIONS]
Install OSM from binaries or source code (by default, from binaries)
 OPTIONS
...
    -b <refspec>:   install OSM from source code using a specific branch (master, v2.0, ...) or tag
                    -b master          (main dev branch)
                    -b v2.0            (v2.0 branch)
                    -b tags/v1.1.0     (a specific tag)
                    ...
    -m <MODULE>:    install OSM but only rebuild the specified docker images (NG-UI, NBI, LCM, RO, MON, POL, KAFKA, MONGO, PROMETHEUS, PROMETHEUS-CADVISOR, KEYSTONE-DB, NONE)
Or to use master branch in LCM:
./install_osm.sh -m LCM -b master
Or to use an old version of MON:
./install_osm.sh -m MON -b tags/v6.0.3
3.6.3. How to upgrade OSM when using the Charmed installation
3.6.3.1. Upgrading only a specific component
There are two main components which can be upgraded: The OSM charms and the OSM images.
In general for a complete upgrade of an OSM component the following steps are recommended in this order:
Upgrade the OSM Charm to the latest version.
Upgrade the OSM version by passing the latest OSM image.
3.6.3.1.1. Upgrading OSM Charms
By upgrading the OSM Charms new features for operations can be enabled or a new OSM version can be supported in case the previous charm revision wasn’t able to support it. New Charm revisions will be compatible with different OSM versions, therefore the charm can be updated without updating the docker image version.
To update a charm to its latest stable version the following command will be executed:
juju upgrade-charm ui-k8s --channel stable
There is also the possibility to upgrade to a specific revision with the following command:
juju upgrade-charm ui-k8s --revision 43 # 43 being the revision number of the new charm version.
3.6.3.1.2. Upgrading OSM version
OSM is distributed with docker images, therefore, when a new version is released, a new tag is created for it. To update to this new tag the following command needs to be executed:
juju config lcm-k8s image=opensourcemano/lcm:8.0.1 # 8.0.1 Being the version tag
This will restart the pod with the new image version.
3.6.3.1.3. Upgrading from source version
First, the microk8s registry will have to be enabled, for more information please consult the official documentation.
microk8s enable registry
Afterwards the docker image of the module that needs to be upgraded has to be built and pushed, it is important that the tag starts with localhost:32000.
docker build LCM -f LCM/Dockerfile.local -t localhost:32000/osm-lcm:registry --no-cache
docker push localhost:32000/osm-lcm:registry
Finally the image config variable will be updated in the charm with the new tag.
juju config lcm-k8s image=localhost:32000/osm-lcm:registry
If the upgrades are executed several times, different tag names will have to be used, due to their not being an automatic pull of the images.