3. How to install OSM
3.1. Pre-requirements
In order to install OSM, you will need, at least, a single server or VM with the following requirements:
RECOMMENDED: 4 CPUs, 16 GB RAM, 80GB disk and a single interface with Internet access
Base image: Ubuntu24.04
Reminder: Although OSM could work with other base images, the only recommended are the ones above, since these are the images used in our daily tests.
In addition, you will need a Virtual Infrastructure Manager available so that OSM can orchestrate workloads on it. The following figure illustrates OSM interaction with VIMs and the VNFs to be deployed there:
OSM communicates with the VIM for the deployment of VNFs.
OSM communicates with the VNFs deployed in a VIM to run day-0, day-1 and day-2 configuration primitives.
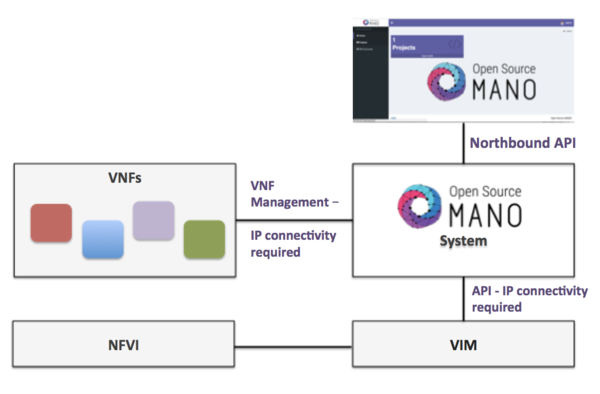
Hence, it is assumed that:
Each VIM has an API endpoint reachable from OSM.
Each VIM has a so-called management network, which provides IP addresses to VNFs.
That management network is reachable from OSM.
3.2. How to install OSM (standard installation)
Once you have one host available with the characteristics above, you just need to trigger the OSM installation by:
wget https://osm-download.etsi.org/ftp/osm-19.0-nineteen/install_osm.sh
chmod +x install_osm.sh
./install_osm.sh
This will install a standalone Kubernetes on a single host, and OSM on top of it.
TIP: In order to facilitate potential troubleshooting later, it is recommended to save the full log of your installation process:
wget https://osm-download.etsi.org/ftp/osm-19.0-nineteen/install_osm.sh
chmod +x install_osm.sh
./install_osm.sh 2>&1 | tee osm_install_log.txt
You will be asked if you want to proceed with the installation and configuration of LXD, juju, docker CE and the initialization of a local Kubernetes cluster, as pre-requirements. Please answer y.
3.2.1. How to control installation of management and auxiliary cluster
From Release SIXTEEN, OSM includes new operations and workflows for cluster management (creation, upgrading, scaling, deletion). Every operation related to the cluster or the applications running on them is reflected in Git repositories, following the GitOps model.
For that reason, OSM incorporates the provision of a management cluster for remote cloud-native management of infrastructure and applications. In addition, ad-hoc Git repositories are automatically created during OSM installation to support Continuous Deployment operations.
By default, the management and auxiliary cluster are provisioned in the same Kubernetes cluster where OSM is deployed. However, it is possible to control the provision of those clusters with the following options in the installer:
--no-mgmt-cluster: Do not provision a mgmt cluster for cloud-native gitops operations in OSM (NEW in Release SIXTEEN) (by default, it is installed)
--no-aux-cluster: Do not provision an auxiliary cluster for cloud-native gitops operations in OSM (NEW in Release SIXTEEN) (by default, it is installed)
-M <KUBECONFIG_FILE>: Kubeconfig of an existing cluster to be used as mgmt cluster instead of OSM cluster
-G <KUBECONFIG_FILE>: Kubeconfig of an existing cluster to be used as auxiliary cluster instead of OSM cluster
3.2.2. How to install optional components
There are some components that were part of OSM and were maintained by the project in previous releases, but are no longer maintained. It must be noted that those components are provided as-is and can be optionally added to your OSM installation. If someone is interested in contributing and leading its evolution, please contact TSC.
You can include those optional components in your installation by adding the following flags:
Kubernetes Monitor:
--k8s_monitor(install an add-on to monitor the Kubernetes cluster and OSM running on top of it, through prometheus and grafana)PLA:
--pla(install the PLA module for placement support)Old Service Assurance:
--old-sa(install old Service Assurance framework with MON and POL; do not install Airflow and Pushgateway)”Juju and LXD:
--juju --lxd(install Juju controller, required for VNFs that use Execution Environments based on Juju charms)
Example:
./install_osm.sh --k8s_monitor --pla
3.2.3. Reference: Other installer options
OSM installer includes a larger number of install options. The general usage is the following:
./install_osm.sh [OPTIONS]
Options:
    -y:             do not prompt for confirmation, assumes yes
    -r <repo>:      use specified repository name for osm packages
    -R <release>:   use specified release for osm binaries (deb packages, lxd images, ...)
    -u <repo base>: use specified repository url for osm packages
    -k <repo key>:  use specified repository public key url
    --showopts:     print chosen options and exit (only for debugging)
    -D <devops path> use local devops installation path
    -h / --help:    prints help
3.3. How to upgrade components from daily images in standard deployment
Upgrading a specific OSM component without upgrading the others accordingly may lead to potential inconsistencies. Unless you are really sure about what you are doing, please use this procedure with caution.
One of the commonest reasons for this type of upgrade is using your own cloned repo of a module for development purposes.
3.3.1. Upgrading RO in K8s
This involves upgrading (ro):
git clone https://osm.etsi.org/gerrit/osm/RO
#you can then work in the cloned repo, apply patches with git pull, etc.
docker build RO -f RO/Dockerfile.local -t opensourcemano/ro:develop --no-cache
kubectl -n osm patch deployment ro --patch '{"spec": {"template": {"spec": {"containers": [{"name": "ro", "image": "opensourcemano/ro:develop"}]}}}}'
kubectl -n osm scale deployment ro --replicas=0
kubectl -n osm scale deployment ro --replicas=1
# In order to make this change persistent after reboots,
# you will have to update the file /etc/osm/docker/osm_pods/ro.yaml to reflect the change
# in the docker image, for instance:
# sudo sed -i "s/opensourcemano\/ro:.*/opensourcemano\/ro:develop/g" /etc/osm/docker/osm_pods/ro.yaml
# kubectl -n osm apply -f /etc/osm/docker/osm_pods/ro.yaml
3.3.2. Upgrading LCM in K8s
git clone https://osm.etsi.org/gerrit/osm/LCM
#you can then work in the cloned repo, apply patches with git pull, etc.
docker build LCM -f LCM/Dockerfile.local -t opensourcemano/lcm:develop --no-cache
kubectl -n osm patch deployment lcm --patch '{"spec": {"template": {"spec": {"containers": [{"name": "lcm", "image": "opensourcemano/lcm:develop"}]}}}}'
kubectl -n osm scale deployment lcm --replicas=0
kubectl -n osm scale deployment lcm --replicas=1
# In order to make this change persistent after reboots,
# you will have to update the file /etc/osm/docker/osm_pods/lcm.yaml to reflect the change
# in the docker image, for instance:
# sudo sed -i "s/opensourcemano\/lcm:.*/opensourcemano\/lcm:develop/g" /etc/osm/docker/osm_pods/lcm.yaml
# kubectl -n osm apply -f /etc/osm/docker/osm_pods/lcm.yaml
3.3.3. Upgrading MON in K8s
git clone https://osm.etsi.org/gerrit/osm/MON
#you can then work in the cloned repo, apply patches with git pull, etc.
docker build MON -f MON/docker/Dockerfile -t opensourcemano/mon:develop --no-cache
kubectl -n osm patch deployment mon --patch '{"spec": {"template": {"spec": {"containers": [{"name": "mon", "image": "opensourcemano/mon:develop"}]}}}}'
kubectl -n osm scale deployment mon --replicas=0
kubectl -n osm scale deployment mon --replicas=1
# In order to make this change persistent after reboots,
# you will have to update the file /etc/osm/docker/osm_pods/mon.yaml to reflect the change
# in the docker image, for instance:
# sudo sed -i "s/opensourcemano\/mon:.*/opensourcemano\/mon:develop/g" /etc/osm/docker/osm_pods/mon.yaml
# kubectl -n osm apply -f /etc/osm/docker/osm_pods/mon.yaml
3.3.4. Upgrading POL in K8s
git clone https://osm.etsi.org/gerrit/osm/POL
#you can then work in the cloned repo, apply patches with git pull, etc.
docker build POL -f POL/docker/Dockerfile -t opensourcemano/pol:develop --no-cache
kubectl -n osm patch deployment pol --patch '{"spec": {"template": {"spec": {"containers": [{"name": "pol", "image": "opensourcemano/pol:develop"}]}}}}'
kubectl -n osm scale deployment pol --replicas=0
kubectl -n osm scale deployment pol --replicas=1
# In order to make this change persistent after reboots,
# you will have to update the file /etc/osm/docker/osm_pods/pol.yaml to reflect the change
# in the docker image, for instance:
# sudo sed -i "s/opensourcemano\/pol:.*/opensourcemano\/pol:develop/g" /etc/osm/docker/osm_pods/pol.yaml
# kubectl -n osm apply -f /etc/osm/docker/osm_pods/pol.yaml
3.3.5. Upgrading NBI in K8s
git clone https://osm.etsi.org/gerrit/osm/NBI
#you can then work in the cloned repo, apply patches with git pull, etc.
docker build NBI -f NBI/Dockerfile.local -t opensourcemano/nbi:develop --no-cache
kubectl -n osm patch deployment nbi --patch '{"spec": {"template": {"spec": {"containers": [{"name": "nbi", "image": "opensourcemano/nbi:develop"}]}}}}'
kubectl -n osm scale deployment nbi --replicas=0
kubectl -n osm scale deployment nbi --replicas=1
# In order to make this change persistent after reboots,
# you will have to update the file /etc/osm/docker/osm_pods/nbi.yaml to reflect the change
# in the docker image, for instance:
# sudo sed -i "s/opensourcemano\/nbi:.*/opensourcemano\/nbi:develop/g" /etc/osm/docker/osm_pods/nbi.yaml
# kubectl -n osm apply -f /etc/osm/docker/osm_pods/nbi.yaml
3.3.6. Upgrading Next Generation UI in K8s
git clone https://osm.etsi.org/gerrit/osm/NG-UI
#you can then work in the cloned repo, apply patches with git pull, etc.
docker build NG-UI -f NG-UI/docker/Dockerfile -t opensourcemano/ng-ui:develop --no-cache
kubectl -n osm patch deployment ng-ui --patch '{"spec": {"template": {"spec": {"containers": [{"name": "ng-ui", "image": "opensourcemano/ng-ui:develop"}]}}}}'
kubectl -n osm scale deployment ng-ui --replicas=0
kubectl -n osm scale deployment ng-ui --replicas=1
# In order to make this change persistent after reboots,
# you will have to update the file /etc/osm/docker/osm_pods/ng-ui.yaml to reflect the change
# in the docker image, for instance:
# sudo sed -i "s/opensourcemano\/ng-ui:.*/opensourcemano\/ng-ui:develop/g" /etc/osm/docker/osm_pods/ng-ui.yaml
# kubectl -n osm apply -f /etc/osm/docker/osm_pods/ng-ui.yaml
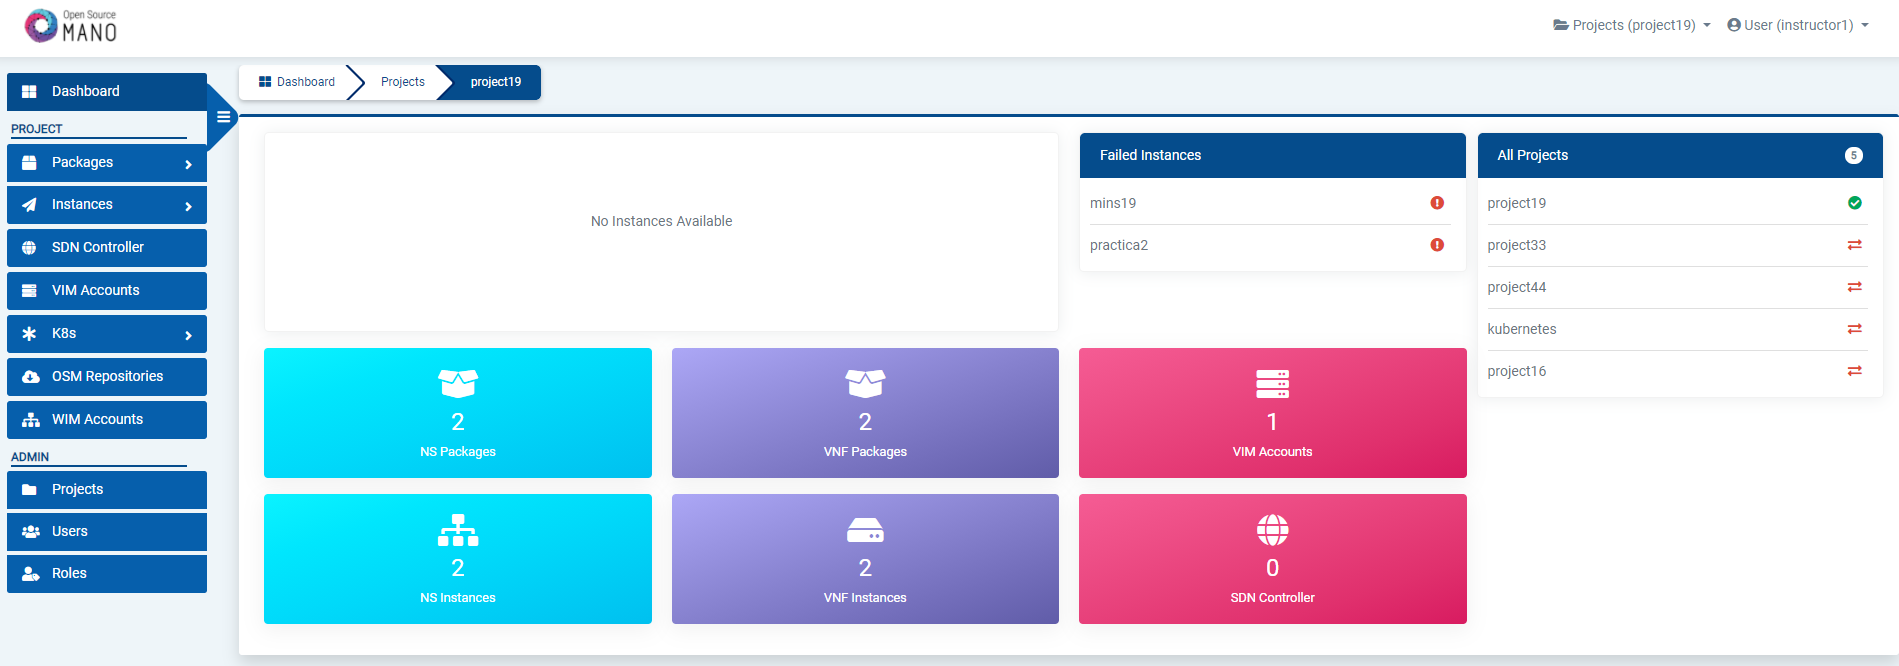
3.4. How to check OSM installation (standard installation)
After some time, you will get a fresh OSM installation with its latest, pre-built docker images which are built daily. You can access to the UI in the following URL (user:admin, password: admin): http://1.2.3.4, replacing 1.2.3.4 by the IP address of your host.

As a result of the installation, different K8s objects (deployments, statefulsets, etc.) created in the host. You can check the status by running the following commands:
kubectl get all -n osm
To check the logs of any container:
kubectl logs -n osm deployments/lcm           # for LCM
kubectl logs -n osm deployments/ng-ui         # for NG-UI
kubectl logs -n osm deployments/mon           # for MON
kubectl logs -n osm deployments/nbi           # for NBI
kubectl logs -n osm deployments/pol           # for POL
kubectl logs -n osm deployments/ro            # for RO
kubectl logs -n osm deployments/keystone      # for Keystone
kubectl logs -n osm deployments/grafana       # for Grafana
kubectl logs -n osm statefulset/kafka         # for Kafka
kubectl logs -n osm statefulset/mongodb-k8s   # for MongoDB
kubectl logs -n osm statefulset/mysql         # for Mysql
kubectl logs -n osm statefulset/prometheus    # for Prometheus
kubectl logs -n osm statefulset/zookeeper     # for Zookeeper
Finally, if you used the option --k8s_monitor to install an add-on to monitor the K8s cluster and OSM, you can check the status in this way.
kubectl get all -n monitoring
OSM client, a python-based CLI for OSM, will be available as well in the host machine. Via the OSM client, you can manage descriptors, NS and VIM complete lifecycle.
osm --help
3.5. Explanation: What the OSM client is
The OSM Client is a client library and a command-line tool (based on Python) to operate OSM, which accesses OSM’s Northbound Interface (NBI) and lets you manage descriptors, VIMs, Network Services, Slices, etc. along with their whole lifecycle. In other words, the OSM Client is a sort of Swiss knife that provides a convenient access to all the functionality that OSM’s NBI offers.
Although the OSM Client is always available in the host machine after installation, it is sometimes convenient installing an OSM Client in another location, different from the OSM host, so that the access to the OSM services does not require OS-level/SSH credentials. Thus, in those cases where you have an OSM already installed in a remote server, you can still operate it from your local computer using the OSM Client.
3.5.1. How to install standalone OSM Client
In order to install the OSM Client in your local Linux machine, you should follow this procedure:
OSM_CLIENT_VERSION="v19.0"
OSM_IM_VERSION="v19.0"
sudo DEBIAN_FRONTEND=noninteractive apt-get install -y python3 python3-setuptools python3-dev python3-pip
sudo DEBIAN_FRONTEND=noninteractive apt-get install -y libmagic1
sudo DEBIAN_FRONTEND=noninteractive apt-get install -y make
sudo -H python3 -m pip install -U pip
# Install OSM IM and its dependencies via pip
python3 -m pip install -r "https://osm.etsi.org/gitweb/?p=osm/IM.git;a=blob_plain;f=requirements.txt;hb=${OSM_IM_VERSION}"
# Path needs to include $HOME/.local/bin in order to use pyang
[ "$(which pyang)" = "$HOME/.local/bin/pyang" ] || export PATH=$HOME/.local/bin:${PATH}
python3 -m pip install "git+https://osm.etsi.org/gerrit/osm/IM.git@${OSM_IM_VERSION}#egg=osm-im" --upgrade
python3 -m pip install -r "https://osm.etsi.org/gitweb/?p=osm/osmclient.git;a=blob_plain;f=requirements.txt;hb=${OSM_CLIENT_VERSION}"
python3 -m pip install git+https://osm.etsi.org/gerrit/osm/osmclient.git@${OSM_CLIENT_VERSION}#egg=osmclient
3.5.2. Usage
Once installed, you can type osm to see a list of commands.
Since we are installing the OSM Client in a host different from OSM’s at a minimum you will need to specify the OSM host, either via an environment variable or via the osm command line. For instance, you can set your client to access an OSM host running at 10.80.80.5 by using:
export OSM_HOSTNAME="nbi.10.80.80.5.nip.io"
You can get the ingress endpoint of OSM NBI by running the following command:
export OSM_HOSTNAME=$(kubectl get -n osm -o jsonpath="{.spec.rules[0].host}" ingress nbi-ingress)
echo "OSM_HOSTNAME (for osm client): $OSM_HOSTNAME"
For additional options, see osm --help for more info, and check our OSM client reference guide here
3.6. Reference. Helm-based OSM installation
Since Release FOURTEEN, the deployment of OSM services (LCM, RO, NBI, NG-UI, etc.) in the community installer is done with a Helm chart.
When OSM is installed, behind the scenes the following steps are done:
Installation of client tools
Installation and initialization of a local Kubernetes cluster, including a CNI , container storage (OpenEBS) and a Load Balancer (MetalLB)
Deployment auxiliary services (Git, S3)
Deploy of management cluster services (FluxCD, ArgoWorkflows, Crossplane, CAPI)
Deployment of OSM with the OSM Helm Chart, which includes the following components:
NBI
LCM
RO
NG-UI
MON
Webhook translator
NG-SA (new Service Assurance), which includes Airflow, Prometheus Alert Manager and Prometheus Pushgateway Helm Charts
Other (Mysql, Keystone, Kafka, Prometheus, Grafana)
Once OSM is installed, the following helm releases can be seen in namespace osm:
$ helm -n osm ls
NAME            NAMESPACE       REVISION        UPDATED                                 STATUS          CHART                           APP VERSION
osm             osm             1               2026-02-01 15:08:43.421836769 +0000 UTC deployed        osm-19.0.0                      19.0.0
The helm release osm corresponds to the OSM Helm chart.
And the following pods can be seen in osm namespace:
$ kubectl -n osm get pods
NAME                                                  READY   STATUS    RESTARTS        AGE
airflow-postgresql-0                                  1/1     Running   2 (2d20h ago)   5d22h
airflow-redis-0                                       1/1     Running   1 (2d20h ago)   5d22h
airflow-scheduler-5f7dbdc4f5-54x9c                    2/2     Running   4 (2d20h ago)   5d22h
airflow-statsd-d8c8f886c-vt7xq                        1/1     Running   4 (2d20h ago)   5d22h
airflow-triggerer-6668bd965c-n6snh                    2/2     Running   3 (2d20h ago)   5d22h
airflow-webserver-5fb957dcf7-bcgzw                    1/1     Running   1 (2d20h ago)   5d22h
airflow-worker-0                                      2/2     Running   2 (2d20h ago)   5d22h
alertmanager-0                                        1/1     Running   6 (2d20h ago)   5d22h
grafana-69c9c55dfb-jtwfl                              2/2     Running   2 (2d20h ago)   5d22h
kafka-0                                               1/1     Running   1 (2d20h ago)   5d22h
keystone-7dbf4b7796-rqwg4                             1/1     Running   1 (2d20h ago)   5d22h
lcm-6d97b88675-4m77j                                  1/1     Running   2 (2d20h ago)   5d22h
modeloperator-7dd8bf6c79-wx49m                        1/1     Running   1 (2d20h ago)   5d22h
mon-ccb965d54-drvmr                                   1/1     Running   1 (2d20h ago)   5d22h
mongodb-k8s-0                                         1/1     Running   3 (2d20h ago)   5d22h
mongodb-k8s-operator-0                                1/1     Running   1 (2d20h ago)   3d11h
mysql-0                                               1/1     Running   1 (2d20h ago)   5d22h
nbi-64b4f6ffd9-jtbf5                                  1/1     Running   5 (2d20h ago)   5d22h
ngui-78d9bd66dc-xbff6                                 1/1     Running   3 (2d19h ago)   5d22h
prometheus-0                                          2/2     Running   4 (2d20h ago)   5d22h
pushgateway-prometheus-pushgateway-6f9dc6cb4d-4sp4x   1/1     Running   1 (2d20h ago)   5d22h
ro-86cf9d4b55-z6ls7                                   1/1     Running   5 (2d20h ago)   5d22h
webhook-translator-57b75fc797-j9s7w                   1/1     Running   1 (2d20h ago)   5d22h
zookeeper-0                                           1/1     Running   1 (2d20h ago)   5d22h
3.7. How to install OSM using OSM helm chart
Assuming that you have a Kubernetes cluster, it is possible to deploy OSM on top of that cluster.
3.7.1. Deploy OSM helm chart directly from Gitlab OCI repo
helm install -n osm osm oci://osm.etsi.org:5050/osm/devops/osm --version 19.0.0
# Optionally pull, then install
# helm pull osm oci://osm.etsi.org:5050/osm/devops/osm --version 19.0.0
# helm install -n osm --repo osm osm-19.0.0.tgz
3.7.2. Deploy OSM helm chart from devops repo
# Make sure you are in devops directory
cd devops
# Optionally check out a specific version
# DESIRED_OSM_VERSION="19.0.0"
# git checkout $DESIRED_OSM_VERSION

# Check default values
helm -n osm show values installers/helm/osm

# Specify the repository base and the version that you want for the docker images
OSM_HELM_OPTS=""
OSM_HELM_OPTS="${OSM_HELM_OPTS} --set global.image.repositoryBase=opensourcemano"
OSM_HELM_OPTS="${OSM_HELM_OPTS} --set global.image.tag=\"19\""

# Build the helm chart dependencies
helm dependency build installers/helm/osm

# Check that there are no errors
helm -n osm template osm installers/helm/osm -f osm-values.yaml ${OSM_HELM_OPTS}

# Deploy OSM helm chart
helm -n osm install osm installers/helm/osm -f osm-values.yaml ${OSM_HELM_OPTS}
helm -n osm status osm
3.7.3. Check the status of helm releases and pods
Run the following commands to check the status of helm releases and the pods. All pods should have started properly.
helm -n osm ls
kubectl -n osm get pods
3.8. Other installation methods
The following installation methods are captured here as a reference. Since Release FIFTEEN, they have not been tested and they might now work. Specifically, in the case of the Charmed OSM, the latest supported version is Release FOURTEEN.
3.8.1. How to install Charmed OSM
Note: The latest supported version of Charmed OSM is Release FOURTEEN.
3.8.1.1. Standalone

wget https://osm-download.etsi.org/ftp/osm-14.0-fourteen/install_osm.sh
chmod +x install_osm.sh
./install_osm.sh --charmed
This will install OSM on microk8s using Charms.
3.8.1.2. How to install Charmed OSM using external infraestructure
For the installation using external components the following parameters can be added:
wget https://osm-download.etsi.org/ftp/osm-14.0-fourteen/install_osm.sh
chmod +x install_osm.sh
./install_osm.sh --charmed --k8s ~/.kube/config --vca <name> --lxd <lxd-cloud.yaml> --lxd-cred <lxd-credentials.yaml>
The values for the parameters are the following:
k8s: This will be the path of the kubeconfig file of your external Kubernetes.vca: This will be the name of the controller already added to your Juju CLI.lxd: This will be the path to thecloud.yamlfile of your external LXD Cluster.lxd-cred: This will be the path to thecredential.yamlfile of your external LXD Cluster.
For more information on the LXD cloud.yaml and credential.yaml files consult here
3.8.1.3. How to configure needed environment variables in Charmed OSM
Once the installation is over, follow these instructions to configure the environments variables needed by the osmclient:
NBI_IP=$(microk8s.kubectl describe -n osm ingress | grep -E "nbi.*\.io" | xargs)
export OSM_HOSTNAME=$NBI_IP
NBI_PASSWORD=$(juju config -m osm keystone admin-password)
export OSM_PASSWORD=$NBI_PASSWORD
To have the osm client always available include it in your .bashrc:
NBI_IP=$(microk8s.kubectl describe -n osm ingress | grep -E "nbi.*\.io" | xargs)
echo "export OSM_HOSTNAME=$NBI_IP" >> ~/.bashrc
NBI_PASSWORD=$(juju config -m osm keystone admin-password)
echo "export OSM_PASSWORD=$NBI_PASSWORD" >> ~/.bashrc
3.8.1.4. How to retrieve login usernames and passwords in Charmed OSM
The following instructions show how to retrieve usernames and passwords of OSM modules in Charmed installations.
3.8.1.4.1. OSM UI
The following commands return the username and password for logging into OSM UI as administrator:
juju config -m osm keystone admin-username
juju config -m osm keystone admin-password
If you also need the exposed IP address for the UI, you can issue the following command:
microk8s.kubectl describe -n osm ingress | grep -E "ui.*\.io" | xargs
3.8.1.4.2. Grafana
The following commands return the username and password for logging into Grafana dashboard:
juju config -m osm mon grafana-user
juju config -m osm mon grafana-password
3.8.1.4.3. Prometheus
The following commands return the username and password for logging into Prometheus dashboard:
juju config -m osm prometheus web_config_username
juju config -m osm prometheus web_config_password
3.8.1.4.4. Databases
Disclaimer: manual access to the databases is usually not required and we strongly suggest not to perform operations on them. However, in case the is a particular reason to access and/or manually modify them, here you can find the steps to retrieve the login data for Keystone and MariaDB.
3.8.1.4.4.1. Keystone
The following commands return the username and password for logging into Keystone:
juju config -m osm keystone admin-username
juju config -m osm keystone admin-password
juju config -m osm keystone keystone-db-password
juju config -m osm keystone service-password
3.8.1.4.4.2. MariaDB
The following commands return the username and password for logging into MariaDB:
juju config -m osm mariadb root_password
juju config -m osm mariadb password
3.8.1.5. Scaling OSM Components
3.8.1.5.1. How to scale Charmed OSM components
Scaling or replicating the amount of containers each OSM component has can help both with distributing the workloads (in the case of some components) and also with high availability in case of one of the replicas failing.
For the High Availability scenario Charms will automatically apply anti-affinity rules to distribute the component pods between different Kubernetes worker nodes. Therefore for real High Availability a Kubernetes with multiple Worker Nodes will be needed.
To scale a charm the following command needs to be executed:
juju scale-application lcm-k8s 3 # 3 being the amount of replicas
If the application is already scaled to the number stated in the scale-application command nothing will change. If the number is lower, the application will scale down.
3.8.1.5.2. How to scale Charmed OSM VCA
For more detailed information about setting up a highly available controller please consult the official documentation.
Nevertheless, one way of setting up a manual HA Juju Controller which will act as VCA will be demonstrated.
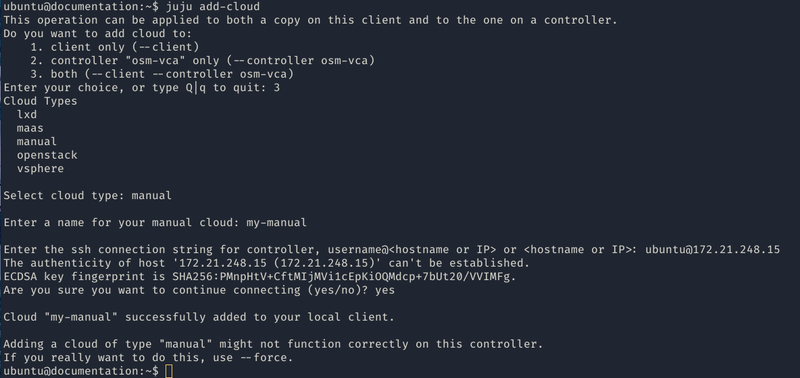
First of all, the set up of 3 machines with the latest LTS of Ubuntu and at least 4GB of RAM will be needed. The machine from which the controller will be created will need SSH access to the previously mentioned 3 machines.
Afterwards, the manual cloud will be added, executing the first command and following the steps shown in the screenshot.
juju add-cloud
Once the add-cloud command is finished. The following commands will be executed to create the controller, add the remaining machines and enable HA.
juju bootstrap my-manual manual-controller
juju switch controller
juju add-machine ssh:ubuntu@<ip-second-machine>
juju add-machine ssh:ubuntu@<ip-third-machine>
juju enable-ha --to 1,2
Once the juju status shows all machines in a “started” state, the HA controller is initialized.
To install Charmed OSM with the HA controller the following argument will be passed:
./install_osm.sh --charmed --vca manual-controller
3.8.1.6. How to use external DBs with Charmed OSM
Charmed OSM supports the usage of external DBs. For this purpose, relations to the DBs should be removed:
juju remove-relation nbi mongodb-k8s
juju remove-relation lcm mongodb-k8s
juju remove-relation ro mongodb-k8s
juju remove-relation mon mongodb-k8s
juju remove-relation pol mariadb-k8s
juju remove-relation pol mongodb-k8s
juju remove-relation pla mongodb-k8s
juju remove-relation keystone mariadb-k8s
juju remove-application mongodb-k8s
juju remove-application mariadb-k8s
Now, add the configuration to access the external DBs:
juju config nbi mongodb_uri="<MongoDB URI>"
juju config lcm mongodb_uri="<MongoDB URI>"
juju config ro mongodb_uri="<MongoDB URI>"
juju config mon mongodb_uri="<MongoDB URI>"
juju config pol mysql_uri="<MySQL URI>"
juju config pol mongodb_uri="<MongoDB URI>"
juju config pla mongodb_uri="<MongoDB URI>"
juju config keystone mysql_host="<MySQL Host>"
juju config keystone mysql_port="<MySQL Port>"
juju config keystone mysql_root_password="<MySQL Root Password>"
3.8.2. How to install OSM in a remote OpenStack infrastructure
OSM could be installed to a remote OpenStack infrastructure from the OSM standard installer. It is based on Ansible and it takes care of configuring the OpenStack infrastructure before deploying a VM with OSM. The Ansible playbook performs the following steps:
Creation of a new VM flavour (4 CPUs, 16 GB RAM, 80 GB disk)
Download of Ubuntu 24.04 image and upload it to OpenStack Glance
Generation of a new SSH private and public key pair
Setup of a new security group to allow external SSH and HTTP access
Deployment of a clean Ubuntu 24.04 VM and installation of OSM to it
Important note: The OpenStack user needs Admin rights or similar to perform those operations.
The installation can be performed with the following command:
wget https://osm-download.etsi.org/ftp/osm-19.0-nineteen/install_osm.sh
chmod +x install_osm.sh
./install_osm.sh -O <openrc file/cloud name> -N <OpenStack public network name/ID> [--volume] [OSM installer options]
The options -O and -N are mandatory. The -O accepts both a path to an OpenStack openrc file or a cloud name. If a cloud name is used, the clouds.yaml file should be under ~/.config/openstack/ or /etc/openstack/. More information about the clouds.yaml file can be found here
The -N requires an external network name or ID. This is going to be the OpenStack network where the OSM VM is going to be attached.
The --volume option is used to instruct OpenStack to create an external volume attached to the VM instead of using a local one. This may be suitable for production environments. It requires OpenStack Cinder configured on the OpenStack infrastructure.
Some OSM installer options are supported, in particular the following: -r -k -u -R -t. Other options will be supported in the future.