5. OSM Usage
5.1. How to deploy your first Network Service
Before going on, clone VNF and NS packages from Gitlab osm-packages repository
git clone --recursive https://osm.etsi.org/gitlab/vnf-onboarding/osm-packages.git
5.1.1. Onboarding a VNF package
The onboarding of a VNF in OSM involves preparing and adding the corre sponding VNF package to the system. This process also assumes, as a pre-condition, that the corresponding VM images are available in the VIM(s) where it will be instantiated.
5.1.1.1. Uploading VM image(s) to the VIM(s)
In this example, only a vanilla Ubuntu18.04 image is needed. It can be obtained from the following link: https://cloud-images.ubuntu.com/bionic/current/bionic-server-cloudimg-amd64.img
It will be required to upload the image into the VIM. Instructions differ from one VIM to another (please check the reference of your type of VIM).
For instance, this is the OpenStack command for uploading images:
openstack image create --file="./bionic-server-cloudimg-amd64.img" --container-format=bare ubuntu18.04
5.1.1.2. Onboarding a VNF Package
From the UI:
Go to ‘VNF Packages’ on the ‘Packages’ menu to the left
Drag and drop the VNF package file
hackfest_basic_vnf.tar.gzin the importing area.

From OSM client:
git clone --recursive https://osm.etsi.org/gitlab/vnf-onboarding/osm-packages.git
cd osm-packages
osm nfpkg-create hackfest_basic_vnf
osm nfpkg-list
5.1.2. Onboarding a NS Package
From the UI:
Go to ‘NS Packages’ on the ‘Packages’ menu to the left
Drag and drop the NS package file
hackfest_basic_ns.tar.gzin the importing area.
From OSM client:
cd osm-packages
osm nspkg-create hackfest_basic_ns
osm nspkg-list
5.1.3. Instantiating the NS
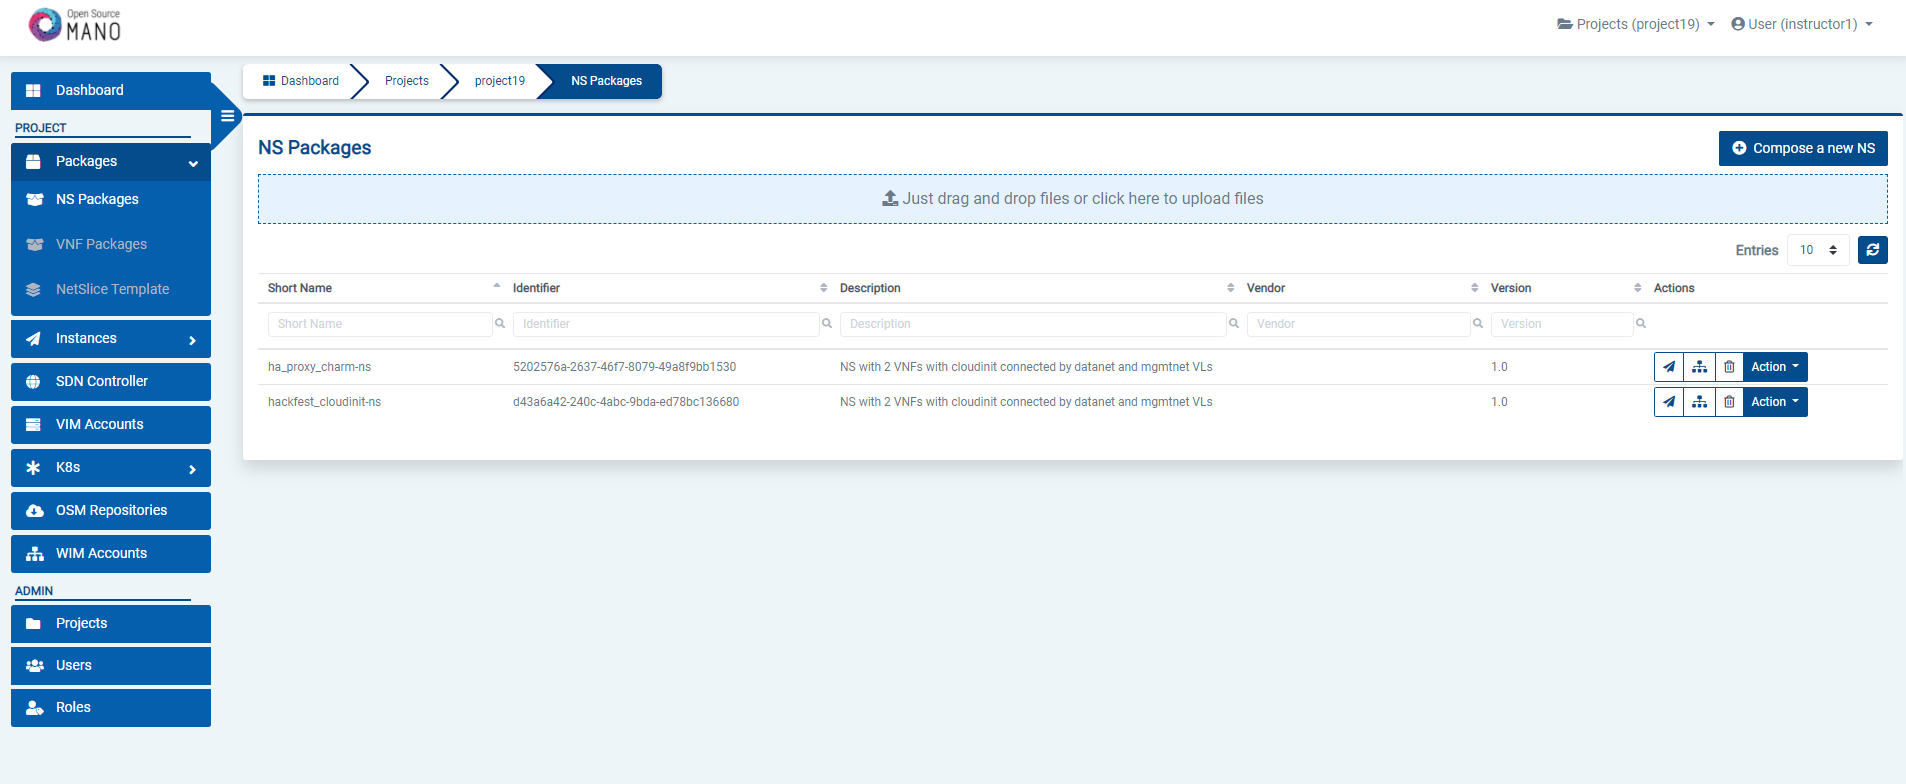
5.1.3.1. Instantiating a NS from the UI
Go to ‘NS Packages’ on the ‘Packages’ menu to the left
Next the NS descriptor to be instantiated, click on the ‘Instantiate NS’ button.

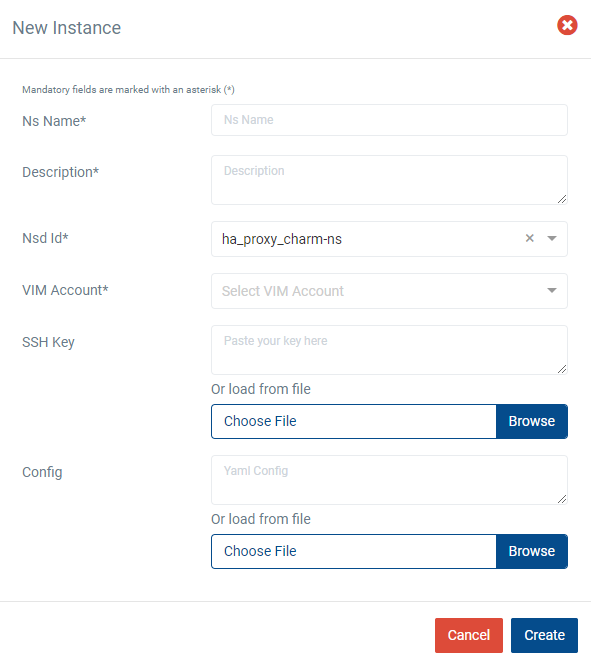
Fill in the form, adding at least a name, description and selecting the VIM:
5.1.3.2. Instantiating a NS from the OSM client
osm ns-create --ns_name <ns-instance-name> --nsd_name hackfest_basic-ns --vim_account <vim-target-name>
osm ns-list
5.2. How to update the VNF instance in a Network Service
If you have an active network service and you would like to update the one of your running VNF instances, you can follow the below steps in order to update it.
5.2.1. Update the VNF package
To be able update the NS instance, first we need to create a new revision of the VNFd package that has the changes we want to perform in our NS. The existing VNFD can be updated by executing the following command through the CLI.
osm vnfpkg-update --content <new_vnfd_package> <vnfd_package_name_to_be_updated>
Example:
osm vnfpkg-update --content ha_proxy_charm_vnf ha_proxy_charm-vnf
You can modify your VNFD according to the update type you would like to apply.
There are 2 supported update types:
CHANGE_VNFPKG
REMOVE_VNF
5.2.1.1. CHANGE_VNFPKG Update
CHANGE_VNFPKG update type provides following operations on a running VNF instance:
Redeploy the VNF
Upgrade the charms in the VNF
Update the policies
5.2.1.1.1. Alterable parameters in VNFD for redeployment
There is a distinctive parameter named software-version in VNF descriptor which is used to dissociate the CHANGE_VNFPKG update type operations.
If the updated package software-version has changed and the original VNFD does not include a charm, the VNF is redeployed (the redeployment is only available right now for NFs that don’t include charms).
If the software-version is not placed in the VNFD, it is taken as 1.0 by default.
At that time, most of the parameters could be changed in the modified VNF package except the parameters which are refered in NSD.
vnfd:
  id: ha_proxy_charm-vnf
  mgmt-cp: vnf-mgmt-ext
  product-name: ha_proxy_charm-vnf
  description: A VNF consisting of 1 VDU
    data and another one for management
  version: 1.0
  software-version: 1.0
5.2.1.1.2. Alterable parameters in VNFD for charm upgrade in the VNF Instance
The charm upgrade in a running VNF instance is supported unless the running VNF is a juju-bundle.
Only the parameter changes of day1-2 operations are allowed for charm upgrade operations.
Here are the alterable parameters in the VNFD for charm upgrade operations:
All day1-2:initial-config-primitives are allowed to change.
    |  +--rw lcm-operations-configuration
    |  |  +--rw operate-vnf-op-config
    |  |  |     +--rw day1-2:initial-config-primitive* [seq]
    |  |  |     |  +--rw day1-2:seq                                uint64
    |  |  |     |  +--rw (day1-2:primitive-type)?
    |  |  |     |     +--:(day1-2:primitive-definition)
    |  |  |     |        +--rw day1-2:name?                        string
    |  |  |     |        +--rw day1-2:execution-environment-ref?   -> ../../execution-environment-list/id
    |  |  |     |        +--rw day1-2:parameter* [name]
    |  |  |     |        |  +--rw day1-2:name         string
    |  |  |     |        |  +--rw day1-2:data-type?   common:parameter-data-type
    |  |  |     |        |  +--rw day1-2:value?       string
    |  |  |     |        +--rw day1-2:user-defined-script?         string
All day1-2:config-primitives are allowed to change.
    |  +--rw lcm-operations-configuration
    |  |  +--rw operate-vnf-op-config
    |  |  |     +--rw day1-2:config-primitive* [name]
    |  |  |     |  +--rw day1-2:name                               string
    |  |  |     |  +--rw day1-2:execution-environment-ref?         -> ../../execution-environment-list/id
    |  |  |     |  +--rw day1-2:execution-environment-primitive?   string
    |  |  |     |  +--rw day1-2:parameter* [name]
    |  |  |     |  |  +--rw day1-2:name              string
    |  |  |     |  |  +--rw day1-2:data-type?        common:parameter-data-type
    |  |  |     |  |  +--rw day1-2:mandatory?        boolean
    |  |  |     |  |  +--rw day1-2:default-value?    string
    |  |  |     |  |  +--rw day1-2:parameter-pool?   string
    |  |  |     |  |  +--rw day1-2:read-only?        boolean
    |  |  |     |  |  +--rw day1-2:hidden?           boolean
    |  |  |     |  +--rw day1-2:user-defined-script?               string
All day1-2:terminate-config-primitives are allowed to change.
    |  +--rw lcm-operations-configuration
    |  |  +--rw operate-vnf-op-config
    |  |  |     +--rw day1-2:terminate-config-primitive* [seq]
    |  |  |     |  +--rw day1-2:seq                          uint64
    |  |  |     |  +--rw day1-2:name?                        string
    |  |  |     |  +--rw day1-2:execution-environment-ref?   -> ../../execution-environment-list/id
    |  |  |     |  +--rw day1-2:parameter* [name]
    |  |  |     |  |  +--rw day1-2:name         string
    |  |  |     |  |  +--rw day1-2:data-type?   common:parameter-data-type
    |  |  |     |  |  +--rw day1-2:value?       string
    |  |  |     |  +--rw day1-2:user-defined-script?         string
5.2.1.1.3. Alterable parameters for policy updates
Policy update changes are performed on running VNF instance unless software-version is changed in the new revision of VNFD.
Policy update can be used to update all the parameters related to policies like scaling-aspect and healing.
     +--rw vdu* [id]
     |  +--rw scaling-aspect* [id]
     |  |  +--rw id                               string
     |  |  +--rw name?                            string
     |  |  +--rw description?                     string
     |  |  +--rw max-scale-level?                 uint32
     |  |  +--rw aspect-delta-details
     |  |  |  +--rw deltas* [id]
     |  |  |  |  +--rw id                             string
     |  |  |  |  +--rw vdu-delta* [id]
     |  |  |  |  |  +--rw id                     -> ../../../../../../vdu/id
     |  |  |  |  |  +--rw number-of-instances?   uint32
     |  |  |  |  +--rw virtual-link-bit-rate-delta* [id]
     |  |  |  |  |  +--rw id                       string
     |  |  |  |  |  +--rw bit-rate-requirements
     |  |  |  |  |     +--rw root    uint32
     |  |  |  |  |     +--rw leaf?   uint32
     |  |  |  |  +--rw scaling:kdu-resource-delta* [id]
     |  |  |  |     +--rw scaling:id                     -> ../../../../../kdu-resource-profile/id
     |  |  |  |     +--rw scaling:number-of-instances?   uint32
     |  |  |  +--rw step-deltas?   -> ../deltas/id
     |  |  +--rw scaling:scaling-policy* [name]
     |  |  |  +--rw scaling:name                        string
     |  |  |  +--rw scaling:scaling-type?               common:scaling-policy-type
     |  |  |  +--rw scaling:enabled?                    boolean
     |  |  |  +--rw scaling:scale-in-operation-type?    common:scaling-criteria-operation
     |  |  |  +--rw scaling:scale-out-operation-type?   common:scaling-criteria-operation
     |  |  |  +--rw scaling:threshold-time              uint32
     |  |  |  +--rw scaling:cooldown-time               uint32
     |  |  |  +--rw scaling:scaling-criteria* [name]
     |  |  |     +--rw scaling:name                              string
     |  |  |     +--rw scaling:scale-in-threshold?               decimal64
     |  |  |     +--rw scaling:scale-in-relational-operation?    common:relational-operation-type
     |  |  |     +--rw scaling:scale-out-threshold?              decimal64
     |  |  |     +--rw scaling:scale-out-relational-operation?   common:relational-operation-type
     |  |  |     +--rw scaling:vnf-monitoring-param-ref?         string
     |  |  +--rw scaling:scaling-config-action* [trigger]
     |  |     +--rw scaling:trigger                          common:scaling-trigger
     |  |     +--rw scaling:vnf-config-primitive-name-ref?   -> /vnfd:vnfd/df/lcm-operations-configuration/operate-vnf-op-config/day1-2:day1-2/config-primitive/name
5.2.1.2. REMOVE_VNF Update
REMOVE_VNF operation involves terminating a running VNF instance. This operation could terminate one VNF instance at a time from a NS instance. If termination is invoked for a VNF and it is the last VNF instance in a NS instance, then it cannot be terminated.
The Remove VNF operation currently does not support VNFs that include charms.
5.2.2. Perform NS Update Operation
In the ns update request, all the parameters are mandatory except the timeout and wait parameters.
Update request is executed per VNF basis. VnfdId in the update request should be same with the vnfd-id of VNF to be updated.
VNF is always updated to the latest VNFD revision although there are several VNFD revisions. Updating VNF by using specific VNFD revision is not supported at the moment.
300 or higher float variables are supported as timeout parameter.
update_type has 2 options:
CHANGE_VNFPKG
REMOVE_VNF
If CHANGE_VNFPKG is selected as update_type, update_data is changeVnfPackageData
If REMOVE_VNF is selected as update_type, update_data is removeVnfInstanceId
osm ns-update <ns_instance_id> --updatetype <update_type> --config '{<update_data>: [{vnfInstanceId: <vnf_instance_id>, vnfdId: <vnfd_id>}]}' --timeout 300 --wait
Example command:
osm ns-update 6f0835ba-50cb-4e69-b745-022ea2319b96 --updatetype CHANGE_VNFPKG --config '{changeVnfPackageData: [{vnfInstanceId: "f13dfde9-b7da-4469-a921-1a66923f084c", vnfdId: "7f30ca8b-2c96-4bd3-8eab-b7eb19c2a9ed"}]}' --timeout 300 --wait
5.2.2.1. Removing a VNF from UI
Go to ‘NS Instances’ on the ‘Instances’ menu to the left
Next, in the NS instance where the VNF to be terminated is a part of, click on the ‘Action’ button.
From the dropdown actions, click on ‘NS Update’
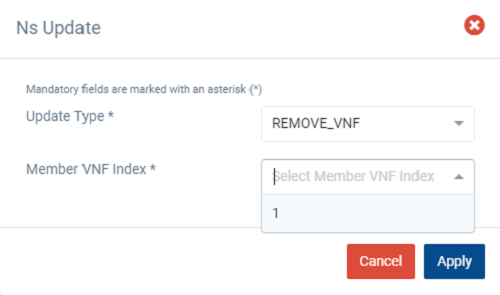
Fill in the form by selecting ‘REMOVE_VNF’ from the dropdown of ‘Update Type’ and the member vnf index of the VNF to be terminated and click ‘Apply’
A warning message is displayed, click ‘Terminate VNF’ to proceed
Click ‘Cancel’ to cancel the termination operation

5.2.2.2. Redeploying a VNF from UI
Go to ‘NS Instances’ on the ‘Instances’ menu to the left
Next to the NS instance which the VNF to be redeployed is a part of, click on the ‘Action’ button.
From the dropdown actions, click on ‘NS Update’
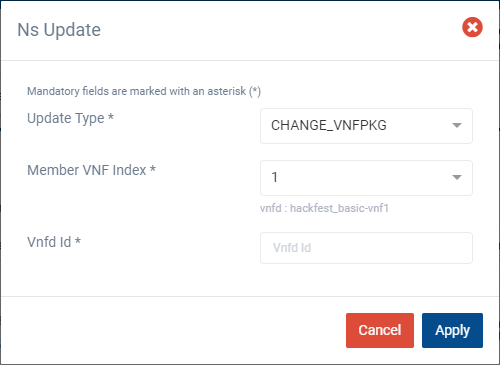
Fill in the form by selecting the following,
‘CHANGE_VNFPKG’ from the dropdown of ‘Update Type’
The member vnf index of the VNF to be updated
VNFDId for the update (Should be same as the vnfd-id of the VNF to be updated)
Finally, click ‘Apply’
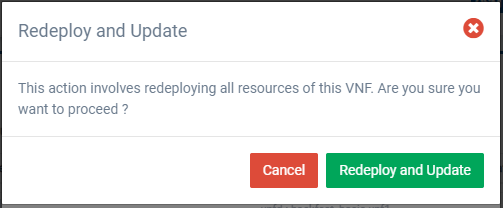
A warning message is displayed, click ‘Redeploy and Update’ to proceed
Click ‘Cancel’ to cancel the update operation
5.3. Advanced instantiation: using instantiation parameters
OSM allows the parametrization of NS or NSI upon instantiation (Day-0 and Day-1), so that the user can easily decide on the key parameters of the service without any need of changing the original set of validated packages.
Thus, when creating a NS instance, it is possible to pass instantiation parameters to OSM using the --config option of the client or the config parameter of the UI. In this section we will illustrate through some of the existing examples how to specify those parameters using OSM client. Since this is one of the most powerful features of OSM, this section is intended to provide a thorough overview of this functionality with practical use cases.
5.3.1. Specify a VIM network name for a NS VLD
In a generic way, the mapping can be specified in the following way, where vldnet is the name of the network in the NS descriptor and netVIM1 is the existing VIM network that you want to use:
--config '{vld: [ {name: vldnet, vim-network-name: netVIM1} ] }'
You can try it using one of the examples of the hackfest (packages: hackfest_basic_vnf, hackfest_basic_ns); images: ubuntu18.04) in the following way:
osm ns-create --ns_name hf-basic --nsd_name hackfest_basic-ns --vim_account openstack1 --config '{vld: [ {name: mgmtnet, vim-network-name: mgmt} ] }'
5.3.2. Specify a VIM network name for an internal VLD of a VNF
In this scenario, the mapping can be specified in the following way, where "1" is the member vnf index of the constituent vnf in the NS descriptor, internal is the name of internal-vld in the VNF descriptor and netVIM1 is the VIM network that you want to use:
--config '{vnf: [ {member-vnf-index: "1", internal-vld: [ {name: internal, vim-network-name: netVIM1} ] } ] }'
You can try it using one of the examples of the hackfest (packages: hackfest_multivdu_vnf, hackfest_multivdu_ns); images: ubuntu20.04) in the following way:
osm ns-create --ns_name hf-multivdu --nsd_name hackfest_multivdu-ns --vim_account openstack1 --config '{vnf: [ {member-vnf-index: "1", internal-vld: [ {name: internal, vim-network-name: mgmt} ] } ] }'
5.3.3. Specify a VIM network (provider network) to be created with specific parameters (physnet label, encapsulation type, segmentation id) for a NS VLD
The mapping can be specified in the following way, where vldnet is the name of the network in the NS descriptor, physnet1 is the physical network label in the VIM, vlan is the encapsulation type and 400 is the segmentation IDthat you want to use:
--config '{vld: [ {name: vldnet, provider-network: {physical-network: physnet1, network-type: vlan, segmentation-id: 400} } ] }'
You can try it using one of the examples of the hackfest (packages: hackfest_basic_vnf, hackfest_basic_ns); images: ubuntu18.04) in the following way:
osm ns-create --ns_name hf-basic --nsd_name hackfest_basic-ns --vim_account openstack1 --config '{vld: [ {name: mgmtnet, provider-network: {physical-network: physnet1, network-type: vlan, segmentation-id: 400} } ] }'
5.3.4. Specify IP profile information and IP for a NS VLD
In a generic way, the mapping can be specified in the following way, where datanet is the name of the network in the NS descriptor, ip-profile is where you have to fill the associated parameters from the data model ( NS data model ), and vnfd-connection-point-ref is the reference to the connection point:
--config '{vld: [ {name: datanet, ip-profile: {...}, vnfd-connection-point-ref: {...} } ] }'
You can try it using one of the examples of the hackfest (packages: hackfest_multivdu_vnf, hackfest_multivdu_ns); images: ubuntu20.04) in the following way:
osm ns-create --ns_name hf-multivdu --nsd_name hackfest_multivdu-ns --vim_account openstack1 --config '{vld: [ {name: datanet, ip-profile: {ip-version: ipv4 ,subnet-address: "192.168.100.0/24", gateway-address: "0.0.0.0", dns-server: [{address: "8.8.8.8"}],dhcp-params: {count: 100, start-address: "192.168.100.20", enabled: true}}, vnfd-connection-point-ref: [ {member-vnf-index-ref: vnf1, vnfd-connection-point-ref: vnf-data, ip-address: "192.168.100.17"}]}]}'
5.3.5. Specify IP profile information for an internal VLD of a VNF
In this scenario, the mapping can be specified in the following way, where vnf1 is the member vnf index of the constituent vnf in the NS descriptor, internal is the name of internal-vld in the VNF descriptor and ip-profile is where you have to fill the associated parameters from the data model (VNF data model):
--config '{vnf: [ {member-vnf-index: vnf1, internal-vld: [ {name: internal, ip-profile: {...} ] } ] }'
You can try it using one of the examples of the hackfest (packages: hackfest_multivdu_vnf, hackfest_multivdu_ns); images: ubuntu20.04) in the following way:
osm ns-create --ns_name hf-multivdu --nsd_name hackfest_multivdu-ns --vim_account openstack1 --config '{vnf: [ {member-vnf-index: vnf1, internal-vld: [ {name: internal, ip-profile: {ip-version: ipv4, subnet-address: "192.168.100.0/24", gateway-address: "0.0.0.0", dns-server: [{address: "8.8.8.8"}] ,dhcp-params: {count: 100, start-address: "192.168.100.20", enabled: true}}}]}]} '
5.3.6. Specify IP address and/or MAC address for an interface
5.3.6.1. Specify IP address for an interface
In this scenario, the mapping can be specified in the following way, where vnf1 is the member vnf index of the constituent vnf in the NS descriptor, ‘internal’ is the name of internal-vld in the VNF descriptor, ip-profile is where you have to fill the associated parameters from the data model (VNF data model), id1 is the internal-connection-point id and a.b.c.d is the IP that you have to specify for this scenario:
--config '{vnf: [ {member-vnf-index: vnf1, internal-vld: [ {name: internal, ip-profile: {...}, internal-connection-point: [{id-ref: id1, ip-address: "a.b.c.d"}] ] } ] }'
You can try it using one of the examples of the hackfest (packages: hackfest_multivdu_vnf, hackfest_multivdu_ns); images: ubuntu20.04) in the following way:
osm ns-create --ns_name hf-multivdu --nsd_name hackfest_multivdu-ns --vim_account openstack1 --config '{vnf: [ {member-vnf-index: vnf1, internal-vld: [ {name: internal, ip-profile: {ip-version: ipv4, subnet-address: "192.168.100.0/24", gateway-address: "0.0.0.0", dns-server: [{address: "8.8.8.8"}] ,dhcp-params: {count: 100, start-address: "192.168.100.20", enabled: true}}, internal-connection-point: [{id-ref: mgmtVM-internal, ip-address: "192.168.100.3"}]}]}]}'
5.3.6.2. Specify MAC address for an interface
In this scenario, the mapping can be specified in the following way, where "1" is the member vnf index of the constituent vnf in the NS descriptor, id1 is the id of VDU in the VNF descriptor and interf1 is the name of the interface to which you want to add the MAC address:
--config '{vnf: [ {member-vnf-index: "1", vdu: [ {id: id1, interface: [{name: interf1, mac-address: "aa:bb:cc:dd:ee:ff" }]} ] } ] } '
You can try it using one of the examples of the hackfest (packages: hackfest_basic_vnf, hackfest_basic_ns); images: ubuntu18.04) in the following way:
osm ns-create --ns_name hf-basic --nsd_name hackfest_basic-ns --vim_account openstack1 --config '{vnf: [ {member-vnf-index: vnf, vdu: [ {id: hackfest_basic-vnf, interface: [{name: vdu-eth0, mac-address: "52:33:44:55:66:21"}]} ] } ] } '
5.3.6.3. Specify IP address and MAC address for an interface
In the following scenario, we will bring together the two previous cases.
You can try it using one of the examples of the hackfest (packages: hackfest_multivdu_vnf, hackfest_multivdu_ns); images: ubuntu20.04) in the following way:
osm ns-create --ns_name hf-multivdu --nsd_name hackfest_multivdu-ns --vim_account openstack1 --config '{vnf: [ {member-vnf-index: vnf1, internal-vld: [ {name: internal , ip-profile: {ip-version: ipv4, subnet-address: "192.168.100.0/24", gateway-address: "0.0.0.0", dns-server: [{address: "8.8.8.8"}] , dhcp-params: {count: 100, start-address: "192.168.100.20", enabled: true} }, internal-connection-point: [ {id-ref: mgmtVM-internal, ip-address: "192.168.100.3"} ] }, ], vdu: [ {id: mgmtVM, interface: [{name: mgmtVM-eth0, mac-address: "52:33:44:55:66:21"}]} ] } ] } '
5.3.7. Force floating IP address for an interface
In a generic way, the mapping can be specified in the following way, where id1 is the name of the VDU in the VNF descriptor and interf1 is the name of the interface:
--config '{vnf: [ {member-vnf-index: vnf1, vdu: [ {id: id1, interface: [{name: interf1, floating-ip-required: True }]} ] } ] } '
You can try it using one of the examples of the hackfest (packages: hackfest_multivdu_vnf, hackfest_multivdu_ns); images: ubuntu20.04) in the following way:
osm ns-create --ns_name hf-multivdu --nsd_name hackfest_multivdu-ns --vim_account openstack1 --config '{vnf: [ {member-vnf-index: vnf1, vdu:[ {id: mgmtVM, interface: [{name: mgmtVM-eth0, floating-ip-required: True }]} ] } ] } '
Make sure that the target specified in vim-network-name of the NS Package is made available from outside to be able to use the parameter floating-ip-required.
5.3.8. Multi-site deployments (specifying different VIM accounts for different VNFs)
In this scenario, the mapping can be specified in the following way, where "1" and "2" are the member vnf index of the constituent vnfs in the NS descriptor, vim1 and vim2 are the names of vim accounts and netVIM1 and netVIM2 are the VIM networks that you want to use:
--config '{vnf: [ {member-vnf-index: vnf1, vim_account: vim1}, {member-vnf-index: vnf2, vim_account: vim2} ], vld: [ {name: datanet, vim-network-name: {vim1: netVIM1, vim2: netVIM2} } ] }'
You can try it using one of the examples of the hackfest (packages: hackfest_multivdu_vnf, hackfest_multivdu_ns); images: ubuntu20.04) in the following way:
osm ns-create --ns_name hf-multivdu --nsd_name hackfest_multivdu-ns --vim_account openstack1 --config '{vnf: [ {member-vnf-index: vnf1, vim_account: openstack1}, {member-vnf-index: "2", vim_account: openstack3} ], vld: [ {name: mgmtnet, vim-network-name: {openstack1: mgmt, openstack3: mgmt} } ] }'
5.3.9. Specifying a volume ID for a VNF volume
In a generic way, the mapping can be specified in the following way, where VM1 is the name of the VDU, Storage1 is the volume name in VNF descriptor and 05301095-d7ee-41dd-b520-e8ca08d18a55 is the volume id:
--config '{vnf: [ {member-vnf-index: vnf1, vdu: [ {id: VM1, volume: [ {name: Storage1, vim-volume-id: 05301095-d7ee-41dd-b520-e8ca08d18a55} ] } ] } ] }'
You can try it using one of the examples of the hackfest (packages: hackfest_basic_vnf, hackfest_basic_ns); images: ubuntu18.04) in the following way:
osm ns-create --ns_name hf-basic --nsd_name hackfest_basic-ns

With the previous hackfest example, according to [VNF data model](https://osm-download.etsi.org/repository/osm/debian/ReleaseEIGHTEEN/docs/osm-im/osm_im_trees/etsi-nfv-vnfd.html) you will add in VNF Descriptor:

```yaml
     volumes:
        - name: Storage1
          size: 'Size of the volume'
Then:
osm ns-create --ns_name hf-basic --nsd_name hackfest_basic-ns --vim_account openstack1 --config '{vnf: [ {member-vnf-index: vnf, vdu: [ {id: hackfest_basic-VM, volume: [ {name: Storage1, vim-volume-id: 8ab156fd-0f8e-4e01-b434-a0fce63ce1cf} ] } ] } ] }'
5.3.10. Adding additional parameters
Since OSM Release SIX, additional user parameters can be added, and they land at vdu:cloud-init (Jinja2 format) and/or vnf-configuration primitives (enclosed by <>). Here is an example of a VNF descriptor that uses two parameters called touch_filename and touch_filename2.
vnfd:
    ...
    vnf-configuration:
        config-primitive:
        -   name: touch
            parameter:
            -   data-type: STRING
                default-value: <touch_filename2>
                name: filename
        initial-config-primitive:
        -   name: config
            parameter:
            -   name: ssh-hostname
                value: <rw_mgmt_ip>  # this parameter is internal
            -   name: ssh-username
                value: ubuntu
            -   name: ssh-password
                value: osm4u
            seq: '1'
        -   name: touch
            parameter:
            -   name: filename
                value: <touch_filename>
            seq: '2'
And they can be provided with:
--config '{additionalParamsForVnf: [{member-vnf-index: vnf1, additionalParams: {touch_filename: your-value, touch_filename2: your-value2}}]}'
5.3.11. Specifying an affinity-or-anti affinity group
Affinity-or-anti-affinity groups may be defined in the VNF descriptor, in the df section, under affinity-or-anti-affinity-group.
The type may be affinity or anti-affinity, and the scope must be nfvi-node. VDU profiles may reference one of the defined affinity-or-anti-affinity-group. Notice that, in Openstack, only one group is allowed. The following example shows a VNF with two VDU, both assigned to the same affinity-group affinity-group-1. Both virtual machines will be then instantiated in the same host.
vnfd:
  description: A basic VNF descriptor w/ two VDUs and an affinity group
  df:
  - id: default-df
    instantiation-level:
    - id: default-instantiation-level
      vdu-level:
      - number-of-instances: 1
        vdu-id: affinity_basic-VM-1
      - number-of-instances: 1
        vdu-id: affinity_basic-VM-2
    vdu-profile:
    - id: affinity_basic-VM-1
      min-number-of-instances: 1
      affinity-or-anti-affinity-group:
      - id: affinity-group-1
    - id: affinity_basic-VM-2
      min-number-of-instances: 1
      affinity-or-anti-affinity-group:
      - id: affinity-group-1
    affinity-or-anti-affinity-group:
    - id: affinity-group-1
      type: affinity
      scope: nfvi-node
An existing server-group may be passed as an instantiation parameter to be used as affinity-or-anti-affinity-group. In this case, the server-group will not be created, but reused, and will not be deleted when the Network Service instance is deleted. The following example shows the syntax
--config '{additionalParamsForVnf: [{member-vnf-index: affinity-basic-1, affinity-or-anti-affinity-group: [{ id: affinity-group-1, "vim-affinity-group-id": "81b82372-bbd4-48d6-b368-4d0b9d04d592"}]}]}'
Where the id of the affinity-or-anti-affinity-group is the one in the descriptor, and the vim-affinity-group-id is the guid of the existing server-group in Openstack to be used (instead of being created).
5.3.12. Keeping Persistent Volumes
OSM supports three types of volumes: persistent, swap and ephemeral. Swap and ephemeral volumes are deleted together with the virtual machine.
Persistent volumes are used as an root disk or ordinary disk and could be kept in the Openstack Cloud environment upon virtual machine deletion by setting keep-volume flag true under vdu-storage-requirements in the VNFD. If the keep-volume is set to false or is not included in the descriptor, persistent volume is deleted together with virtual machine. A sample descriptor which keeps persistent volumes is given as follows:
vnfd:
  description: A basic VNF descriptor w/ one VDU and several volumes, keeping persistent volume
  df:
  - id: default-df
    instantiation-level:
    - id: default-instantiation-level
      vdu-level:
      - number-of-instances: 1
        vdu-id: keep-persistent-vol-VM
    vdu-profile:
    - id: keep-persistent-vol-VM
      min-number-of-instances: 1
  id: keep_persistent-volumes-vnf
  mgmt-cp: vnf-mgmt-ext
  product-name: keep_persistent-volumes-vnf
  vdu:
  - id: keep-persistent-vol-VM
    name: keep-persistent-vol-VM
    sw-image-desc: ubuntu20.04
    alternative-sw-image-desc:
    - ubuntu20.04-aws
    - ubuntu20.04-azure
    virtual-compute-desc: keep-persistent-vol-VM-compute
    virtual-storage-desc:
    - root-volume
    - persistent-volume
    - ephemeral-volume
  version: 1.0
  virtual-storage-desc:
  - id: root-volume
    type-of-storage: persistent-storage
    size-of-storage: 10
    vdu-storage-requirements:
      - key: keep-volume
        value: 'true'
  - id: persistent-volume
    type-of-storage: persistent-storage
    size-of-storage: 1
    vdu-storage-requirements:
      - key: keep-volume
        value: 'true'
  - id: ephemeral-volume
    type-of-storage: ephemeral-storage
    size-of-storage: 2
An existing persistent volume could be passed as an instantiation parameter by identifing the name of volume and vim-volume-id which is exact volume ID in the Openstack Cloud. vim-volume-id is only accepted as an instantiation parameter, it could not be provided in the descriptor. If the vim-volume-id is provided as a persistent volume, new persistent volume is not created, but reused. Existing volumes which are provided with vim-volume-id parameter are always kept without checking keep-volume flag, when the Network Service instance is deleted. The following example shows the syntax:
--config '{ vnf: [ {member-vnf-index: vnf-persistent-volumes, vdu: [ {id: keep-persistent-vol-VM, volume: [{"name": root-volume, vim-volume-id: 53c485d0-7f32-4675-919d-a3ccaf655629}, {"name": persistent-volume, vim-volume-id: 4391a6af-6e00-470c-960f-73213840431e}] } ] } ] }'
Where the name of the persistent-storage is the one in the descriptor, and the vim-volume-id is the ID of volume in Openstack to be used (instead of being created).
5.3.13. Creating a deployment with a multi-attach volume
OSM supports the usage of multi-attach volumes when working with multiples VDUs in the same deployment. This feature only works in the Openstack Cloud environment and needs to be activated beforehand. Using cinder, create the volume type multiattach and activate it using the following commands:
$ cinder type-create multiattach
$ cinder type-key multiattach set multiattach="<is> True"
Verify that the configuration was has been applied by using the following command:
$ cinder type-list
+--------------------------------------+-------------+---------------------+-----------+
| ID                                   | Name        | Description         | Is_Public |
+--------------------------------------+-------------+---------------------+-----------+
| b365d243-0c21-45e2-8e41-aa975c4bd78c | __DEFAULT__ | Default Volume Type | True      |
| fdbf0985-86ca-4691-a5ba-9acb752bfed4 | multiattach | -                   | True      |
+--------------------------------------+-------------+---------------------+-----------+
Now, build a descriptor according to this feature: set multiattach flag as true under vdu-storage-requirements in the VNFD, then, add the volume id to both vdu under virtual-storage-desc, so it will attach itself to both VMs. The following is an example of a descriptor which generates a multi-attach volume:
vnfd:
  description: A basic VNF descriptor w/ two VDU
  df:
  - id: default-df
    instantiation-level:
    - id: default-instantiation-level
      vdu-level:
      - number-of-instances: 1
        vdu-id: hackfest_basic-VM
      - number-of-instances: 1
        vdu-id: hackfest_basic-VM1
    vdu-profile:
    - id: hackfest_basic-VM
      min-number-of-instances: 1
      affinity-or-anti-affinity-group:
      - id: affinity-group-1
    - id: hackfest_basic-VM1
      min-number-of-instances: 1
      affinity-or-anti-affinity-group:
      - id: affinity-group-1
    affinity-or-anti-affinity-group:
    - id: affinity-group-1
      type: anti-affinity
      scope: nfvi-node
  ext-cpd:
  - id: vnf-cp0-ext
    int-cpd:
      cpd: vdu-eth0-int
      vdu-id: hackfest_basic-VM
  - id: vnf-cp1-ext
    int-cpd:
      cpd: vdu-eth0-int
      vdu-id: hackfest_basic-VM1
  id: hackfest_basic_multi-vnf
  mgmt-cp: vnf-cp0-ext
  product-name: hackfest_basic_multi-vnf
  sw-image-desc:
  - id: ubuntu18.04
    name: ubuntu18.04
    image: ubuntu18.04
  - id: ubuntu18.04-aws
    name: ubuntu18.04-aws
    image: ubuntu/images/hvm-ssd/ubuntu-artful-17.10-amd64-server-20180509
    vim-type: aws
  - id: ubuntu18.04-azure
    name: ubuntu18.04-azure
    image: Canonical:UbuntuServer:18.04-LTS:latest
    vim-type: azure
  - id: ubuntu18.04-gcp
    name: ubuntu18.04-gcp
    image: ubuntu-os-cloud:image-family:ubuntu-1804-lts
    vim-type: gcp
  vdu:
  - id: hackfest_basic-VM
    name: hackfest_basic-VM
    sw-image-desc: ubuntu18.04
    alternative-sw-image-desc:
    - ubuntu18.04-aws
    - ubuntu18.04-azure
    - ubuntu18.04-gcp
    virtual-compute-desc: hackfest_basic-VM-compute
    virtual-storage-desc:
    - root-volume
    - hackfest_basic-VM-storage
    int-cpd:
    - id: vdu-eth0-int
      virtual-network-interface-requirement:
      - name: vdu-eth0
        virtual-interface:
          type: PARAVIRT
  - cloud-init: |
        #cloud-config
        password: osmpass
        chpasswd: { expire: False }
        ssh_pwauth: True
    id: hackfest_basic-VM1
    name: hackfest_basic-VM1
    sw-image-desc: ubuntu18.04
    alternative-sw-image-desc:
    - ubuntu18.04-aws
    - ubuntu18.04-azure
    - ubuntu18.04-gcp
    virtual-compute-desc: hackfest_basic-VM-compute
    virtual-storage-desc:
    - root-volume
    - hackfest_basic-VM-storage
    int-cpd:
    - id: vdu-eth0-int
      virtual-network-interface-requirement:
      - name: vdu-eth0
        virtual-interface:
          type: PARAVIRT
  version: 1.0
  virtual-compute-desc:
  - id: hackfest_basic-VM-compute
    virtual-cpu:
      num-virtual-cpu: 1
    virtual-memory:
      size: 1.0
  virtual-storage-desc:
  - id: root-volume
    size-of-storage: 5
  - id: hackfest_basic-VM-storage
    type-of-storage: persistent-storage
    size-of-storage: 10
    vdu-storage-requirements:
    - key: multiattach
      value: true
In this case, the volume hackfest_basic-VM-storage will be created under the name shared-{virtual-storage-desc.id}-vnf and will be the shared between both VMs. To check if it worked, run the openstack volume list and check if it is multi-attached to both VDUs.
+--------------------------------------+-----------------------------------------------------------+-----------+------+-------------------------------------------------------------------------------------------------------------------------+
| ID                                   | Name                                                      | Status    | Size | Attached to                                                                                                             |
+--------------------------------------+-----------------------------------------------------------+-----------+------+-------------------------------------------------------------------------------------------------------------------------+
| 91bf5674-5b85-41d1-aa3b-4848e2691088 | shared-hackfest_basic-VM-storage-hackfest_basic_multi-vnf | in-use    |   10 | Attached to multi_test-vnf-hackfest_basic-VM1-0 on /dev/vdb Attached to multi_test-vnf-hackfest_basic-VM-0 on /dev/vdb  |
+--------------------------------------+-----------------------------------------------------------+-----------+------+-------------------------------------------------------------------------------------------------------------------------+
It is possible to add the the flag keep-volume so the volume will stay on Openstack after deleting the VM. Add the key in the vdu-storage-requirements to make it work:
vdu-storage-requirements:
- key: multiattach
  value: true
- key: keep-volume
  value: true
If the value for the keep-volume key is set to false, or if the key does not exist, the volume will be deleted from OpenStack along with the VMs when the NS (Network Service) is deleted.
5.3.14. Using existing flavors (OpenStack only)
Typically, OSM creates the flavors needed by the VDUs, which are specified by the virtual-compute-desc parameter in the VNFD. In some cases, flavors must contain a complex EPA configuration that is not supported by descriptors, so they need to be created manually in the VIM beforehand.
An existing flavor can be used by passing it’s ID to vim-flavor-id at the VDU level. The following example shows the syntax:
--config '{vnf: [ {member-vnf-index: "vnf", vdu: [ {id: hackfest_basic-VM, vim-flavor-id: "O1.medium" } ] } ] }'
5.4. Understanding Day-1 and Day-2 Operations
VNF configuration is done in three “days”:
Day-0: The machine gets ready to be managed (e.g. import ssh-keys, create users/pass, network configuration, etc.)
Day-1: The machine gets configured for providing services (e.g.: Install packages, edit config files, execute commands, etc.)
Day-2: The machine configuration and management is updated (e.g.: Do on-demand actions, like dump logs, backup databases, update users etc.)
In OSM, Day-0 is usually covered by cloud-init, as it just implies basic configurations.
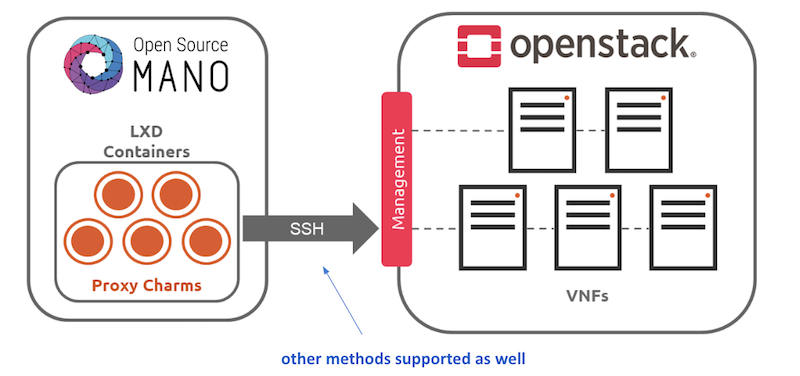
Day-1 and Day-2 are both managed by the VCA (VNF Configuration & Abstraction) module, which consists of a Juju Controller that interacts with VNFs through “charms”, a generic set of scripts for deploying and operating software which can be adapted to any use case.
There are two types of charms:
Native charms: the set of scripts run inside the VNF components.
Proxy charms: the set of scripts run in LXC containers in an OSM-managed machine (which could be where OSM resides), which use ssh or other methods to get into the VNF instances and configure them.
These charms can run with three scopes:
VDU: running a per-vdu charm, with individual actions for each.
VNF: running globally for the VNF, for the management VDU that represents it.
NS: running for the whole NS, after VNFs have been configured, to handle interactions between them.
Depending on the scope of charms, the charm application naming differs:
The VNF level charm application name is prepared by combining the relevant execution environment name and vnf-profile-id.
The VDU level charm application name includes vdu-profile-id as an identifier together with the relevant execution environment name and vnf-profile-id that it belongs.
The NS level charm application name is identified with the charm name.
The structure of charm application name makes the charm more apparent. Besides, it makes the VDU/KDU more visible by looking through the related charm. The structure of charm application names which are limited with 50 characters, are described below according to scope of charms:
NS level: <charm-name>-ns
VNF level: <ee-name>-z<vnf-ordinal-scale-number>-<vnf-profile-id>-vnf
VDU level: <ee-name>-z<vnf-ordinal-scale-number>-<vnf-profile-id>-<vdu-profile-id>-z<vdu-ordinal-scale-number>-vdu
For detailed instructions on how to add cloud-init or charms to your VNF, visit the following references:
5.5. Monitoring and autoscaling
5.5.1. Performance Management
5.5.1.1. VNF performance management
OSM automatically monitors the status of every VM running in the VIM account. In addition, OSM can collect VM resource consumption metrics such as CPU usage, memory usage, disk usage, and I/O packet rates. For resource consumption metrics to be collected, your VIM must support a Telemetry system. Currently, the collection of VM resource consumption metrics in OSM works with:
OpenStack telemetry services: VIM-legacy (ceilometer-based), Gnocchi-based or Prometheus.
Microsoft Azure.
Google Cloud Platform.
VMware vCloud Director with vRealizeOperations.
Next step is to activate metrics collection at your VNFDs. Every metric to be collected from the VIM for each VDU has to be described both at the VDU level, and then at the VNF level. For example:
vdu:
   id: hackfest_basic_metrics-VM
  ...
    monitoring-parameter:
    - id: vnf_cpu_util
      name: vnf_cpu_util
      performance-metric: cpu_utilization
    - id: vnf_memory_util
      name: vnf_memory_util
      performance-metric: average_memory_utilization
    - id: vnf_packets_sent
      name: vnf_packets_sent
      performance-metric: packets_sent
    - id: vnf_packets_received
      name: vnf_packets_received
      performance-metric: packets_received
As you can see, a list of “NFVI metrics” is defined first at the VDU level, which contains an ID and the corresponding normalized metric name (in this case, cpu_utilization and average_memory_utilization). Normalized metric names are: cpu_utilization, average_memory_utilization, disk_read_ops, disk_write_ops, disk_read_bytes, disk_write_bytes, packets_received, packets_sent, packets_out_dropped, packets_in_dropped
Not all metrics can be collected from all types of VIMs, the following table shows which metrics are supported by each type of VIM:
| Metric | Openstack | Azure | GCP |
|---|---|---|---|
| cpu_utilization | X | X | X |
| average_memory_utilization | X | X | |
| disk_read_ops | X | X | X |
| disk_write_ops | X | X | X |
| disk_read_bytes | X | X | X |
| disk_write_bytes | X | X | X |
| packets_in_dropped | X | ||
| packets_out_dropped | X | ||
| packets_received | X | X | |
| packets_sent | X | X |
Available attributes and values can be directly explored at the OSM Information Model. A complete VNFD example can be downloaded from here.
5.5.1.1.1. VMware vCD specific notes (OLD)
Since REL6 onwards, MON collects all the normalized metrics, with the following exceptions:
packets_in_droppedis not available and will always return 0.packets_receivedcannot be measured. Instead the number of bytes received for all interfaces is returned.packets_sentcannot be measured. Instead the number of bytes sent for all interfaces is returned.
The rolling average for vROPS metrics is always 5 minutes. The collection interval is also 5 minutes, and can be changed, however, it will still report the rolling average for the past 5 minutes, just updated according to the collection interval. See https://kb.vmware.com/s/article/67792 for more information.
Although it is not recommended, if a more frequent interval is desired, the following procedure can be used to change the collection interval:
Log into vROPS as an admin.
Navigate to Administration and expand Configuration.
Select Inventory Explorer.
Expand the Adapter Instances and select vCenter Server.
Edit the vCenter Server instance and expand the Advanced Settings.
Edit the Collection Interval (Minutes) value and set to the desired value.
Click OK to save the change.
5.5.1.2. Infrastructure Status Collection
OSM MON collects, automatically, “status metrics” for:
VIMs - each VIM that OSM establishes contact with, the metric will be reflected with the name
osm_vim_statusin the TSDB.VMs - VMs for each VDU that OSM has instantiated, the metric will be reflected with the name
osm_vm_statusin the TSDB.
Metrics will be “1” or “0” depending on the element availability.
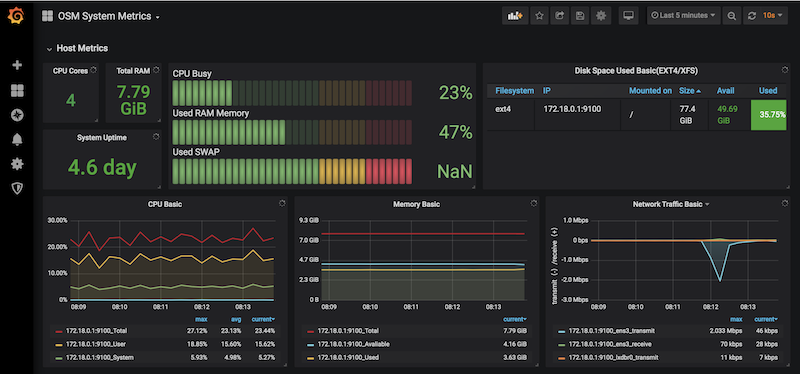
5.5.1.3. System Metrics
OSM collects system-wide metrics directly using Prometheus exporters. The way these metrics are collected is highly dependant on how OSM was installed:
| OSM on Kubernetes | OSM on Docker Swarm | |
|---|---|---|
| Components | Prometheus Operator Chart / Other charts: MongoDB, MySQL and Kafka exporters | Node exporter / CAdvisor exporter |
| Implements | Multiple Grafana dashboards for a comprehensive health check of the system. | Single Grafana dashboard with the most important system metrics. |
The name with which these metrics are stored in Prometheus also depends on the installation, so Grafana Dashboards will be available by default, already showing these metrics. Please note that the K8 installation requires the optional Monitoring stack.
5.5.1.4. Retrieving OSM metrics from Prometheus TSDB
Once the metrics are being collected, they are stored in the Prometheus Time-Series DB with an ‘osm_’ prefix, and there are a number of ways in which you can retrieve them.
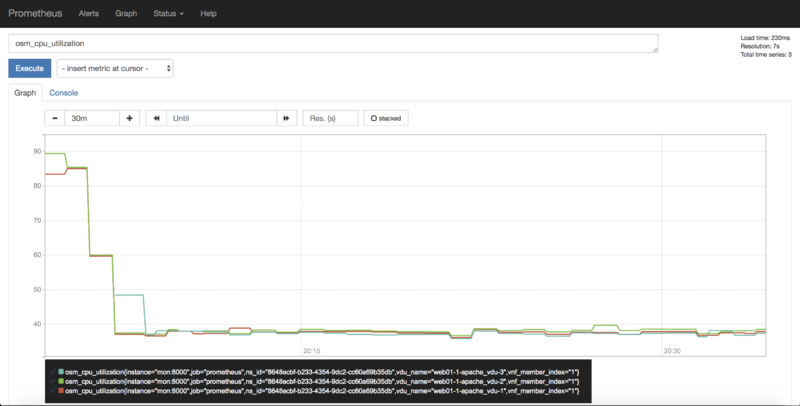
5.5.1.4.1. 1) Visualizing metrics in Prometheus UI
Prometheus TSDB includes its own UI, which you can visit at http://[OSM_IP]:9091.
From there, you can:
Type any metric name (i.e.
osm_cpu_utilization) in the ‘expression’ field and see its current value or a histogram.Visit the Status –> Target menu, to monitor the connection status between Prometheus and MON (through
mon-exporter)
5.5.1.4.2. 2) Visualizing metrics in Grafana
Starting in Release 7, OSM includes by default its own Grafana installation (deprecating the former experimental pm_stack)
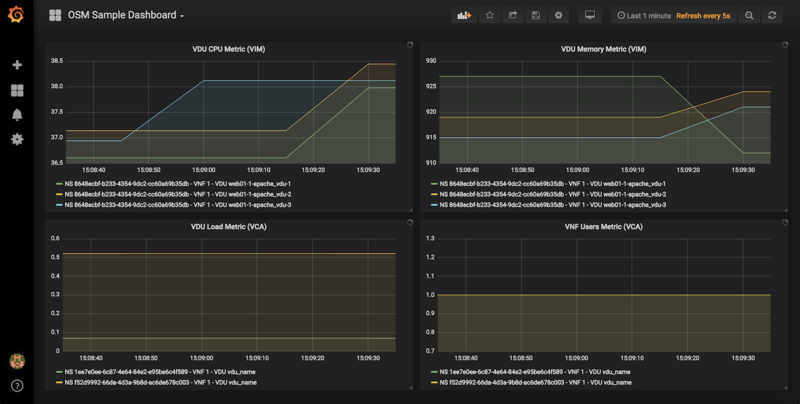
Access Grafana with its default credentials (admin / admin) at http://[OSM_IP_address]:3000 and by clicking the ‘Manage’ option at the ‘Dashboards’ menu (to the left), you will find a sample dashboard containing two graphs for VIM metrics, and two graphs for VNF metrics. You can easily change them or add more, as desired.
5.5.1.4.2.1. Dashboard Automation
Starting in Release 7, Grafana Dashboards are created by default in OSM. This is done by the “dahboarder” service in MON, which provisions Grafana following changes in the common DB.
| Updates in | Automates these dashboards |
|---|---|
| OSM installation | System Metrics, Admin Project-scoped |
| OSM Projects | Project-scoped |
| OSM Network Services | NS-scoped sample dashboard |
5.5.1.4.3. 3) Querying metrics through OSM SOL005-based NBI
For collecting metrics through the NBI, the following URL format should be followed:
https://<host-ip>:<nbi-port>/osm/nspm/v1/pm_jobs/<project-id>/reports/<network-service-id>
Where:
<host-ip>: Is the machine where OSM is installed.<nbi-port>: The NBI port, i.e. 9999<project-id>: Currently it can be any string.<network-service-id>: It is the NS ID got after instantiation of network service.
Please note that a token should be obtained first in order to query a metric. More information on this can be found in the OSM NBI Documentation
In response, you would get a list of the available VNF metrics, for example:
   performanceMetric: osm_cpu_utilization
   performanceValue:
       performanceValue:
           performanceValue: '0.9563615332000001'
           vduName: test_fet7912-2-ubuntuvnf2vdu1-1
           vnfMemberIndex: '2'
       timestamp: 1568977549.065
5.5.1.4.4. 4) Interacting with Prometheus directly through its API
The Prometheus HTTP API is always directly available to gather any metrics. A couple of examples are shown below:
Example with Date range query
curl 'http://localhost:9091/api/v1/query_range?query=osm_cpu_utilization&start=2018-12-03T14:10:00.000Z&end=2018-12-03T14:20:00.000Z&step=15s'
Example with Instant query
curl 'http://localhost:9091/api/v1/query?query=osm_cpu_utilization&time=2018-12-03T14:14:00.000Z'
Further examples and API calls can be found at the Prometheus HTTP API documentation.
5.5.1.4.5. 5) Interacting directly with MON Collector
The way Prometheus TSDB stores metrics is by querying Prometheus ‘exporters’ periodically, which are set as ‘targets’. Exporters expose current metrics in a specific format that Prometheus can understand, more information can be found here
OSM MON features a “mon-exporter” module that exports current metrics through port 8000. Please note that this port is by default not being exposed outside the OSM docker’s network.
A tool that understands Prometheus ‘exporters’ (for example, Elastic Metricbeat) can be plugged-in to integrate directly with “mon-exporter”. To get an idea on how metrics look alike in this particular format, you could:
5.5.1.4.5.1. 1. Get into MON console
docker exec -ti osm_mon.1.[id] bash
5.5.1.4.5.2. 2. Install curl
apt -y install curl
5.5.1.4.5.3. 3. Use curl to get the current metrics list
curl localhost:8000
Please note that as long as the Prometheus container is up, it will continue retrieving and storing metrics in addition to any other tool/DB you connect to mon-exporter.
5.5.1.4.6. 6) Using your own TSDB
OSM MON integrates Prometheus through a plugin/backend model, so if desired, other backends can be developed. If interested in contributing with such option, you can ask for details at our Slack #service-assurance channel or through the OSM Tech mailing list.
5.5.2. Fault Management
Reference diagram:
5.5.2.1. Basic functionality
5.5.2.1.1. Logs & Events
Logs can be monitored on a per-container basis via command line, like this:
docker logs <container id or name>
For example:
docker logs osm_lcm.1.tkb8yr6v762d28ird0edkunlv
Logs can also be found in the corresponding volume of the host filesystem: /var/lib/containers/[container-id]/[container-id].json.log
Furthermore, there are some important events flowing between components through the Kafka bus, which can be monitored on a per-topic basis by external tools.
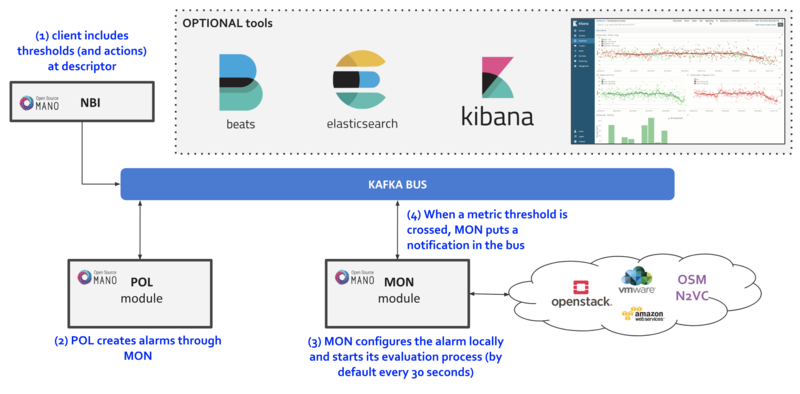
5.5.2.1.2. Alarm Manager for Metrics
As of Release FIVE, MON includes a new module called ‘mon-evaluator’. The only use case supported today by this module is the configuration of alarms and evaluation of thresholds related to metrics, for the Policy Manager module (POL) to take actions such as auto-scaling.
Whenever a threshold is crossed and an alarm is triggered, the notification is generated by MON and put in the Kafka bus so other components, like POL can consume them. This event is today logged by both MON (generates notification) and POL (consumes notification, for its auto-scaling or webhook actions)
By default, threshold evaluation occurs every 30 seconds. This value can be changed by setting an environment variable, for example:
docker service update --env-add OSMMON_EVALUATOR_INTERVAL=15 osm_mon
To configure alarms that send webhooks to a web service, add the following to the VNF descriptor:
vdu:
-   alarm:
    -   alarm-id: alarm-1
        operation: LT
        value: 20
        actions:
          alarm:
            - url: https://webhook.site/1111
          ok:
            - url: https://webhook.site/2222
          insufficient-data:
            - url: https://webhook.site/3333
        vnf-monitoring-param-ref: vnf_cpu_util
Regarding how to configure alarms through VNFDs for the auto-scaling use case, follow the auto-scaling documentation
5.5.3. Autoscaling
5.5.3.1. Reference diagram
The following diagram summarizes the feature:
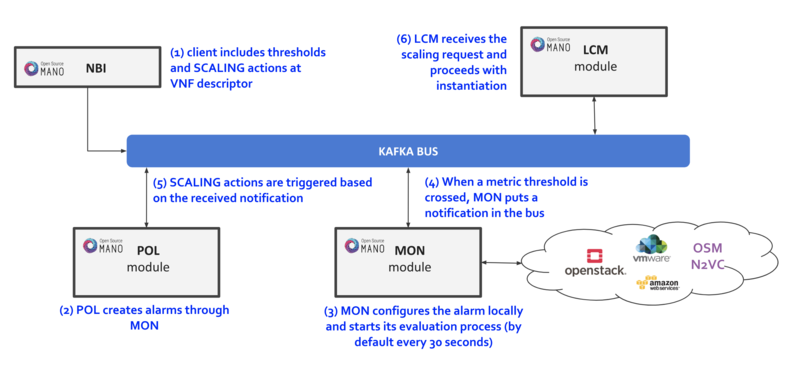
Scaling descriptors can be included and be tied to automatic reaction to VIM/VNF metric thresholds.
Supported metrics are both VIM and VNF metrics. More information about metrics collection can be found at the Performance Management documentation
An internal alarm manager has been added to MON through the ‘mon-evaluator’ module, so that both VIM and VNF metrics can also trigger threshold-violation alarms and scaling actions. More information about this module can be found at the Fault Management documentation
5.5.3.2. Scaling Descriptor
The scaling descriptor is part of a VNFD. Like the example below shows, it mainly specifies:
An existing metric to be monitored, which should be pre-defined in the monitoring-param list (
vnf-monitoring-param-ref).The VDU to be scaled (
aspect-delta-details:deltas:vdu-delta:id) and the amount of instances to scale per event (number-of-instances)The thresholds to monitor (
scale-in/out-threshold)The VDU’s (
vdu-profile:id) minimum and maximum amount of scaled instances to produceThe minimum time it should pass between scaling operations (
cooldown-time)The minimum amount of scaled instances to produce (
max-scale-level)
    scaling-aspect:
    - aspect-delta-details:
        deltas:
        - id: vdu_autoscale-delta
          vdu-delta:
          - id: hackfest_basic_metrics-VM
            number-of-instances: 1
      id: vdu_autoscale
      max-scale-level: 1
      name: vdu_autoscale
      scaling-policy:
      - cooldown-time: 5
        name: cpu_util_above_threshold
        scaling-criteria:
        - name: cpu_util_above_threshold
          scale-in-relational-operation: LT
          scale-in-threshold: 10
          scale-out-relational-operation: GT
          scale-out-threshold: 60
          vnf-monitoring-param-ref: vnf_cpu_util
        scaling-type: automatic
        threshold-time: 1
    vdu-profile:
    - id: hackfest_basic_metrics-VM
      max-number-of-instances: 2
      min-number-of-instances: 1
5.5.3.3. How to enable/disable autoscaling
With the previous SA architecture based on POL and MON, it is possible to enable/disable autoscaling by patching the POL deployment in kubernetes:
The steps are given below:
To enable the autoscaling feature, modify the env
OSMPOL_AUTOSCALE_ENABLEDtoTrueinpoldeployment:kubectl -n osm edit deployment pol
OSMPOL_AUTOSCALE_ENABLED: True
To disable the autoscaling feature, modify the env
OSMPOL_AUTOSCALE_ENABLEDtoFalseinpoldeployment:kubectl -n osm edit deployment pol
OSMPOL_AUTOSCALE_ENABLED: False
With the new architecture, Airflow DAGs for scaling can be selectively disabled in Airflow UI by pressing the toggle next to the DAG to pause/unpause it:
scalein_vdu, to enable/disable auto-scale-inscaleout_vdu, to enable/disable auto-scale-out
5.5.3.4. Example
This will launch a Network Service formed by an HAProxy load balancer and an (autoscalable) Apache web server. Please check:
Your VIM has an accesible ‘public’ network and a management network (in this case called “PUBLIC” and “vnf-mgmt”)
Your VIM has the ‘haproxy_ubuntu’ and ‘apache_ubuntu’ images, which can be found here
Get the descriptors:
git clone --recursive https://osm.etsi.org/gitlab/vnf-onboarding/osm-packages.git
Onboard them:
cd osm-packages
osm vnfd-create wiki_webserver_autoscale_vnfd
osm nsd-create wiki_webserver_autoscale_nsd
Launch the NS:
osm ns-create --ns_name web01 --nsd_name wiki_webserver_autoscale_ns --vim_account <VIM_ACCOUNT_NAME>|<VIM_ACCOUNT_ID>
osm ns-list
osm ns-show web01
Testing:
To ensure the NS is working, visit the Load balancer’s IP at the public network using a browser, the page should show an OSM logo and active VDUs.
To check metrics at Prometheus, visit
http://[OSM_IP]:9091and look forosm_cpu_utilizationandosm_average_memory_utilization(initial values could take some some minutes depending on your telemetry system’s granularity).To check metrics at Grafana, just visit
http://[OSM_IP]:3000(admin/admin), you will find a sample dashboard (the two top charts correspond to this example).To increase CPU in this example to auto-scale the web server, install Apache Bench in a client within reach (could be the OSM host) and run it towards
test.php.
sudo apt install apache2-utils
ab -n 5000000 -c 2 http://<load-balancer-ip>/test.php
# Can also be run in the HAproxy machine.
ab -n 10000000 -c 1000 http://<Private IP of Apache webserver>:8080/
# This will stress CPU to 100% and trigger a scale-out operation in POL.
# In this test, scaling will usually go up to 3 web servers before HAProxy spreads to load to reach a normal CPU level (w/ 60s granularity, 180s cooldown)
If HA proxy is not started
service haproxy status
sudo service haproxy restart
Any of the VMs can be accessed through SSH (credential: ubuntu/osm2021) to further monitor (with htop, for example), and there is an HAProxy UI at port http://[HAProxy_IP]:32700 (credential: osm/osm2018)
5.5.4. Autohealing
5.5.4.1. Reference diagram
The following diagram summarizes the feature:
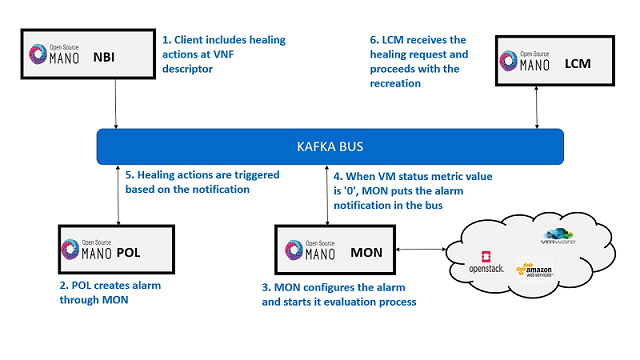
Healing descriptors can be included and be tied to automatic reaction to VM metric thresholds.
An internal alarm manager has been added to MON through the ‘mon-evaluator’ module, so VM metrics can trigger threshold-violation alarms when VM is in
ERROR/DELETEstate and perform healing actions.
5.5.4.2. Healing Descriptor
The healing descriptor is part of a VNFD. Like the example below shows, it mainly specifies:
The VDU to be healed (
healing-policy:vdu-id)The healing recovery option (
action-on-recovery)The minimum time it should pass between healing operations (
cooldown-time)To run day1 primitives for VDU (
day1)
healing-aspect:
-   id: autoheal_vnfd-VM_autoheal
    healing-policy:
    - vdu-id: autoheal_vnfd-VM
      event-name: heal-alarm
      recovery-type: automatic
      action-on-recovery: REDEPLOY_ONLY
      cooldown-time: 180
      day1: false
5.5.4.3. Example
Get the descriptors:
git clone --recursive https://osm.etsi.org/gitlab/vnf-onboarding/osm-packages.git
Onboard them:
cd osm-packages
osm vnfpkg-create autoheal_vnf
osm nspkg-create autoheal_ns
Launch the NS:
osm ns-create --ns_name heal --nsd_name autoheal_nsd --vim_account <VIM_ACCOUNT_NAME>|<VIM_ACCOUNT_ID>
osm ns-list
osm ns-show heal
5.5.4.4. How to enable/disable autohealing
With the previous SA architecture, it is possible to enable/disable autohealing by patching the POL deployment in kubernetes:
The steps are given below:
To enable the autohealing feature
change the env
OSMPOL_AUTOHEAL_ENABLEDtoTruein devops dockerfile.To enable during runtime, in pol deployment file modify the env
OSMPOL_AUTOHEAL_ENABLEDtoTrue.kubectl -n osm edit deployment pol
   - env:
       - name: OSMPOL_AUTOHEAL_ENABLED
         value: True
To disable the autohealing feature
change the env
OSMPOL_AUTOHEAL_ENABLEDtoFalsein devops dockerfile.To disable during runtime, in pol deployment file modify the env
OSMPOL_AUTOHEAL_ENABLEDtoFalse.kubectl -n osm edit deployment pol
   - env:
       - name: OSMPOL_AUTOHEAL_ENABLED
         value: False
With the new architecture, Airflow DAGs for healing can be selectively disabled in Airflow UI by pressing the toggle next to the DAG to pause/unpause it:
- vdu_down, to enable/disable auto-heal
5.5.4.5. Testing:
To ensure NS is instantiated successfully, check metrics at Prometheus, visit
http://[OSM_IP]:9091and look forosm_vm_status. Metric value should be ‘1’.Run the following openstack commands to induce and error or delete a VM:
# To test healing in error state, induce error state in vm
openstack server set --state error <server-id>
# To test healing in deleted state, delete the vm
openstack server delete <server-id>
Check metrics at Prometheus, visit
http://[OSM_IP]:9091and look forosm_vm_status. Metric value should be ‘0’.Heal operation will be triggered at POL and VM respawn will happen.
5.6. How to deploy Network Slices
In order to illustrate better how network slicing works in OSM, it will be discussed in the context of a running example.
5.6.1. Resources
This example of use network slicing requires a set of resources (VNFs, NSs, NSTs) that are available in the following Gitlab osm-packages repository:
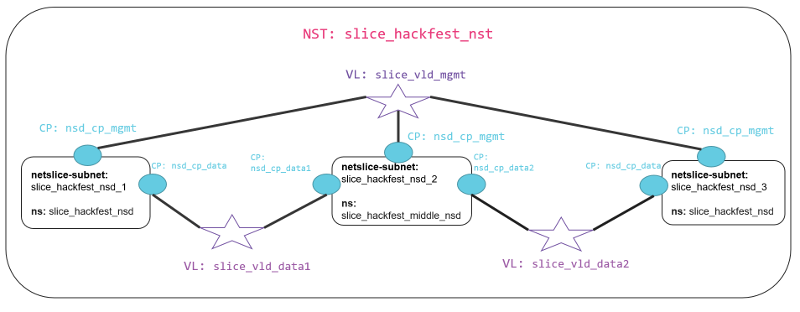
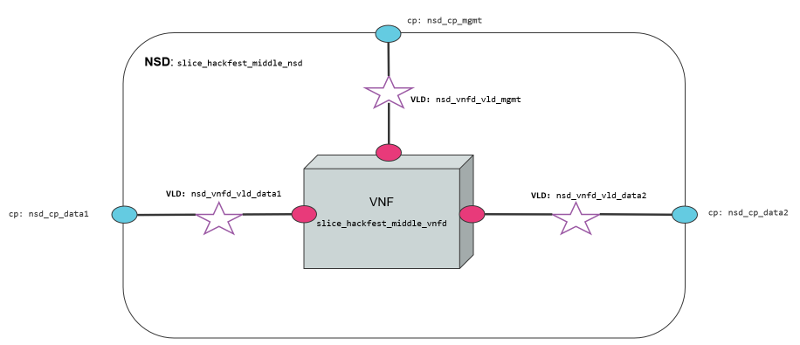
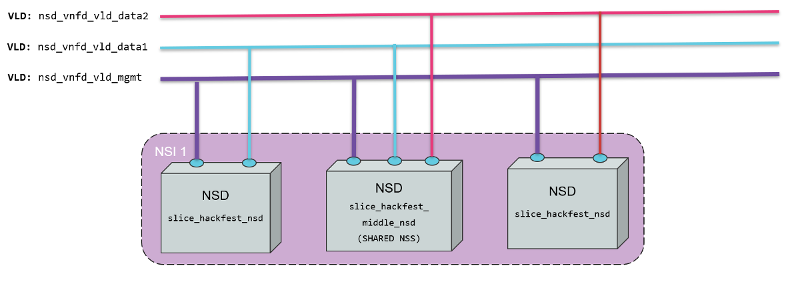
5.6.2. Network Slice Template Diagram
The diagram below shows the Network Slice Template created for the example. As is shown in the picture, three network slice subnets are connected by Virtual Links Descriptors (VLDs) through the connection points of the network services. We have a Virtual Link for management slice_vld_mgmt and two Virtual links for data, slice_vld_data1 and slice_vld_data2. In the middle, we have a network-slice-subnet that interconnects the Netslice subnets we have on both sides.
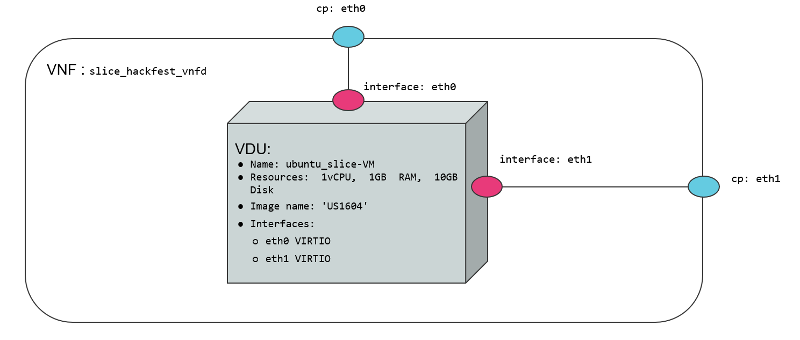
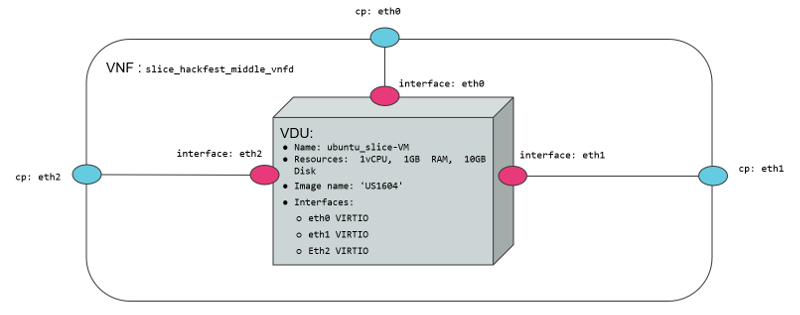
5.6.2.1. Virtual Network Functions
We use two VNFs for this example. The difference between them is the number of network interfaces to create connections. While the slice_basic_vnf has two interfaces(mgmt, data), the slice_basic_middle_vnf VNF have three interfaces (mgmt, data1, data2). The specifications vCPU (1), RAM (1GB), disk (10GB), and image-name (’ubuntu18.04’) are the same in both VNFs.
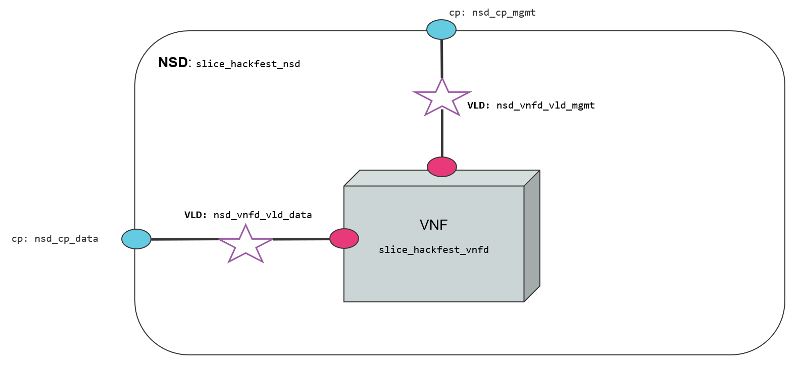
5.6.2.2. Network Services
We use two network services in this example. They are differentiated by 1) the number of interfaces that posses, 2) the VNF contained inside the Network service, 3) the NS slice_hackfest_nsd have two VLDs, one for data and other for management 4) the slice_hackfest_middle_nsd has three VLDs, one for management and the other two for data1 and data2.
The slice_basic_middle_ns has inside the slice_basic_middle_vnf and the slice_basic_ns has the vnf slice_basic_vnf.
The diagram below shows the slice_basic_ns and slice_basic_middle_ns, its connection points, VLDs and VNFs.
5.6.3. Creating a Network Slice Template (NST)
Based on the OSM information model for Network slice templates here it is possible to start writing the YAML descriptor for the NST.
nst:
-   id: slice_basic_nst
    name: slice_basic_nst
    SNSSAI-identifier:
        slice-service-type: eMBB
    quality-of-service:
        id: 1
The snippet above contains the mandatory fields for the NST. Additionally, we can find the description below of the netslice-subnet and netslice-vld sections. When we create an NST, the id references the Network Slice Template, and the name is the name set to the NST. Additionally, the required parameter SNSSAI-identifier is a reference to which kind of service is inside this slice. In OSM we have three types of slice-service-type. Enhanced mobile broadband (eMBB), Ultra-reliable low-latency communications (URLLC) or massive machine type communications (mMTC). Moreover, we add a quality-of-service parameter that is related to the 5G QoS Indicator (5QI).
The section netslice-subnet shown below is the place to allocate the network services that compose the slice. Each item of the netslice-subnet list has:
An
idto identify the netslice-subnet.The option
is-shared-nssis a boolean flag to determine if the NSS is shared among Network Slice Instances that use this Netslice Subnet.An optional
description.The
nsd-refis the reference to the Network Service descriptor that forms the netslice subnet.
    netslice-subnet:
    -   id: slice_basic_nsd_1
        is-shared-nss: false
        description: NetSlice Subnet (service) composed by 1 vnf with 2 cp
        nsd-ref: slice_basic_ns
    -   id: slice_basic_nsd_2
        is-shared-nss: true
        description: NetSlice Subnet (service) composed by 1 vnf with 3 cp
        nsd-ref: slice_basic_middle_ns
    -   id: slice_basic_nsd_3
        is-shared-nss: false
        description: NetSlice Subnet (service) composed by 1 vnf with 2 cp
        nsd-ref: slice_basic_ns
Finally, it is defined the connections among the netslice-subnets in section netslice-vld as is shown below:
    netslice-vld:
    -   id: slice_vld_mgmt
        name: slice_vld_mgmt
        type: ELAN
        mgmt-network: true
        nss-connection-point-ref:
        -   nss-ref: slice_basic_nsd_1
            nsd-connection-point-ref: nsd_cp_mgmt
        -   nss-ref: slice_basic_nsd_2
            nsd-connection-point-ref: nsd_cp_mgmt
        -   nss-ref: slice_basic_nsd_3
            nsd-connection-point-ref: nsd_cp_mgmt
    -   id: slice_vld_data1
        name: slice_vld_data1
        type: ELAN
        nss-connection-point-ref:
        -   nss-ref: slice_basic_nsd_1
            nsd-connection-point-ref: nsd_cp_data
        -   nss-ref: slice_basic_nsd_2
            nsd-connection-point-ref: nsd_cp_data1
    -   id: slice_vld_data2
        name: slice_vld_data2
        type: ELAN
        nss-connection-point-ref:
        -   nss-ref: slice_basic_nsd_2
            nsd-connection-point-ref: nsd_cp_data2
        -   nss-ref: slice_basic_nsd_3
            nsd-connection-point-ref: nsd_cp_data
Having the network slice template ready is needed to onboard the resources to the OSM before upload the network slice template. The following commands help you to onboard packages to OSM:
VNF package:
List Virtual Network Functions Descriptors
osm nfpkg-list
Upload the slice_basic_vnf package
osm nfpkg-create slice_basic_vnf
Upload the slice_basic_middle_vnf package
osm nfpkg-create slice_basic_middle_vnf
Show if slice_basic_vnf was uploaded correctly to OSM
osm nfpkg-show slice_basic_vnf
Show if slice_basic_middle_vnf was uploaded correctly to OSM
osm nfpkg-show slice_basic_middle_vnf
NS package:
List Network Service Descriptors
osm nspkg-list
Upload the slice_basic_ns package
osm nspkg-create slice_basic_ns
Upload the slice_basic_middle_ns package
osm nspkg-create slice_basic_middle_ns
Show if slice_basic_ns was uploaded correctly to OSM
osm nsd-show slice_hackfest_nsd
Show if slice_basic_middle_ns was uploaded correctly to OSM
osm nsd-show slice_hackfest_middle_nsd
NST:
List network slice templates
osm nst-list
Upload the slice_basic_nst.yaml template
osm nst-create slice_basic_nst/slice_basic_nst.yaml
Upload the slice_basic_2nd_nst template
osm nst-create slice_basic_nst/slice_basic_2nd_nst.yaml
Show if slice_basic_nst.yaml was uploaded correctly to OSM
osm nst-show slice_basic_nst.yaml
Show if slice_basic_2nd_nst was uploaded correctly to OSM
osm nst-show slice_basic_2nd_nst
With all resources already available in OSM, it is possible to create the Network Slice Instance (NSI) using the slice_hackfest_nst. You can find below the help of the command to create a network slice instance:
osm nsi-create --help
Usage: osm nsi-create [OPTIONS]

  creates a new Network Slice Instance (NSI)

Options:
  --nsi_name TEXT     name of the Network Slice Instance
  --nst_name TEXT     name of the Network Slice Template
  --vim_account TEXT  default VIM account id or name for the deployment
  --ssh_keys TEXT     comma separated list of keys to inject to vnfs
  --config TEXT       Netslice specific yaml configuration:
                      netslice_subnet: [
                      id: TEXT, vim_account: TEXT,
                      vnf: [member-vnf-index: TEXT, vim_account: TEXT]
                      vld: [name: TEXT,
                            vim-network-name: TEXT or DICT with vim_account,
                            vim_net entries]
                      additionalParamsForNsi: {param: value, ...}
                      additionalParamsForsubnet: [{id: SUBNET_ID,
                      additionalParamsForNs: {},
                      additionalParamsForVnf: {}}]
                      ],
                      netslice-vld: [name: TEXT,
                      vim-network-name: TEXT or DICT with vim_account,
                      vim_net entries]
  --config_file TEXT  nsi specific yaml configuration file
  --wait              do not return the control immediately, but keep it
                      until the operation is completed, or timeout
  -h, --help          Show this message and exit.
To instantiate the network slice template use the following command:
osm nsi-create\
--nsi_name my_first_slice \
--nst_name slice_basic_nst \
--vim_account <replace_vim_account_name> \
--config 'netslice-vld: [{ "name": "slice_vld_mgmt", "vim-network-name": <replace_vim_external_network> }]'
Where:
--nsi-nameis the name of the Network Slice Instance:my_first_slice--nst-nameis the name of the Network Slice Template:slice_basic_nst--vim_accountis the default VIM account id or name to be used by the NSI--configis the configuration parameter used for the slice. For example, it is possible to attach the NS management network to an external network of the VIM to have access to the VNF deployed in the slice. In this case,netslice-vldlist, contains the name of the VLDslice_vld_mgmtused to attach the external network of the VIM byvim-network-namekey.
The commands to operate the slice are:
List Network Slice Instances
osm nsi-list
Delete Network Slice Instance
osm nsi-delete <nsi_name> or <nsi_id>
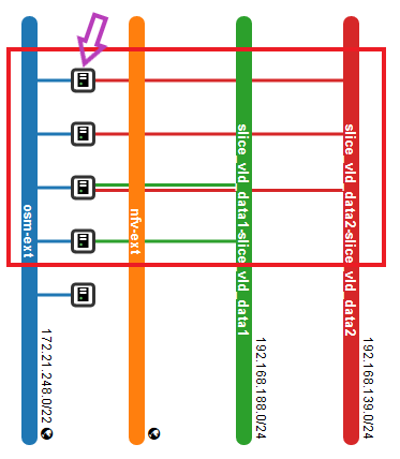
The result of the deployment in Openstack looks like:
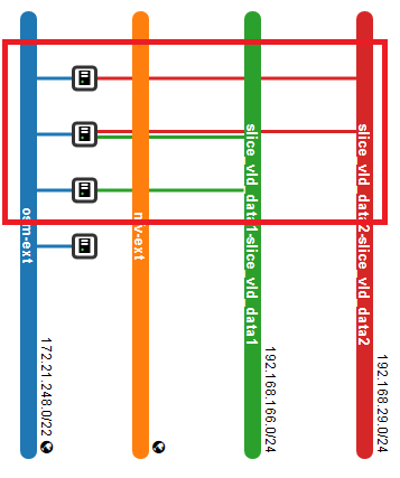
In the picture above, it is shown three VNFs deployed in OpenStack connected to management OpenStack network osm-ext and also connected among them, following the VLDs described in the network slice template.
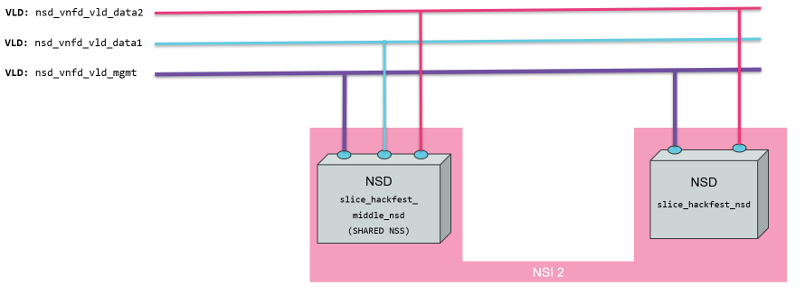
5.6.4. Sharing a Network Slice Subnet
To test the feature of sharing a network slice subnet, we create a new network slice template that uses the shared netslice subnet from the previous instantiation. The picture below shows the Network Slice Template.

The network slice template used for sharing a network slice subnet is slice_hackfest2_nst.yaml and it is available in the resources section.
nst:
-   id: slice_basic_nst2
    name: slice_basic_nst2
    SNSSAI-identifier:
        slice-service-type: eMBB
    quality-of-service:
        id: 1

    netslice-subnet:
    -   id: slice_basic_nsd_2
        is-shared-nss: true
        description: NetSlice Subnet (service) composed by 1 vnf with 3 cp
        nsd-ref: slice_basic_middle_ns
    -   id: slice_basic_nsd_3
        is-shared-nss: false
        description: NetSlice Subnet (service) composed by 1 vnf with 2 cp
        nsd-ref: slice_basic_ns

    netslice-vld:
    -   id: slice_vld_mgmt
        name: slice_vld_mgmt
        type: ELAN
        mgmt-network: true
        nss-connection-point-ref:
        -   nss-ref: slice_basic_nsd_2
            nsd-connection-point-ref: nsd_cp_mgmt
        -   nss-ref: slice_basic_nsd_3
            nsd-connection-point-ref: nsd_cp_mgmt
    -   id: slice_vld_data2
        name: slice_vld_data2
        type: ELAN
        nss-connection-point-ref:
        -   nss-ref: slice_basic_nsd_2
            nsd-connection-point-ref: nsd_cp_data2
        -   nss-ref: slice_basic_nsd_3
            nsd-connection-point-ref: nsd_cp_data
The YAML above contains two netslice-subnet, one with the flag is-shared-nss as true and the other one with the flag is-shared-nss as false. The netslice-vlds will connect the slice_basic_nsd_2 nss with management interface and data2 with the slice_basic_nsd_3 via nsd_cp_data.
To instantiate this network slice, we will use the same command used previously but changing the nst_name to slice_basic_2nd_nst:
osm nsi-create\
--nsi_name my_shared_slice \
--nst_name slice_basic_2nd_nst \
--vim_account <replace_vim_account_name> \
--config 'netslice-vld: [{ "name": "slice_vld_mgmt", "vim-network-name": <replace_vim_external_network> }]'
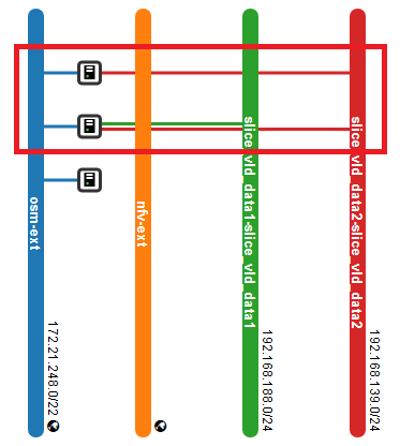
You can see the result of the instantiation in the picture below:
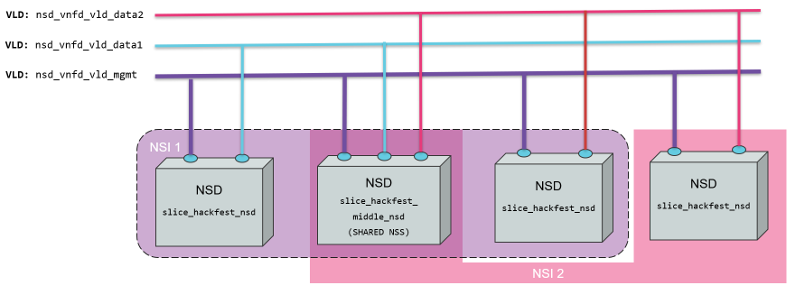
Only one Network Slice Subnet was instantiated since the middle Network Slice Subnet is shared with this second NSI.
5.6.4.1. Result of deleting the Network Slice Instance 1
What would happens with the shared Network Slice Subnet and the second Network Slice Instance if we delete the first Network Slice Instance?
With the command osm nsi-delete my_first_slice we can delete the first Network Slice Instance. The result is that the middle Network Slice Subnet (shared) belongs to the NSI2, and it is not deleted when NSI1 is deleted. All networks and services created for NSS middle are kept. In the picture below, is shown the result in Openstack and the logical result of the deletion of NSI1:
To remove the NSI2 run the command: osm nsi-delete my_shared_slice.
5.7. Using Kubernetes-based VNFs (KNFs)
OSM supports Kubernetes-based Network Functions (KNF). This feature unlocks more than 20.000 packages that can be deployed besides VNFs and PNFs. This section guides you to deploy your first KNF, from the installation of multiple ways of Kubernetes clusters until the selection of the package and deployment.
5.7.1. Kubernetes installation
KNFs feature requires an operative Kubernetes cluster. There are several ways to have that Kubernetes running. From the OSM perpective, the Kubernetes cluster is not an isolated element, but it is a technology that enables the deployment of microservices in a cloud-native way. To handle the networks and facilitate the conection to the infrastructure, the cluster have to be associated to a VIM. There is an special case where the Kubernetes cluster is installed in a baremetal environment without the management of the networking part but in general, OSM consider that the Kubernetes cluster is located in a VIM.
For OSM you can use one of these three different ways to install your Kubernetes cluster:
5.7.2. OSM Kubernetes requirements
After the Kubernetes installation is completed, you need to check if you have the following components in your cluster.
Kubernetes Loadbalancer: to expose your KNFs to the network
Kubernetes default Storageclass: to support persistent volumes.
5.7.3. Adding kubernetes cluster to OSM
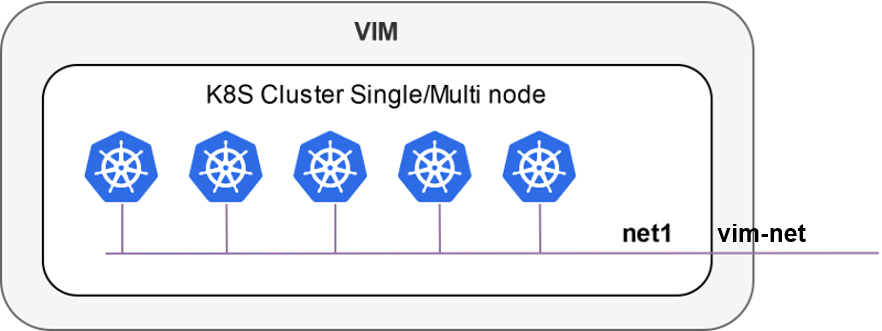
In order to test Kubernetes-based VNF (KNF), you require a K8s cluster, and that K8s cluster is expected to be connected to a VIM network. For that purpose, you will have to associate the cluster to a VIM target, which is the deployment target unit in OSM.
The following figures illustrate two scenarios where a K8s cluster might be connected to a network in the VIM (e.g. vim-net):
A K8s cluster running on VMs inside the VIM, where all VMs are connected to the VIM network
A K8s cluster running on baremetal and it is physically connected to the VIM network
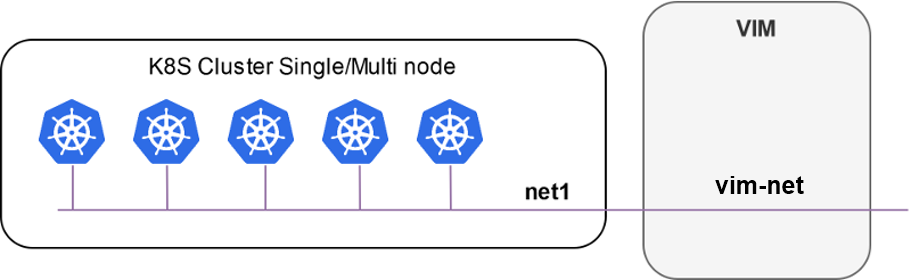
In order to add the K8s cluster to OSM, you can use these instructions:
osm k8scluster-add --creds clusters/kubeconfig-cluster.yaml --version '1.15' --vim <VIM_NAME|VIM_ID> --description "My K8s cluster" --k8s-nets '{"net1": "vim-net"}' cluster
osm k8scluster-list
osm k8scluster-show cluster
The options used to add the cluster are the following:
--creds: Is the location of the kubeconfig file where you have the cluster credentials--version: Current version of your Kubernetes cluster--vim: The name of the VIM where the Kubernetes cluster is deployed--description: Give a description to your Kubernetes cluster--k8s-nets: It is a dictionary of the cluster network, where thekeyis an arbitrary name and thevalueof the dictionary is the name of the network in the VIM. In case your k8s cluster is not located in a VIM, you could use ‘{net1: null}’
In some cases, you might be interested in using an isolated K8s cluster to deploy your KNF. Although these situations are discouraged (an isolated K8s cluster does not make sense in the context of an operator network), it is still possible by creating a dummy VIM target and associating the K8s cluster to that VIM target:
osm vim-create --name mylocation1 --user u --password p --tenant p --account_type dummy --auth_url http://localhost/dummy
osm k8scluster-add cluster --creds .kube/config --vim mylocation1 --k8s-nets '{k8s_net1: null}' --version "v1.15.9" --description="Isolated K8s cluster in mylocation1"
5.7.4. Adding repositories to OSM
You might need to add some repos from where to download helm charts required by the KNF:
osm repo-add --type helm-chart --description "Bitnami repo" bitnami https://charts.bitnami.com/bitnami
osm repo-add --type helm-chart --description "Cetic repo" cetic https://cetic.github.io/helm-charts
osm repo-add --type helm-chart --description "Elastic repo" elastic https://helm.elastic.co
osm repo-list
osm repo-show bitnami
5.7.5. KNF Service on-boarding and instantiation
KNFs can be on-boarded using Helm Charts or Juju Bundles. In this section, examples with Helm Chart and Juju Bundles are shown.
5.7.5.1. Note about deprecation of Helm v2
Helm v2 has been deprecated since 2020. Starting from OSM Release FIFTEEN, OSM no longer supports Helm v2. If the end user tries to deploy a KNF using Helm v2, the following error will be found:
ERROR: Error 422: {
    "code": "UNPROCESSABLE_ENTITY",
    "status": 422,
    "detail": "Error in pyangbind validation: {'error-string': 'helm_version must be of a type compatible with enumeration', 'defined-type': 'kdu:enumeration', 'generated-type': 'YANGDynClass(base=RestrictedClassType(base_type=six.text_type,                                     restriction_type=\"dict_key\",                                     restriction_arg={\\'v3\\': {}},), default=six.text_type(\"v3\"), is_leaf=True, yang_name=\"helm-version\", parent=self, choice=(\\'kdu-model\\', \\'helm-chart\\'), path_helper=self._path_helper, extmethods=self._extmethods, register_paths=True, namespace=\\'urn:etsi:osm:yang:augments:kdu\\', defining_module=\\'kdu\\', yang_type=\\'enumeration\\', is_config=True)'}"
  }
If you are the KNF provider and want to upgrade a helm chart from v2 to v3, follow the official documentation
5.7.5.2. KNF Helm Chart
Once the cluster is attached to your OSM, you can work with KNF in the same way as you do with any VNF. For instance, you can onboard the example below of a KNF consisting of a single Kubernetes deployment unit based on OpenLDAP helm chart.
git clone --recursive https://osm.etsi.org/gitlab/vnf-onboarding/osm-packages.git
cd osm-packages
osm nfpkg-create openldap_knf
osm nspkg-create openldap_ns
You can instantiate two NS instances:
osm ns-create --ns_name ldap --nsd_name openldap_ns --vim_account <VIM_NAME|VIM_ID>
osm ns-create --ns_name ldap2 --nsd_name openldap_ns --vim_account <VIM_NAME|VIM_ID> --config '{additionalParamsForVnf: [{"member-vnf-index": "openldap", additionalParamsForKdu: [{ kdu_name: "ldap", "additionalParams": {"replicaCount": "2"}}]}]}'
Check in the cluster that pods are properly created:
The pods associated to ldap should be using version
openldap:1.2.1and have 1 replicaThe pods associated to ldap2 should be using version
openldap:1.2.1and have 2 replicas
Now you can upgrade both NS instances:
osm ns-action ldap --vnf_name openldap --kdu_name ldap --action_name upgrade --params '{kdu_model: "stable/openldap:1.2.2"}'
osm ns-action ldap2 --vnf_name openldap --kdu_name ldap --action_name upgrade --params '{kdu_model: "stable/openldap:1.2.1", "replicaCount": "3"}'
Check that both operations are marked as completed:
osm ns-op-list ldap
osm ns-op-list ldap2
Check in the cluster that both actions took place:
The pods associated to ldap should be using version openldap:1.2.2
The pods associated to ldap2 should be using version openldap:1.2.1 and have 3 replicas
Rollback both NS instances:
osm ns-action ldap --vnf_name openldap --kdu_name ldap --action_name rollback
osm ns-action ldap2 --vnf_name openldap --kdu_name ldap --action_name rollback
Check that both operations are marked as completed:
osm ns-op-list ldap
osm ns-op-list ldap2
Check in the cluster that both actions took place:
The pods associated to ldap should be using version openldap:1.2.1
The pods associated to ldap2 should be using version openldap:1.2.1 and have 2 replicas
Delete both instances:
osm ns-delete ldap
osm ns-delete ldap2
Delete the packages:
osm nspkg-delete openldap_ns
osm nfpkg-delete openldap_knf
Optionally, remove the repos and the cluster
#Delete repos
osm repo-delete cetic
osm repo-delete bitnami
osm repo-delete elastic
#Delete cluster
osm k8scluster-delete cluster
5.7.5.3. Primitives in Helm Charts
Proxy charms are used to implement primitives on Helm KNFs. In the VNF descriptor we can set the list of services exposed by the Helm chart, and the information of those services will be passed to the Proxy charm.
vnfd:
  # ...
  kdu:
  - name: ldap
    helm-chart: stable/openldap
    # List of exposed services:
    service:
    - name: stable-openldap
If you are trying to connect to the exposed services from the Proxy charm, there should be connectivity between them. There are two options in terms of connectivity:
Proxy charm and Helm chart not living in the same K8s cluster. Proxy charms can live in LXD or in a K8s cluster different from where the Helm chart is deployed. In these cases, the recommended solution is to expose LoadBalancer services, so that the Proxy charm will have reachability to the service.
Proxy charm and Helm chart living in the same K8s cluster. In this case, you can expose also the ClusterIP services of your Helm chart, because the Proxy charm will be able to reach it.
The easiest way of creating a Proxy charm that is able to implement primitives to Helm chart is by the use of the osm-libs Charm Library. This is an example of an OpenLdap Helm-based KNF with primitives that uses the mentioned library.
5.7.5.4. KNF Juju Bundle
This is an example on how to onboard a service that uses a Juju Bundle. For this example the service to onboard is Squid, a web server application which provides proxy and cache services for protocols like HTTP or FTP.
git clone --recursive https://osm.etsi.org/gitlab/vnf-onboarding/osm-packages
cd osm-packages
osm nfpkg-create squid_metrics_cnf
osm nspkg-create squid_metrics_cnf_ns
You can instantiate the Network Service as follows:
osm ns-create --ns_name squid-ns --nsd_name squid_cnf_ns --vim_account <VIM_NAME|VIM_ID>
To check the status of the deployment you can run the following command:
osm ns-op-list squid-ns
+--------------------------------------+-------------+-------------+-----------+---------------------+--------+
| id                                   | operation   | action_name | status    | date                | detail |
+--------------------------------------+-------------+-------------+-----------+---------------------+--------+
| 364c1378-ba86-447e-ad00-93fc1bf1bdd5 | instantiate | N/A         | COMPLETED | 2020-02-24T13:49:03 | -      |
+--------------------------------------+-------------+-------------+-----------+---------------------+--------+
To remove the network service you can:
osm ns-delete squid-ns
5.7.5.4.1. How to Add Instantiation Parameters to KNF Juju Bundles
It is possible to set custom parameters to KDUs upon NS instantiation, without modifying the previously validated KNF packages.
Instantiation parameters will be added to the Juju Bundles using Overlays Bundles. Overlay Bundles allow you to customize settings in an upstream bundle for your own needs, without modifying the existing bundle directly. Juju Bundles and Overlay Bundles use the same YAML syntax. You can find the format of a bundle here: Juju Bundle Documentation.
First, you need to create a YAML file that will contain the instantiation parameters for your KDU. It must containt the following parameters:
# Additional parameters will be added to the VNF.
additionalParamsForVnf:
  # ID of the VNF.
  - member-vnf-index: squid_cnf
    # Additional parameters will be added to the KDU.
    additionalParamsForKdu:
      # ID of the KDU.
      - kdu_name : squid-metrics-kdu
        # Instantiation parameters will be added here.
        additionalParams:
          # “overlay” will be used as a keyword to identify the instantiation parameters.
          overlay:
            # The overlay starts here. Use same format as Juju Bundles.
            applications:
              squid:
                scale: 3
“overlay” is used as keyword to identify the Bundle Overlay.
You can modify the number of units to deploy or set custom machine constraints. However, OSM will not allow you to add new applications to the original bundle. All the applications in the overlay must exist on the original bundle.
The original Juju Bundle for squid-metrics-kdu, establishes only one unit for the squid application. In this example we set to 3 the number of units of the squid application of the squid-metrics-kdu KDU on the squid_cnf VNF.
Then, use the flag --config_file during NS instantiation to indicate the YAML file you just created:
osm ns-create --ns_name squid-ns --nsd_name squid_cnf_ns --vim_account <VIM_NAME|VIM_ID> --config_file <YAML_file_name>
Your squid-ns NS will be deployed including 3 units (instead of one), as specified in the instantiation parameters.
Alternatively, you can use the --config flag of osm ns-create command to specify the instantiation parameters as follows:
osm ns-create --ns_name squid-ns --nsd_name squid_cnf_ns --vim_account <VIM_NAME|VIM_ID> --config '{additionalParamsForVnf: [{member-vnf-index: squid_cnf, additionalParamsForKdu: [{ kdu_name: squid-metrics-kdu, additionalParams: { overlay: { applications: { squid: { scale: 3 } }}}}]}]}'
This approach is equivalent to using the --config_file flag.
5.8. Subscription and Notification support in OSM
ETSI NFV SOL005 defines a class of Northbound APIs through which entities can subscribe for changes in the Network Service (NS) life-cycle, Network service descriptor (NSD) and Virtual network service descriptor (VNFD). The entities get notified via HTTP REST APIs which those entities expose.
Since the current support is only restricted to NS, while NSD and VNFD are in roadmap, for here onwards we will refer subscription and notification for NS.
The entities which are interested to know the life-cycle changes of network service are called Subscribers.
Subscribers receive messages called notifications when an event of their interest occurs.
SOL005 specifies usage of filters in the registration phase, through which subscribers can select events and NS they are interested in.
Subscribers can choose the authentication mechanism of their notification receiver endpoint.
Events need to be notified with very little latency and make them near real-time.
Deregistration of subscription should be possible however subscribers can not modify existing subscriptions as per SOL005.
5.8.1. NS Subscription And Notification
5.8.1.1. Steps for subscription
Step 1: Get bearer token.
NBI API: https://<osm_ip>:9999/osm/admin/v1/tokens/
Sample payload
{
    "username": "admin",
    "password": "admin",
    "project": "admin"
}
Step 2: Select for events for which you are interested in and prepare payload.
Please check the Kafka messages for the filter scenario. If kafka message is not of the format, which contain operation state and operation type. If message does not contain operation state and operation type notification will not be raised.**
Kafka messages will be improved in future.
{_admin: {created: 1579592163.561016, modified: 1579592163.561016, projects_read: [
894160c9-1ead-4c85-9742-e7453260ea5f], projects_write: [894160c9-1ead-4c85-9742-e7453260ea5f]},
_id: 5c53f989-defc-4f93-8ab9-93c62136c37e, id: 5c53f989-defc-4f93-8ab9-93c62136c37e,
isAutomaticInvocation: false, isCancelPending: false, lcmOperationType: instantiate,
links: {nsInstance: /osm/nslcm/v1/ns_instances/35f7ae25-2cf6-4a63-8388-a114513198ed,
    self: /osm/nslcm/v1/ns_lcm_op_occs/5c53f989-defc-4f93-8ab9-93c62136c37e}, nsInstanceId: 35f7ae25-2cf6-4a63-8388-a114513198ed,
operationParams: {lcmOperationType: instantiate, nsDescription: testing, nsInstanceId: 35f7ae25-2cf6-4a63-8388-a114513198ed,
    nsName: check, nsdId: f445b11a-63d8-44b3-85a8-b4b864ccccd6, nsr_id: 35f7ae25-2cf6-4a63-8388-a114513198ed,
    ssh_keys: [], vimAccountId: d5d59b88-7015-4f4b-8df6-bd05765cfa25}, operationState: PROCESSING,
startTime: 1579592163.5609882, statusEnteredTime: 1579592163.5609882}
Refer ETSI SOL005 document for filter options Page no 154. Below an example of payload:
{
    "filter": {
        "nsInstanceSubscriptionFilter": {
            "nsdIds": [
                "93b3c041-cac4-4ef3-8ad6-400fbad32a90"
            ]
        },
        "notificationTypes": [
            "NsLcmOperationOccurrenceNotification"
        ],
        "operationTypes": [
            "INSTANTIATE"
        ],
        "operationStates": [
            "PROCESSING"
        ]
    },
    "CallbackUri": "http://192.168.61.143:5050/notifications",
    "authentication": {
        "authType": "basic",
        "paramsBasic": {
            "userName": "user",
            "password": "user"
        }
    }
}
This payload implies that, for nsd id 93b3c041-cac4-4ef3-8ad6-400fbad32a90 if operation state is PROCESSING and operation type is INSTANTIATE then, send a notification to http://192.168.61.143:5050/notifications using the “authentication” mechanism whose payload is of datatype NsLcmOperationOccurrenceNotification.
Step 3: Send an HTTPS POST request to create subscription.
Add the bearer token as authentication parameter from step 1.
Payload from step 2 to https://<osm_ip>:9999/osm/nslcm/v1/subscriptions
Step 4: Verify successful registration of subscription
Send an HTTPS GET request https://<osm_ip>:9999/osm/nslcm/v1/subscriptions
5.8.1.2. Steps for notification
__Step 1: Create an event in osm satisfying the filter criteria.
For instance, you can launch any NS. This event has operation state as PROCESSING and operation type as INSTANTIATE, when network service is just launched.
Step 2: See the notification in notification receiver.
5.8.2. Current support and future roadmap
5.8.3. Current support
Subscriptions for NS lifecycle:
JSON schema validation
Pre-chech of notification endpoint
Duplicate subscription detection
Notifications for NS lifecycle:
SOL005 compliant structure for each subscriber according to their filters and authentication types.
POST events to notification endpoints.
Retry and backoff for failed notifications.
5.8.3.1. Future roadmap
Integration of subscription steps in NG-UI.
Support for OAuth and TLS authentication types for notification endpoint.
Support for subscription and notification for NSD.
Support for subscription and notification for VNFD.
Cache to store subscribers.
5.9. How to cancel an ongoing operation over a NS
The OSM client command ns-op-cancel allows to cancel any ongoing operation of Network Service. For instance, to cancel the instantiation of a NS execute the following steps:
Create the NS with
osm ns-createand save the Network Service ID (NS_ID)Obtain the Operation ID of the NS instantiation with
osm ns-op-list NS_IDCancel the operation with
osm ns-op-cancel OP_IDThe NS will be in
FAILED_TEMPstatus.
Be aware that resources created before the cancellation will not be rolled back and the Network Service could be unhealthy.
If some operation is blocked due to an ungraceful restart of LCM module, you can use this command to delete the operation and unblock the Network Service.
Queued (unstarted) operations can also be deleted with this command.
5.10. Start, Stop and Rebuild operations over a VDU of a running VNF instance
These three operations involves starting , stopping, and rebuilding of a VDU on a running VNF instance by using the NGUI.
OSM allows these three operations over VDUs for all supported VIMs.
5.10.1. Start Operation:
Start operation lets you start one VNF instance at a time and that instance should be in shutoff state.
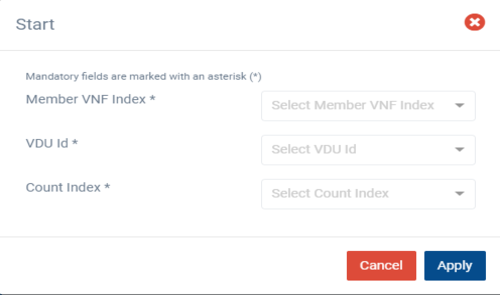
5.10.2. Stop Operation:
Stop operation lets you stop one VNF instance at a time and that instance should be in running state.
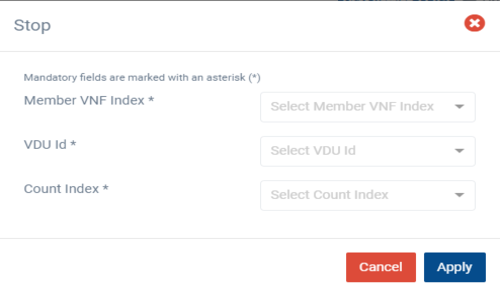
5.10.3. Rebuild Operation:
Rebuild operation lets you rebuild one VNF instance at a time and in this operation, the instance can be in either running or shutoff state.
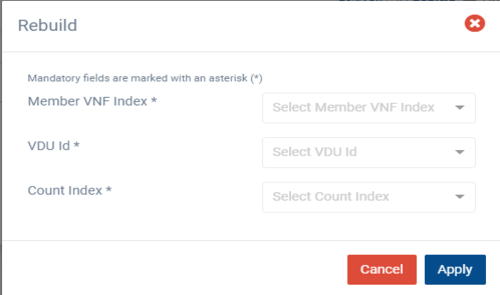
5.10.4. Additional Notes
Each operation is executed independently and only one at a time.
In the rebuild operation, we are not deleting the target VDU nor we are recreating it. The VDU will be rebuilt by using the existing image, so actual properties of the VDU are preserved like name and IP addresses.
5.10.5. How to perform operation from UI
From OSM’s user action menu select the operation (start, stop, rebuild), select the Member VNF index, select the VDU id and Count Index for the target VDU, then select apply. This will trigger the operation.
5.10.5.1. Future roadmap
Implementation of day-1 operation for rebuild operation is in roadmap.
5.11. Migrating VDUs in a Network Service
OSM allows the migration of VDUs, that are part of a VNF, across compute hosts.
The following scenarios are possible:
Migrating a single, specific VDU
Migrating a specific VDU that is part of a scaling group
Migrating all VDU instances in a VNF
The VDUs can be migrated across compute hosts. But, the new compute host should belong to the same availability zone as the current compute host that the VDU belongs to before migration. This is enforced to ensure the validity of placement-groups configuration even after migration.
In case the new compute host is not provided, then a compute host would be selected automatically from the same availability zone.
5.11.1. Additional Notes
OSM currently supports migration of VDUs for OpenStack VIM type only.
5.11.2. Performing Migration from UI
In Migration, ‘Member VNF Index’ is the only mandatory parameter and it is used to identify the VNF to be migrated. If no other parameters are provided, then all the VDUs in the VNF are migrated appropriately.
To migrate a specific VDU that is part of a scaling group, both the ‘VDU Id’ and ‘Count Index’ parameters are required. For VDUs that are not scaled, VDU-Id parameter would suffice.
To migrate to a specific host, ‘Migrate To Host’ parameter has to be provided. If it is not provided, then a compute host would be selected automatically.
From the UI:
Go to ‘NS Instances’ on the ‘Instances’ menu to the left
Next, in the NS instance where the VNF to be migrated is a part of, click on the ‘Action’ button.
From the dropdown actions, click on ‘Vm Migration’
Fill in the form, adding at least the member vnf index:

5.12. How to deploy a VNF that comes with a Prometheus exporter
The Service KPI (Key Performance Indicator) feature in OSM enables efficient monitoring and assurance of network service performance. With the introduction of the Exporter Endpoint, users can now collect Service KPIs directly from VNFs that come with a Prometheus Exporter.
5.12.1. Usage of Service KPI feature
Service KPIs are metrics used to measure the performance of a VNF (Virtualized Network Function) service. These metrics can help operators to ensure that the VNF service is meeting the required service level agreements (SLAs) and to identify any issues that may be impacting service quality.
VNF Package is onboarded with Prometheus job template, and this template is stored in the mongo dB OSM will add the Prometheus job for collection of service KPI metrics. Prometheus will start collecting the service KPI metrics for the VNF using the provided exporter endpoint.
By monitoring and analyzing these Service KPI metrics, network operators can gain insight into the performance of VNFs and take proactive steps to optimize service delivery and ensure that quality of service is as per expectation.
Reference diagram:

5.12.2. How to change the VNF package to include the VNF exporter endpoints
Ensure that the VNF package includes the necessary components for exporting metrics, including the exporter endpoints along with Prometheus job template.
vnfd:
  df:
    exporters-endpoints:
      metric-path: /metrics
      metric-port: 9100
      external-connection-point-ref: vnf-cp0-ext
5.12.3. How to check that the VNF exporter endpoints are exposing their metrics
Instantiate the NS (Network Service) within the OSM environment using the onboarded VNF package.
Confirm that the Service KPI metrics are flowing seamlessly from the VNF instances to OSM-Prometheus, whose graphical interface can be visited at the URL http://$IP:9091/.
5.13. How to prepare a NS that will use static Dual-Stack IP configuration for VNF connection points
Static dual stack assignment enables configuring and allocating IPv4 and IPv6 addresses to VNFs. Typically, IP addresses are provided as instantiation parameters in OSM, as it was described here. However, in some circumstances, it could be useful to configure static IPv6 and IPv4 addresses in the NS Descriptor.
Note: Static Dual-Stack IP allocation is supported only for VNFs deployed in Openstack VIM.
5.13.1. How to configure IPv4/IPv6 Dual Stack addresses statically in the NS descriptor
To configure dual stack IP addresses, add the required IPv4 and IPv6 addresses in the NS descriptor under “ip-address”,
virtual-link-connectivity:
- constituent-cpd-id:
  - constituent-base-element-id: vnf
    constituent-cpd-id: vnf-cp0-ext
    ip-address:
    - 192.168.1.20
    - 2001:db8::23e
To configure only a static IPv4 address, the following can be done:
virtual-link-connectivity:
- constituent-cpd-id:
  - constituent-base-element-id: vnf
    constituent-cpd-id: vnf-cp0-ext
    ip-address: 192.168.1.20
5.13.2. How to Launch NS with Dual Stack IP (IPv4/IPv6) using SOL003 VNFM Interface
First, use API endpoint /osm/vnflcm/v1/vnf_instances to create a VNF object with a POST message, providing all the details mentioned in below sample payload. Make sure to add “ip-address” key and value with dual stack IP addresses. Behind the scenes, this creates a VNF and a NS package in OSM.
{
  "vnfdId":"cirros_vnfd",
  "vnfInstanceName":"rahul-instance",
  "vnfInstanceDescription":"Test vnfm instance description",
  "vimAccountId":"b4275db0-3d1c-46f8-a42a-2b5425b07fb1",
  "additionalParams":{
    "virtual-link-desc":[
      {
        "id":"mgmtnet",
        "mgmt-network":true,
        "vim-network-name": "IPv6"
      }
     ],
     "constituent-cpd-id":"vnf-cp0-ext",
     "ip-address": ["2001:dc9::5", "199.166.155.66"],
     "virtual-link-profile-id":"mgmtnet"
  }
}
Then, use instantiation API /osm/vnflcm/v1/vnf_instances/<vnfId>/instantiate to launch the NS. Mention all the details in payload as shown in below sample.
{
   "vnfName": "sample-instance",
   "vnfDescription": "vnf package",
   "vnfId": "28c8c438-ca9a-4565-9b02-bcfd3ba6c4d6",
   "vimAccountId": "b4275db0-3d1c-46f8-a42a-2b5425b07fb1"
}
5.14. Service Function Chaining
SFC has the ability to cause network packet flows to route through a network via a path other than the one that would be chosen by routing table lookups on the packet’s destination IP address.
5.14.1. How to deploy Service Function Chaining
To illustrate how SFC works in OSM, it will be discussed in the below example.
5.14.1.1. Resources
This example of SFC requires a set of resources (VNFs, NSs) that are available in the following Gitlab osm-packages repository:
5.14.1.2. Virtual Network Functions
Three VNFs are used for this example. All the VNFs has single interface (eth0-ext), specifications vCPU (1), RAM (1GB), disk (10GB), and image-name (bionic).
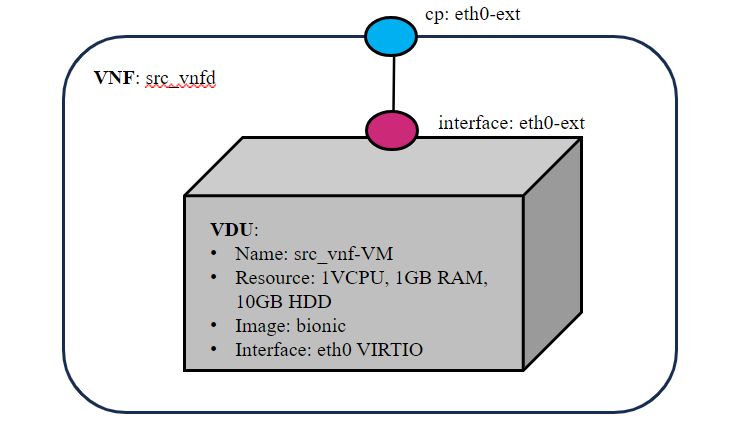
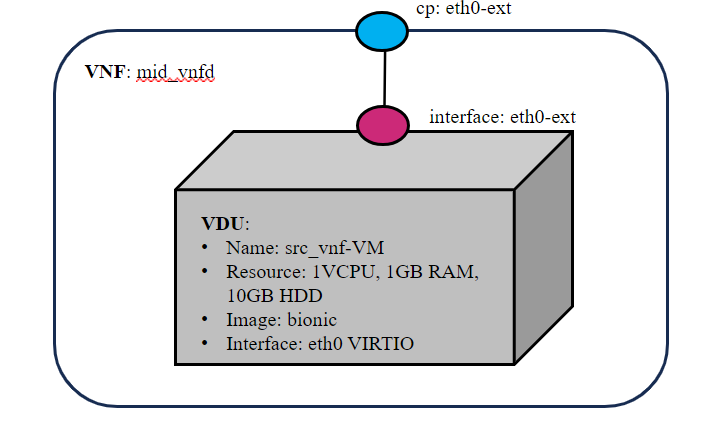
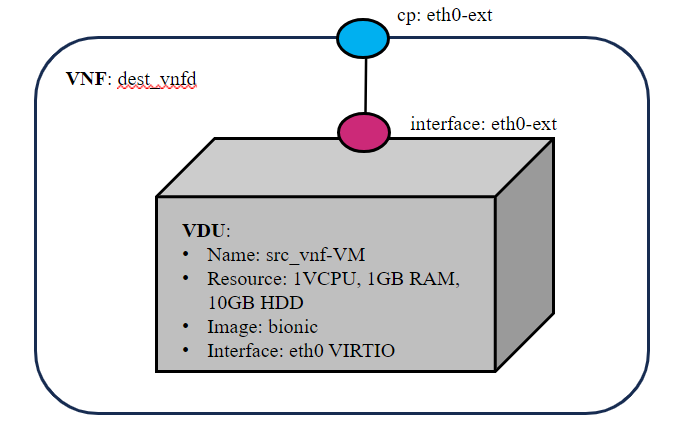
5.14.1.3. Network Service
This Network service has three VNFs.The VNF forwarding graph parameters like match attributes (source ip address, destination ip address, protocol, source port, destination port), ingress connection point interface (packet in) and egress connection point interface (packet out) are configured in NSD descriptor.
The diagram below shows the sfc_nsd and service chaining of VNFs.
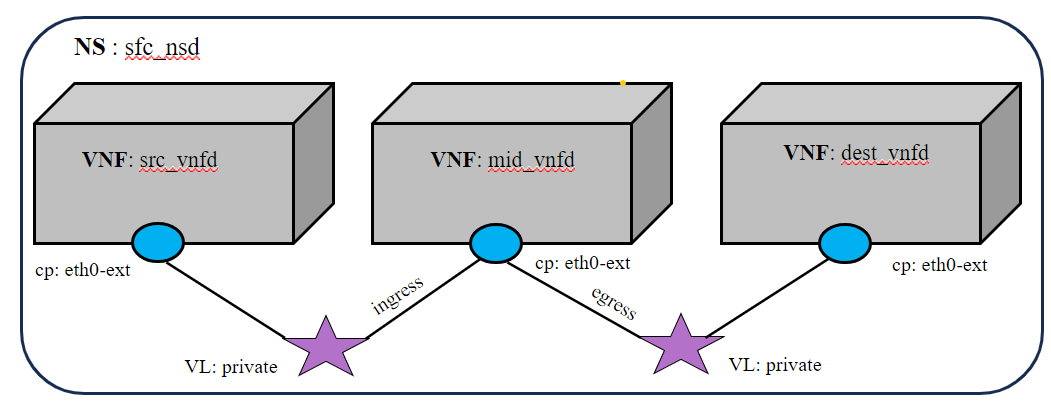
5.14.1.4. SFC Network service Descriptor
VNFFGD configuration are specified as below in NS descriptor:
    vnffgd:
    - id: vnffg1
      vnf-profile-id:
      - vnf2
      nfp-position-element:
      - id: test
      nfpd:
      - id: forwardingpath1
        position-desc-id:
        - id: position1
          nfp-position-element-id:
          - test
          match-attributes:
          -  id: rule1_80
             ip-proto: 6
             source-ip-address:  20.20.20.10
             destination-ip-address: 20.20.20.30
             source-port: 0
             destination-port: 80
             constituent-base-element-id: vnf1
             constituent-cpd-id: eth0-ext
          cp-profile-id:
          -  id: cpprofile2
             constituent-profile-elements:
             - id: cp1
               order: 0
               constituent-base-element-id: vnf2
               ingress-constituent-cpd-id: eth0-ext
               egress-constituent-cpd-id: eth0-ext
The list of VNFs in the forwarding graph (
vnffgd:vnf-profile-id)Source IP address in CIDR notation (
match-attributes:source-ip-address)Source IP address in CIDR notation (
match-attributes:destination-ip-address)Source protocol port (allowed range [1,65535])(
match-attributes:source-port)Destination protocol port (allowed range [1,65535(
match-attributes:destination-port)IP protocol name. Protocol name should be as per IANA standard (
match-attributes:ip-proto)
5.14.1.5. Example
Get the descriptors:
git clone --recursive https://osm.etsi.org/gitlab/vnf-onboarding/osm-packages.git
Onboard them:
cd osm-packages
osm vnfpkg-create src_vnfd
osm vnfpkg-create mid_vnfd
osm vnfpkg-create dest_vnfd
osm nspkg-create sfc_nsd
Launch the NS:
osm ns-create --ns_name sfc --nsd_name sfc_nsd --vim_account <VIM_ACCOUNT_NAME>|<VIM_ACCOUNT_ID>
osm ns-list
5.14.1.6. Testing
# In src_vnf and dest_vnf install the netcat
sudo apt install netcat -y
# In mid_vnf install tcpdump and run the tcpdump command to start the packet capture
sudo apt install tcpdump -y
sudo tcpdump -i <interface name>
# In dest_vnf, open a listener on port 90, waiting for a client to connect
sudo nc -l -p 90
# In src_vnf, run the below command. This command will connect to the server at <dest_vnf> ip-address on port 90
sudo nc <dest_vnf_ip_address> 90
# All the packets from src vnf to dest vnf should route only through the mid vnf.