Developer HowTo for UI Module: Difference between revisions
(Developer How To for UI Module) |
No edit summary |
||
| Line 140: | Line 140: | ||
# Change your directory to .install/usr/share/rw.ui | # Change your directory to .install/usr/share/rw.ui | ||
# Run the following command: | # Run the following command: | ||
/skyquake/scripts/launch_ui.sh | ./skyquake/scripts/launch_ui.sh | ||
Revision as of 03:22, 7 May 2016
Getting Started
Check out the UI module following the instructions @ RiftWare installation (release 0).
Programming Language
The UI module uses ReactJS (JavaScript), Node.js (JavaScript) and SASS (CSS).
Code Style
Please use ECMAScript5 (ES5) for the Node.js code and ECMAScript 6 (ES6) for the the user-facing browser code.
Directory Organization
The code is organized into the following high level directories:
| - api (Contains the intermediate API layer code that the user-facing browser views hit to obtain aggregated data and perform configuration tasks. The api layer performs these operations by hitting management REST endpoints.)
| - scripts (Contains scripts to install the built UI components in the install path.)
| - skyquake (Contains the code for the UI framework, plugins and scripts to build and launch the UI framework and plugins.)
UI Architecture

Development Environment
Architecturally, the UI module is split up into:
- A framework sub-component.
- Several plugin sub-components that are served within the context of the framework and loaded and run in the browser.
- An API component that creates aggregations and serves a RESTful interface as well as a Websocket interface to code running in the browser.
Framework
The code for the UI framework can be found under skyquake/framework.
The framework sub-component consists of:
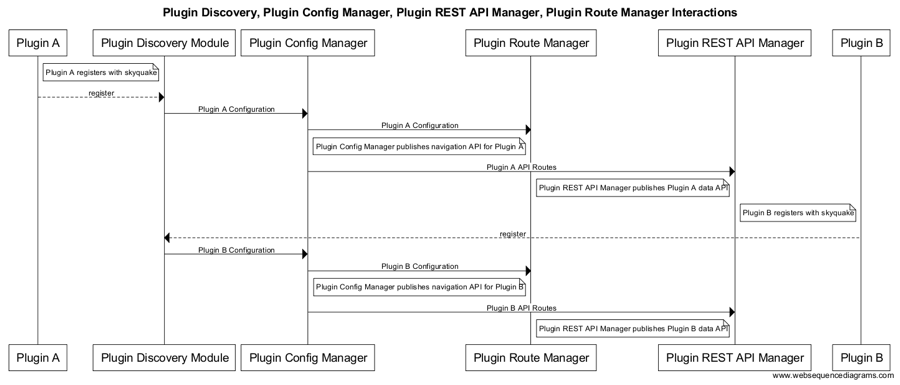
- Plugin Discovery Module, that discovers and loads UI plugins and manages their lifecycle throughout the lifetime of the plugin.
- Common Assets, such as styles, fonts, icons and common utility functions that plugin developers can use.
- Plugin Asset Manager, that loads browser-side asset bundle from installed plugins and serves it at a location known to the in-browser code.
- Plugin REST API Manager + Websocket API Manager (Data Manager), that loads all REST APIs declared in a plugin's routes.js file and serves them at a location known to the in-browser code.
- Plugin Route Manager, that discovers all declared UI routes in a plugin and serves a RESTful API to a navigation and URL routing component that runs in the browser.
- Plugin Config Manager, that provides an abstraction for already developed Single Page Applications (SPAs) to be converted to a plugin in the UI framework.
- View Component Library, that is a set of reusable ReactJS components that plugin developers can use to build UI views and workflows.
- A Navigation Component, that uses the routes exposed by the Plugin Route Manager and provides a common navigation bar to all plugins.
See below diagram for the interactions that happen between framework components when the UI starts:

Building the Framework
In the skyquake folder, run the following command:
npm install
Running the Framework and installed plugins
In the skyquake folder, after you have built the framework, run the following command:
node skyquake.js
Once running the UI can be accessed in a browser by navigating to:
http(s)://<ip_or_fqdn>:8000
UI Plugins
UI plugins can be found under skyquake/plugins
A plugin is an encapsulated set of functionality and can be equated to a Single Page Application (SPA). A developer can use the common components from the view component library to speed up the development of a plugin.
A plugin is packaged as a webpack.
Release 0 consists of the following plugins provided in source:
- about
- composer
- debug
- launchpad
- login
- helloworld
- goodbyeworld
Developing a UI plugin
To develop a UI plugin:
- Add a new folder under skyquake/plugins. Note that the name of the folder must be unique. We recommend using the name of the plugin for naming the folder.
- Under the newly created folder add a config.json file with parameters required skyquake to load the plugin. Look at skyquake/plugins/helloworld/config.json for an example.
- Under the newly created folder add a routes.js file that declares and implements RESTful routes for the plugin's browser-side code. Look at skyquake/plugins/helloworld/routes.js for an example.
- Under the newly created folder add a webpack config file (we recommend the name of the file to be webpack.production.config.json) that will be used to package the plugin into a webpack. Look at skyquake/plugins/helloworld/webpack.production.config.js for an example.
- Add your browser-side code that uses the RESTful APIs under the newly created folder and refer to it from config.json. Look at the code under skyquake/plugins/helloworld/src/ for an example.
- Add a package.json file with npm dependencies. At a minimum, you should have the webpack npm module in your package.json file. Look at skyquake/plugins/helloworld/package.json for an example.
Building a UI Plugin
To build a single UI plugin, follow these steps:
- Change your directory to the plugin folder.
- Run the following command to install npm dependencies:
npm install
- Run the following command to compile and package the plugin code. The line below assumes your webpack config file is named webpack.production.config.json. Otherwise change it to the appropriate name:
./node_modules/.bin/webpack --config webpack.production.config.json
Running a UI Plugin
When the framework is started, it will run all plugins. A plugin can be accessed in a supported browser by navigating to:
http(s)://<ip_or_fqdn>:8000/launchpad/? api_server=http(s)://<ip_or_fqdn>&upload_server=http(s)://<ip_or_fqdn>#/
API Component
In Release 0, API's used by all plugins other than helloworld and goodbyeworld plugins are collocated under the api folder.
We recommend to collocate your API implementations along with your plugin as described in the "Developing a UI plugin" section above.
However, to run serve the API's for plugins developed in Release 0, you need to build and run the API server as in the following sections.
Building the API Component
To build the API Component:
- Change your directory to api/
- Run the following command:
npm install
Running the API Component
Once built, run the following command in the api folder:
node server.js
The APIs can then be accessed at http(s)://<ip_or_fqdn>:3000
Building the complete UI
For building the complete UI, follow these steps:
- Go to the root folder of your repository.
- Run the following commands:
./rift-shell
make
For any incremental builds of the UI, follow these steps when in rift-shell:
- Go to modules/ui/rw.ui
- Run the following command:
cdbuild
- Run the following command:
make
Installing the complete UI
For installing the built files from the UI module into the install location, follow these steps when in rift-shell:
- Go to modules/ui/rw.ui.
- Run the following commands:
cdbuild
make install
The UI gets installed under: .install/usr/share/rw.ui
Running the installed UI components
To run the UI installed in .install/usr/share/rw.ui, follow these steps:
- Change your directory to .install/usr/share/rw.ui
- Run the following command:
./skyquake/scripts/launch_ui.sh