Creating your VNF Charm
Introduction to Juju and charms in OSM
A charm is a collection of scripts and metadata that encapsulate the distilled DevOps knowledge of experts in a particular product. Charms make it easy to reliably and repeatedly deploy applications, then scale them as required with minimal effort.
In the context of OSM, Juju, through the use of charms, is responsible for VNF configuration and life-cycle management, excluding resource operations (instantiation, termination). This is called "manual provider" mode in Juju.
OSM supports a limited version of charms that we call "proxy charms", this charms are installed into an LXD container, and is only responsible for day-1 and day-2 configuration, executed remotely (typically via ssh).
Configurations are mapped to Juju Actions which manage configuration within the VNF. In the case of the proxy charm, the configuration might be done via SSH, via RESTful API, etc.
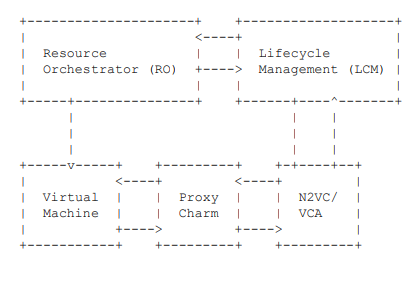
Here is a simple diagram showing how a proxy charm fits into the OSM workflow:
- A VNF package is instantiated via the LCM.
- The LCM requests a virtual machine from the RO.
- The RO instantiates a VM with your VNF image.
- The LCM instructs N2VC, using the VCA, to deploy a VNF proxy charm, and tells it how to access your VM (hostname, user name, and password).
Setup
We recommend that you are running Ubuntu 16.04 or newer, or install snapd on the Linux distribution of your choice.
Install the charm snap, which provides the charm command and libraries necessary to compile your charm:
snap install charm
Setup your workspace for writing layers and building charms:
mkdir -p ~/charms/layers
export JUJU_REPOSITORY=~/charms
export LAYER_PATH=$JUJU_REPOSITORY/layers
cd $LAYER_PATH
Creating a charm
Charms must be created in the layers folder ($LAYER_PATH).
Layers
Layers are individual components that, when combined, result in a finished product, they have individual components that, when combined, result in a finished product.
The Base layer contains the core code needed for other layers to function.
Some of the most used layers in the context of OSM are:
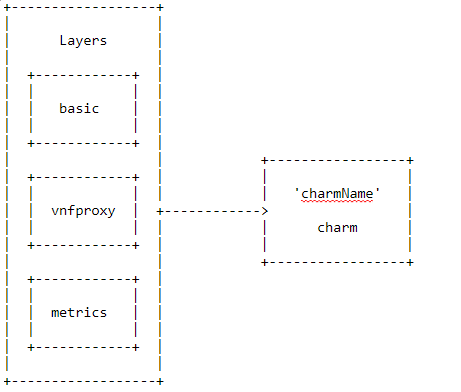
- layer:basic -> imports the reactive framework, contains the core code needed for other layers to function.
- layer:vnfproxy -> imports the required functions to run actions in the VNF via SSH. This layer has been designed to aid in the development of proxy charms.
- layer:metrics -> imports the required functions to get metrics from the VNF.
- layer:restapi -> imports the required functions to run actions in the VNF via REST API.
- layer:netconf -> imports the required functions to run actions in the VNF via Netconf primitives.
The diagram below describes an example of some of the layers contained in a charm, the completed charm is available in the juju-charms repository :

The command "charm create" will create the layer for your proxy charm:
$ cd $JUJU_REPOSITORY/layers
$ charm create 'charmName'
$ cd 'charmName'
This will create a charm layer ready for customization:
$JUJU_REPOSITORY/layers
└── 'charmName'
	├── config.yaml
	├── icon.svg
	├── layer.yaml
	├── metadata.yaml
	├── reactive
		└── 'charmName'.py
	├── README.ex
	└── tests
		  └── 00-setup
		  └── 10-deploy
When you create the charm, you will have to modify different files:
- layer.yaml: specify which layers should be "imported" as part of the charm.
- metadata.yaml: describes what your charm is and sets certain properties used by Juju.
     Typically you should specify at least:
        name: the name of the charm
        maintainer: contact info for the charm
        provides: what interfaces are provided by the charm
        requires: what interfaces are used by the charm
        peers: what peer relations exist
        series: which base image to use for the container running the charm
- metrics.yaml: if the VNF wants to expose some metrics, a new file metrics.yaml has to be created to specify which metrics should be collected.
$JUJU_REPOSITORY/layers
└── 'charmName'
	├── metrics.yaml
- actions.yaml: let’s create `actions.yaml` in the root of the simple charm. Actions are functions that can be called automatically when a VNF is initialized (day-1 configuration) or on-demand by the operator (day2 configuration). In OSM terminology, we know these as config primitives.
$JUJU_REPOSITORY/layers
└── 'charmName'
	├── actions.yaml
For each action, we need to create a script to invoke the reactive framework. This is a boilerplate script that will be used for every action.
$JUJU_REPOSITORY/layers
└── 'charmName'
	├── actions
		└── action1
		└── action2
		       .
		       .
		       .
	├── actions.yaml
- reactive/'charmName.py' : this is where all reactive states are handled. The reactive framework, coupled with the script in the actions/ directory, maps the SO's invocation of the action to the block of code with the matching @when decorator.
Building
Be sure that you are in the charm folder (e.g.: $LAYER_PATH/'charmName') and you have Internet connectivity before building the charm.
$ charm build
This combines all layers that you included, and those that they include, into a charm called 'charmName', located in the ~/charms/builds directory.
Updating VNF Descriptor and VNF Package
In your Virtual Network Function Descriptor (VNFD), you specify the name of the charm as demonstrated below, add 'initial-config-primitive' and 'config-primitive' parameters if needed:
vnfd:vnfd-catalog:
    vnfd:vnfd:
     -  vnfd:id: idvnfExample
        vnfd:name: vnfExample
        vnfd:vnf-configuration:
            vnfd:juju:
                vnfd:charm: 'charmName'
            vnfd:initial-config-primitive:
                         .
                         .
                         .
            vnfd:config-primitive:
                         .
                         .
                         .
Then the compiled charm (from the builds directory) has to be packaged with the descriptor package under the charm directory. So the VNF with the charm would be:
vnfExample
├── charms
│   └── 'charmName'
├── checksums.txt
├── icons
├── images
├── vnfExample.yaml
├── README
└── scripts
Example VNF Charms
This section is intended to be an index to VNF charms written by members of the OSM community.
Simple Charm
You can find all the material for execute Simple-charm:
- VNF package: hackfest_simplecharm_vnf
- NS package: hackfest_simplecharm_ns
- Image : hackfest3-mgmt
- Reference material::
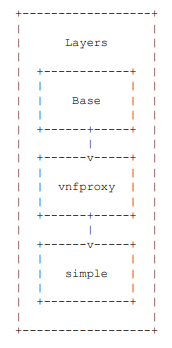
Simple Charm provides different capacities through three layers:
- The Base layer contains the core code needed for other layers to function.
- Vnfproxy is a runtime layer providing common functionality to interoperate with a VNF.
- Simple is the charm layer containing code to manage your vnf.
Edit layer.yaml to include the vnfproxy layer:
includes: ['layer:basic', 'layer:vnfproxy']
options:
    basic:
        use_venv: false
Edit metadata.yaml with the name and description of your charm:
name:simple
summary:A simple VNF proxy charm
maintainer:Name<user@domain.tld>
subordinate:false
series:['xenial']
Let´s create 'actions.yaml' in the root of the simple charm:
touch:
  description: "Touch a file on the VNF."
  params:
    filename:
        description: "The name of the file to touch."
        type: string
        default: ""
  required:
    - filename
$ mkdir actions
Create `actions/touch` with the following content:
#!/usr/bin/env python3
import sys
sys.path.append('lib')
from charms.reactive import main, set_flag
from charmhelpers.core.hookenv import action_fail, action_name

set_flag('actions.{}'.format(action_name()))

try:
   main()
except Exception as e:
   action_fail(repr(e))
When you’re done, mark the script executable:
$ chmod +x actions/touch
Note: The same content has to be used for every action in the charm layer. It is only a boilerplate script to invoke the reactiveframework
Edit 'reactive/simple.py', this is where all reactives states are handled
from charmhelpers.core.hookenv import (
     action_get,
     action_fail,
     action_set,
     status_set,
)
from charms.reactive import (
     clear_flag,
     set_flag,
     when,
     when_not,
)
import charms.sshproxy
# Set the charm’s state to active so the LCM knows
# it’s ready to work.
@when_not('simple.installed')
def install_simple_proxy_charm():
     set_flag('simple.installed')
     status_set('active', 'Ready!')
# Define what to do when the `touch` primitive is invoked.
@when('actions.touch')
def touch():
     err = ''
     try:
          filename = action_get('filename')
          cmd = ['touch {}'.format(filename)]
          result, err = charms.sshproxy._run(cmd)
     except:
         action_fail('command failed:' + err)
     else:
         action_set({'output': result})
      finally:
          clear_flag('actions.touch')
We’re ready to compile the charm with our new action:
$ charm build
Finally, you have to update VNF Descriptor and VNF Package.
vnfd:vnfd-catalog:
    vnfd:
    -   id: hackfest3charmed-vnf
        name: hackfest3charmed-vnf
        vnf-configuration:
            juju:
                charm: simple
            initial-config-primitive:
            -   seq: '1'
                name: config
                parameter:
                -   name: ssh-hostname
                    value: <rw_mgmt_ip>
                -   name: ssh-username
                    value: ubuntu
                -   name: ssh-password
                    value: osm4u
            -   seq: '2'
                name: touch
                parameter:
                -   name: filename
                    value: '/home/ubuntu/first-touch'
            config-primitive:
            -   name: touch
                parameter:
                -   name: filename
                    data-type: STRING
                    default-value: '/home/ubuntu/touched'
Pingpong
You can find all the material for execute Pingpong-charm:
- VNF packages: ping_vnf,pong_vnf
- NS package: ping_pong_ns
- Images : Fedora-x86_64-20-20131211.1-sda-ping,Fedora-x86_64-20-20131211.1-sda-pong
The diagram below describes what our example pingpong charm looks like, followed by a walkthrough of how it is built
Create the layer for your proxy charm:
charm create pingpong
cd pingpong
This will create a charm layer ready for customization:
.
├── config.yaml
├── icon.svg
├── layer.yaml
├── metadata.yaml
├── reactive
│   └── pingpong.py
├── README.ex
└── tests
    ├── 00-setup
    └── 10-deploy
Edit layer.yaml to include the vnfproxy layer:
includes: ['layer:basic', 'layer:vnfproxy']
options:
    basic:
        use_venv: false
Edit metadata.yaml with the name and description of your charm:
name: pingpong
summary: A service to test latency between machines.
maintainer: Adam Israel <adam.israel@canonical.com>
description: |
  The pingpong charm manages the pingpong vnfd deployed by Open Source Mano.
tags:
  - nfv
subordinate: false
series:
    - trusty
    - xenial
There are three pieces that make up an action: 'actions.yaml', which define an action, the actions/ directory where we'll place a small script that invokes the reactive framework, and the python code in reactive/pingpong.py that performs said action.
set-server:
    description: "Set the target IP address and port"
    params:
        server-ip:
            description: "IP on which the target service is listening."
            type: string
            default: ""
        server-port:
            description: "Port on which the target service is listening."
            type: integer
            default: 5555
    required:
        - server-ip
set-rate:
    description: "Set the rate of packet generation."
    params:
        rate:
            description: "Packet rate."
            type: integer
            default: 5
get-stats:
    description: "Get the stats."
get-state:
    description: "Get the admin state of the target service."
get-rate:
    description: "Get the rate set on the target service."
get-server:
    description: "Get the target server and IP set"
$ mkdir actions
For each action, we need to create a script to invoke the reactive framework. This is a boilerplate script that will be used for every action. The first step is to create the first action script.
cat <<'EOF' >> actions/set-server
#!/usr/bin/env python3
import sys
sys.path.append('lib')

from charms.reactive import main
from charms.reactive import set_state
from charmhelpers.core.hookenv import action_fail, action_name

"""
`set_state` only works here because it's flushed to disk inside the `main()`
loop. remove_state will need to be called inside the action method.
"""
set_state('actions.{}'.format(action_name()))

try:
    main()
except Exception as e:
    action_fail(repr(e))
EOF
After this, make the file executable.
chmod +x actions/set-server
Next, copy this script for the remaining actions:
cp actions/set-server actions/set-rate
cp actions/set-server actions/get-stats
cp actions/set-server actions/set-state
cp actions/set-server actions/get-rate
cp actions/set-server actions/get-server
Edit 'reactive/pingpong.py', this is where all reactives states are handled
@when('actions.set-server')
def set_server():
    err = ''
    try:
        cmd = ""
        result, err = charms.sshproxy._run(cmd)
    except:
        action_fail('command failed:' + err)
    else:
        action_set({'outout': result})
    finally:
        remove_flag('actions.set-server')
The reactive framework, coupled with the script in the actions/ directory, maps the SO's invocation of the action to the block of code with the matching @when decorator. As demonstrated in the above code, it will execute a command via the ssh (configured automatically by the SO). You could replace with with calls to a REST API or any other RPC method. You can also run code against the LXD container running the charm.
We’re ready to compile the charm with our new action:
$ charm build
$ charm build
build: Composing into /home/stone/charms
build: Destination charm directory: /home/stone/charms/builds/pingpong
build: Please add a `repo` key to your layer.yaml, with a url from which your layer can be cloned.
build: Processing layer: layer:basic
build: Processing layer: layer:sshproxy
build: Processing layer: layer:vnfproxy
build: Processing layer: pingpong
This combines all layers that you included, and those that they include, into a charm called pingpong, located in the ~/charms/builds directory.
Finally, we have to update VNF Descriptor and VNF Package.
vnfd:vnfd-catalog:
    vnfd:vnfd:
     -  vnfd:id: rift_pong_vnf
        vnfd:name: pong_vnf
        vnfd:vnf-configuration:
            vnfd:juju:
                vnfd:charm: pingpong
Then the compiled charm (from the builds directory) has to be packaged with the descriptor package under the charm directory. So the ping VNF with the charm would be:
ping_vnf
├── charms
│   └── pingpong
├── checksums.txt
├── icons
├── images
├── ping_vnfd.yaml
├── README
└── scripts
Ansible
Under the scope of a H2020 project, 5GinFIRE has developed a charm that enables the configuration of a VNF, instantiated through OSM, using an Ansible playbook. The charm builds off of the base vnfproxy and ansible-base layers, and provides a template ready for customization that supports the execution of an Ansible playbook within the Juju framework used by OSM.
You can find here all files about ansible-charm.
Step by step instructions to use the base charm layer:
-Include playbook.yaml under the playbook folder of the base charm layer:
-The base charm layer already implements a Juju action, ansible-playbook, which runs the playbook. You can define additional actions, if needed by your VNF.
-Build the charm:
-Update the VNF descriptor (VNFD) to use the charm: a) specify the name of the Juju charm in in the VNF configuration; b) Include the action “ansible-playbook” with no arguments as a service primitive and as an initial configuration primitive.
-Include the compiled charm in the VNF package.
UbuntuVNF 'Say Hello' Proxy Charm
A single VDU VNF that instantiates an Ubuntu Xenial machine. Its main primitive, 'say-hello', takes a 'name' parameter and shows a 'Hello [name]' output to all VM terminals through the 'wall' command. This example can be further modified to send any command to a VNF with one or more parameters. The VNF package includes a cloud-init file that sets the credentials to ubuntu/ubuntu.
It serves like an example that can be extended to send any command with parameters to VNFs. Download it from here
Video Transcoder VNFs
Under the scope of a H2020 project, 5GinFIRE has developed two Video Transcoding VNFs. The first uses OpenCV and the other uses FFMpeg. Both VNFs use systemd to run the transcoding service. The systemd services are configured using Juju charms. There is also a small script that builds the VNF and NS packages that might be useful.


