Examples from OSM Hackfests: Difference between revisions
From OSM Public Wiki
Candelpreste (talk | contribs) No edit summary |
Garciadeblas (talk | contribs) |
||
| Line 10: | Line 10: | ||
== Basic VNF and NS == | == Basic VNF and NS == | ||
* '''VNF package:''' [https://osm-download.etsi.org/ftp/osm-4.0-four/3rd-hackfest/packages/hackfest_1_vnfd.tar.gz hackfest1-vnf] | * '''VNF package:''' [https://osm-download.etsi.org/ftp/osm-4.0-four/3rd-hackfest/packages/hackfest_1_vnfd.tar.gz hackfest1-vnf] | ||
* '''NS package:''' [https://osm-download.etsi.org/ftp/osm-4.0-four/3rd-hackfest/packages/hackfest_1_nsd.tar.gz hackfest1-ns] | * '''NS package:''' [https://osm-download.etsi.org/ftp/osm-4.0-four/3rd-hackfest/packages/hackfest_1_nsd.tar.gz hackfest1-ns] | ||
* '''Reference material:''' [https://osm-download.etsi.org/ftp/osm-4.0-four/3rd-hackfest/presentations/20180626%20OSM%20Hackfest%20-%20Session%202%20-%20Creating%20a%20basic%20VNF%20and%20NS.pdf Presentation: creating a basic VNF and NS] | |||
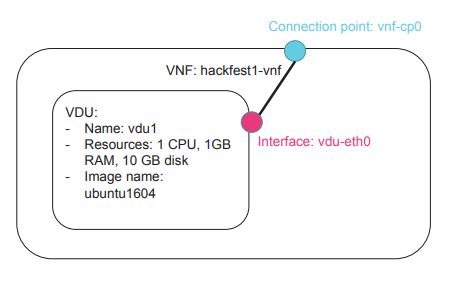
===VNF diagram=== | |||
[[File:VNF1.JPG]] | [[File:VNF1.JPG]] | ||
===VNF descriptor=== | |||
===NS diagram=== | |||
===NS descriptor=== | |||
===Testing with OSM client=== | |||
#Onboard VNF packages | |||
osm vnfd-create hackfest1_vnfd.tar.gz | |||
osm vnfd-list | |||
osm vnfd-show hackfest1-vnf | |||
#Onboard NS packages | |||
osm nsd-create hackfest1_nsd.tar.gz | |||
osm nsd-list | |||
osm nsd-show hackfest1-ns | |||
#Instantiate | |||
osm ns-create --ns_name hf1 --nsd_name hackfest1-ns \ | |||
--vim_account <VIM_ACCOUNT_NAME>|<VIM_ACCOUNT_ID> \ | --vim_account <VIM_ACCOUNT_NAME>|<VIM_ACCOUNT_ID> \ | ||
--ssh_keys <KEY1_PUBKEY_FILE> \ | --ssh_keys <KEY1_PUBKEY_FILE> \ | ||
--config '{vld: [ {name: mgmtnet, vim-network-name: <VIM_MGMT_NAME>} ] }' | --config '{vld: [ {name: mgmtnet, vim-network-name: <VIM_MGMT_NAME>} ] }' | ||
#Check NS status | |||
osm ns-list | |||
osm ns-show hf1 | |||
#Check VNF instances to see the instance and get the mgmt IP address of the VNF | |||
osm vnf-list | |||
osm vnf-show ... | |||
#Connect to the VNF | |||
ssh -i <priv_key> ubuntu@<IP> | |||
#Terminate NS | |||
osm ns-delete hf1 | |||
* | ===Testing with OSM UI=== | ||
* Onboard VNF package | |||
**Go to VNF packages | |||
**Drag and drop the VNF package to the ... | |||
* Onboard NS package | |||
**Drag and drop the NS package to the ... | |||
* Instantiate NS | |||
**Go to NS packages | |||
**In hackfest1-ns, click in “Actions: Instantiate NS” | |||
**Complete the form | |||
***Add a name to the NS instance | |||
***Select the Datacenter where the NS will be deployed | |||
***Specify in the config section a default VIM network name to map “mgmtnet”: | |||
***Paste your public SSH key to get access to the VNF (VMs need to have cloud-init enabled, in this case the hackfest1 example has cloud-init) | |||
*Connect to the VNF: | |||
ssh -i <priv_key> ubuntu@<IP> | |||
== Multi-VDU VNF == | == Multi-VDU VNF == | ||
Revision as of 11:35, 17 July 2018
Examples from the 3rd OSM Hackfest
Work material
Examples
Basic VNF and NS
- VNF package: hackfest1-vnf
- NS package: hackfest1-ns
- Reference material: Presentation: creating a basic VNF and NS
VNF diagram
VNF descriptor
NS diagram
NS descriptor
Testing with OSM client
#Onboard VNF packages
osm vnfd-create hackfest1_vnfd.tar.gz
osm vnfd-list
osm vnfd-show hackfest1-vnf

#Onboard NS packages
osm nsd-create hackfest1_nsd.tar.gz
osm nsd-list
osm nsd-show hackfest1-ns

#Instantiate
osm ns-create --ns_name hf1 --nsd_name hackfest1-ns \
       --vim_account <VIM_ACCOUNT_NAME>|<VIM_ACCOUNT_ID> \
       --ssh_keys <KEY1_PUBKEY_FILE> \
       --config '{vld: [ {name: mgmtnet, vim-network-name: <VIM_MGMT_NAME>} ] }'

#Check NS status
osm ns-list
osm ns-show hf1

#Check VNF instances to see the instance and get the mgmt IP address of the VNF
osm vnf-list
osm vnf-show ...

#Connect to the VNF
ssh -i <priv_key> ubuntu@<IP>
#Terminate NS
osm ns-delete hf1
Testing with OSM UI
- Onboard VNF package
- Go to VNF packages
- Drag and drop the VNF package to the ...
- Onboard NS package
- Drag and drop the NS package to the ...
- Instantiate NS
- Go to NS packages
- In hackfest1-ns, click in “Actions: Instantiate NS”
- Complete the form
- Add a name to the NS instance
- Select the Datacenter where the NS will be deployed
- Specify in the config section a default VIM network name to map “mgmtnet”:
- Paste your public SSH key to get access to the VNF (VMs need to have cloud-init enabled, in this case the hackfest1 example has cloud-init)
- Connect to the VNF:
ssh -i <priv_key> ubuntu@<IP>
Multi-VDU VNF
- VNF and NS packages: hackfest2-vnf, hackfest2-ns
- Reference material: Modeling multi-VDU VNF
VNF with Day-0 configuration
- VNF and NS packages: hackfest3-vnf, hackfest3-ns
- Reference material: Adding day-0 configuration to your VNF
VNF with EPA requirements
- VNF and NS packages: hackfest4-vnf, hackfest4-ns
- Reference material: Modeling EPA capabilities in your VNF descriptor
