15. ANNEX 6: Kubernetes installation and requirements
This section illustrates a safe procedure to setup a Kubernetes cluster that meets the requirements described in chapter 5. Please note that there might be many alternative ways to achieve the same result (i.e. create an equivalent K8s cluster), so, in case you are using different tooling to create your K8s cluster, this annex should be taken just as informative information and refer instead to your tool’s guide to the authoritative reference to achieve equivalent results.
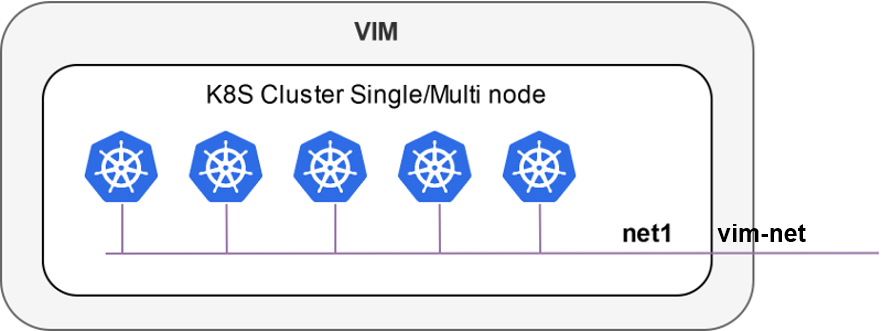
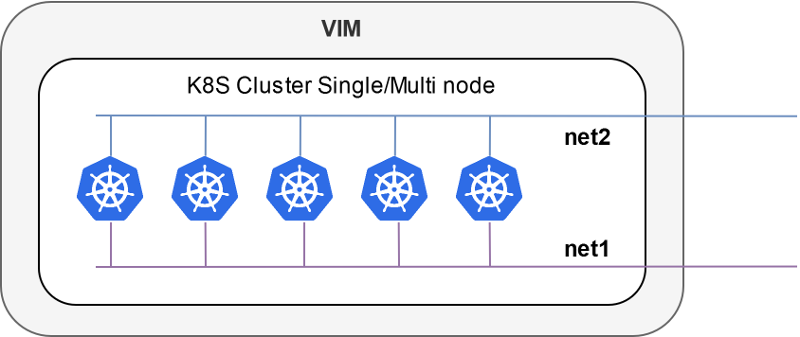
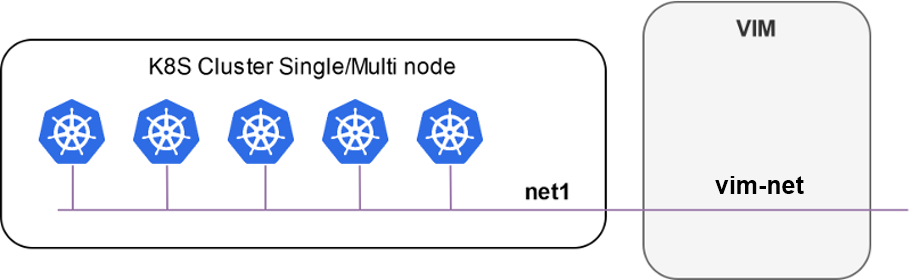
There are two modes to represent a K8s cluster in OSM.
Inside a VIM (single-net and multi-net):
Outside a VIM:
Your Kubernetes cluster needs to meet the following requirements:
Kubernetes
Loadbalancer: to expose your KNFs to the networkKubernetes default
Storageclass: to support persistent volumes.Tiller permissions for K8s clusters > v1.15
Here we will analyse three methods to create a Kubernetes cluster:
OSM Kubernetes cluster created as an OSM’s Network Service (i.e. an OSM-managed Kubernetes deployment).
Local development environment based on MicroK8s.
Manual cluster installation based on
kubeadm.
15.1. Installation method 1: OSM Kubernetes cluster from an OSM Network Service
A K8s cluster can be deployed using the following OSM packages:
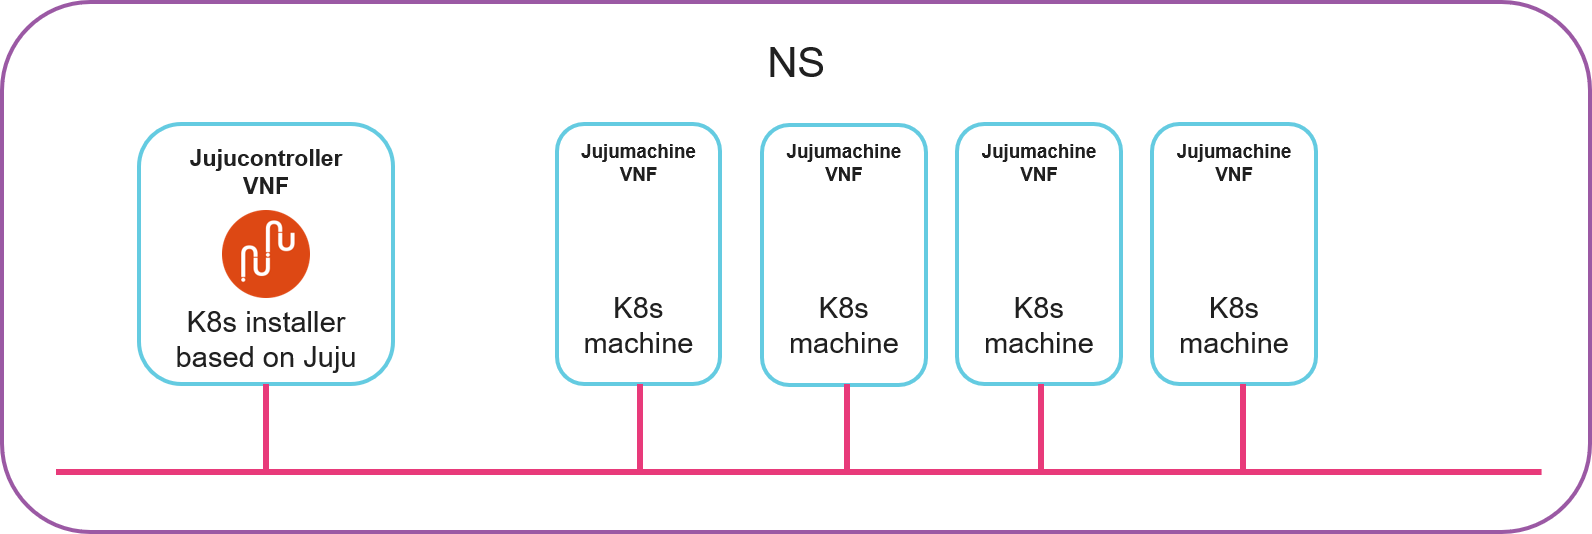
The NS (k8s_juju) consists of 1 deployer (k8s_jujucontroller_vnf) and 4 nodes (k8s_jujumachine_vnf) connected to a single network or vld (mgmtnet). The deployer is a Kubernetes installer based on Juju: it will configure the other 4 nodes to run a Kubernetes cluster. Behind the scenes, the deployer is a Juju controller where the 4 nodes are manually added to a Juju model, then a juju bundle is deployed on that model.
The following figure illustrates the NS.
15.1.1. Onboard NF and NS packages
git clone --recursive https://osm.etsi.org/gitlab/vnf-onboarding/osm-packages.git
cd osm-packages
osm nfpkg-create k8s_jujumachine_vnf
osm nfpkg-create k8s_jujucontroller_vnf
osm nspkg-create k8s_juju_ns
15.1.2. Instantiate the NS
osm ns-create --ns_name k8s-cluster --nsd_name k8s_juju --vim_account <VIM_ACCOUNT> --config_file config.yaml --ssh_keys ${HOME}/.ssh/id_rsa.pub
Instantiation parameters are controlled by config.yaml. The relevant parameters are the IP addresses to be assigned to each machine (in the example below, 192.168.0.X) and the network in the VIM where all nodes will be connected (mgmt in the example below):
---
additionalParamsForVnf:
  -
    member-vnf-index: k8s_juju
    additionalParams:
        MACHINE1: "192.168.0.161"
        MACHINE2: "192.168.0.162"
        MACHINE3: "192.168.0.163"
        MACHINE4: "192.168.0.164"
        MACHINE5: ""
        MACHINE6: ""
        MACHINE7: ""
        MACHINE8: ""
        MACHINE9: ""
        MACHINE10: ""
        BUNDLE: ""
vld:
  -
    name: mgmtnet
    vim-network-name: mgmt              #The network in the VIM to connect all nodes of the clusters
    vnfd-connection-point-ref:
      -
        ip-address: "192.168.0.161"
        member-vnf-index-ref: k8s_vnf1
        vnfd-connection-point-ref: mgmt
      -
        ip-address: "192.168.0.162"
        member-vnf-index-ref: k8s_vnf2
        vnfd-connection-point-ref: mgmt
      -
        ip-address: "192.168.0.163"
        member-vnf-index-ref: k8s_vnf3
        vnfd-connection-point-ref: mgmt
      -
        ip-address: "192.168.0.164"
        member-vnf-index-ref: k8s_vnf4
        vnfd-connection-point-ref: mgmt
      -
        ip-address: "192.168.0.170"
        member-vnf-index-ref: k8s_juju
        vnfd-connection-point-ref: mgmt
15.1.3. Get kubeconfig file
Connect to the machine running juju and get kubeconfig file:
osm vnf-list --ns k8s-cluster --filter vnfd-ref=k8s_jujucontroller_vnf
ssh ubuntu@<JUJU_CONTROLLER_IP_ADDRESS>
cat .kube/config
15.2. Installation method 2: Local development environment
Microk8s is a single-package fully conformant lightweight Kubernetes that works on 42 flavours of Linux. Perfect for developer workstations, IoT, edge, and CI/CD.
Using Microk8s as a Kubernetes cluster in OSM is straightforward.
First, install Microk8s with the following commands:
$ sudo snap install microk8s  --classic
microk8s v1.17.2 from Canonical✓ installed
$ sudo usermod -a -G microk8s `whoami`
$ newgrp microk8s
$ microk8s.status --wait-ready
microk8s is running
addons:
cilium: disabled
dashboard: disabled
dns: disabled
fluentd: disabled
gpu: disabled
helm3: disabled
helm: disabled
ingress: disabled
istio: disabled
jaeger: disabled
juju: disabled
knative: disabled
kubeflow: disabled
linkerd: disabled
metallb: disabled
metrics-server: disabled
prometheus: disabled
rbac: disabled
registry: disabled
storage: disabled
Microk8s uses addons to extend its functionality. The required addons for Microk8s to work with OSM are “storage” and “dns”.
$ microk8s.enable storage dns
Enabling default storage class
[...]
microk8s-hostpath created
Storage will be available soon
Enabling DNS
[...]
DNS is enabled
You may want to use the metallb addon if your Microk8s is not running in the same machine as OSM. When OSM adds a K8s cluster, it initializes the cluster so it can deploy Juju and Helm workloads on it. In the Juju initialization process, a controller will be bootstrapped on the K8s cluster, which then will be accessible by the Juju client (N2VC). When the K8s cluster is external to the OSM host machine, it must give the Juju controller an external IP accessible from OSM.
Just execute the following command and specify the IP range allocable by the load balancer.
$ microk8s.enable metallb
Enabling MetalLB
Enter the IP address range (e.g., 10.64.140.43-10.64.140.49): 192.168.0.10-192.168.0.25
[...]
MetalLB is enabled
Export the Microk8s configuration and add it as a K8s cluster to OSM:
microk8s.config > kubeconfig.yaml
osm k8scluster-add --creds kubeconfig.yaml \
                   --version '1.17' \
                   --vim openstack \
                   --description "My K8s cluster" \
                   --k8s-nets '{"net1": "osm-ext"}' \
                   microk8s-cluster
15.3. Method 3: Manual cluster installation steps for Ubuntu
For the manual installation of Kubernetes cluster we will use a procedure based on kubeadm.
Getting the Docker gpg key to install docker:
curl -fsSL https://download.docker.com/linux/ubuntu/gpg | sudo apt-key add -
Add the Docker Ubuntu repository:
sudo add-apt-repository    "deb [arch=amd64] https://download.docker.com/linux/ubuntu \
   $(lsb_release -cs) \
   stable"
Get the Kubernetes gpg key:
curl -s https://packages.cloud.google.com/apt/doc/apt-key.gpg | sudo apt-key add -
Add the Kubernetes repository:
cat << EOF | sudo tee /etc/apt/sources.list.d/kubernetes.list
deb https://apt.kubernetes.io/ kubernetes-xenial main
EOF
Update your packages:
sudo apt-get update
Install docker, kubelet, kubeadm, and kubectl:
sudo apt-get install -y docker kubelet kubeadm kubectl
Hold them at the current version:
sudo apt-mark hold docker-ce kubelet kubeadm kubectl
Initialize the cluster (run only on the master):
sudo kubeadm init --pod-network-cidr=10.244.0.0/16
Set up local kubeconfig:
mkdir -p $HOME/.kube
sudo cp -i /etc/kubernetes/admin.conf $HOME/.kube/config
sudo chown $(id -u):$(id -g) $HOME/.kube/config
Apply Flannel CNI network overlay:
kubectl apply -f https://raw.githubusercontent.com/coreos/flannel/master/Documentation/kube-flannel.yml
[OPTIONAL] Join the worker nodes to the cluster:
kubeadm join [your unique string from the kubeadm init command]
Verify the worker nodes have joined the cluster successfully:
kubectl get nodes
Compare this result of the kubectl get nodes command:
NAME                            STATUS   ROLES    AGE   VERSION
node1.osm.etsi.org   Ready    master   4m18s v1.13.5
If you have an all-in-one node, then you may want to schedule pods in the master. You need to untaint the master to allow that.
Untaint Master:
kubectl taint nodes --all node-role.kubernetes.io/master-
After the creation of your cluster, you may need to fulfil the requirements of OSM. We can start with the installation of a load balancer for your cluster.
Metallb is a very powerful, easy to configure, load balancer for kubernetes. To install it in your cluster, you can apply the following k8s manifest:
kubectl apply -f https://raw.githubusercontent.com/google/metallb/v0.8.3/manifests/metallb.yaml
The configuration of metallb in layer2 is via Configmap.
apiVersion: v1
kind: ConfigMap
metadata:
  namespace: metallb-system
  name: config
data:
  config: |
    address-pools:
    - name: default
      protocol: layer2
      addresses:
      - 172.21.248.10-172.21.248.250
After the creation of config.yaml we need to apply it to Kubernetes cluster.
kubectl apply -f config.yaml
You should ensure that the range of IP address defined in metallb are accessible from outside the cluster and is not overlapped with other devices in that network. Also this network should be reachable from OSM since OSM will need it to communicate with the cluster.
Other configuration you need for your kubernetes cluster is the creation of the default storageclass:
A kubernetes persistent volume storage can be installed to your kubernetes cluster applying the following manifest.
kubectl apply -f https://openebs.github.io/charts/openebs-operator-1.6.0.yaml
After the installation, you need to check if there is a default storageclass in your kubernetes:
kubectl get storageclass
NAME                         PROVISIONER                                                RECLAIMPOLICY   VOLUMEBINDINGMODE      ALLOWVOLUMEEXPANSION   AGE
openebs-device               openebs.io/local                                           Delete          WaitForFirstConsumer   false                  5m47s
openebs-hostpath             openebs.io/local                                           Delete          WaitForFirstConsumer   false                  5m47s
openebs-jiva-default         openebs.io/provisioner-iscsi                               Delete          Immediate              false                  5m48s
openebs-snapshot-promoter    volumesnapshot.external-storage.k8s.io/snapshot-promoter   Delete          Immediate              false                  5m47s
Until now, there is not default storageclass defined. With the command below we will define openebs-hostpath as default storageclass:
ubuntu@k8s:~$ kubectl patch storageclass openebs-hostpath -p '{"metadata": {"annotations":{"storageclass.kubernetes.io/is-default-class":"true"}}}'
To check the right application of the storageclass definition, we can use the following command:
kubectl get storageclass
NAME                         PROVISIONER                                                RECLAIMPOLICY   VOLUMEBINDINGMODE      ALLOWVOLUMEEXPANSION   AGE
openebs-device               openebs.io/local                                           Delete          WaitForFirstConsumer   false                  5m47s
openebs-hostpath (default)   openebs.io/local                                           Delete          WaitForFirstConsumer   false                  5m47s
openebs-jiva-default         openebs.io/provisioner-iscsi                               Delete          Immediate              false                  5m48s
openebs-snapshot-promoter    volumesnapshot.external-storage.k8s.io/snapshot-promoter   Delete          Immediate              false                  5m47s
For Kubernetes clusters > 1.15 there is needed special permission of Tiller that can be added by the following command:
kubectl create clusterrolebinding tiller-cluster-admin --clusterrole=cluster-admin --serviceaccount=kube-system:default
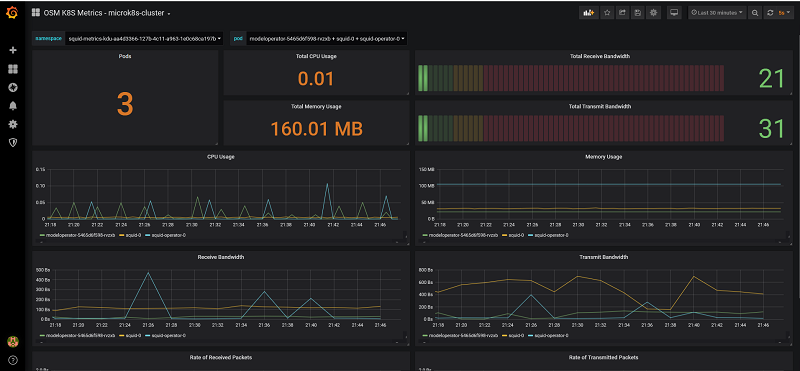
15.4. Enabling K8s Cluster Monitoring
After the K8s cluster is deployed using the steps mentioned above, it is also possible to monitor the workloads running in this K8s cluster using OSM. This K8s cluster is where OSM will deploy KNFs and it is the not the K8s cluster on which OSM is installed.
On the K8 cluster to be monitored Prometheus operator is installed. Once this K8s cluster information is registered in OSM. MON creates a dashboard automatically in Grafana. Grafana connects to the Prometheus opertator installed in K8s cluster to fetch the performance data of the K8s workloads.
The following steps describes the procedure to install prometheus operator on K8s cluster and enable the monitoring.
Run the following steps on K8s-cluster machine to install Prometheus operator:
Install helm:
wget https://get.helm.sh/helm-v3.6.2-linux-amd64.tar.gz
tar -zxvf helm-v3.6.2-linux-amd64.tar.gz
sudo mv linux-amd64/helm /usr/local/bin/helm
Install prometheus-operator in monitoring namespace
helm repo add prometheus-community https://prometheus-community.github.io/helm-charts
helm repo add stable https://charts.helm.sh/stable
helm repo update
helm install prometheus-operator prometheus-community/kube-prometheus-stack -n monitoring --create-namespace --set prometheus.service.type="LoadBalancer"
After steps mentioned above are successful, then OSM is ready to monitor K8s cluster. Once the K8s cluster is registered against a OSM project, the corresponding dashboard will be visible in Grafana, as shown below.