15. ANNEX 7: Setting up an LXD Cluster
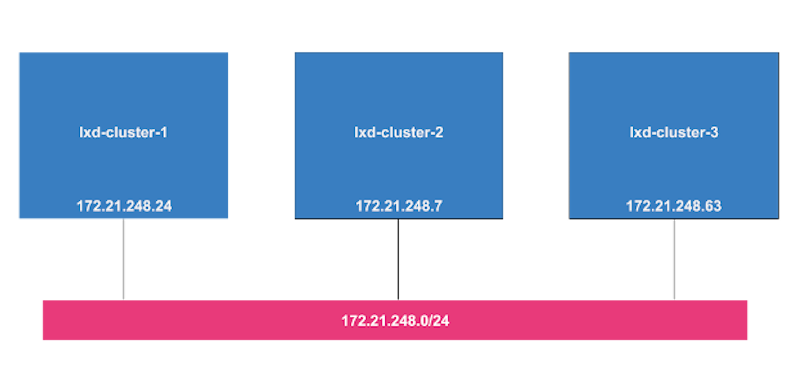
This section illustrates how to set up an LXD Cluster of three nodes. The following figure shows the machines in which the LXD Cluster will be set up.
Note: IPs and the network will be different in other scenarios.

15.1. Install LXD
The steps in this subsection are executed in all the nodes of the LXD Cluster.
Install LXD snap
Add production values in sysctl
Install LXD snap: Execute the following commands
sudo apt update
sudo apt-get purge lxd lxd-client -y
sudo apt-get install zfsutils-linux -y
sudo snap install lxd
Add production values in sysctl: Create a file in /etc/sysctl.d/60-lxd-production.conf with the following content, and then execute sudo sysctl --system.
fs.inotify.max_queued_events=1048576
fs.inotify.max_user_instances=1048576
fs.inotify.max_user_watches=1048576
vm.max_map_count=262144
kernel.dmesg_restrict=1
net.ipv4.neigh.default.gc_thresh3=8192
net.ipv6.neigh.default.gc_thresh3=8192
net.core.bpf_jit_limit=3000000000
kernel.keys.maxkeys=2000
kernel.keys.maxbytes=2000000
15.2. Configure the first LXD node
$ lxc network create lxdbr0 ipv6.address=none ipv4.address=10.0.0.1/16 ipv4.nat=true
$ lxd init
Would you like to use LXD clustering? (yes/no) [default=no]: yes
What name should be used to identify this node in the cluster? [default=lxd-cluster-1]:
What IP address or DNS name should be used to reach this node? [default=172.21.248.24]:
Are you joining an existing cluster? (yes/no) [default=no]:
Setup password authentication on the cluster? (yes/no) [default=yes]:
Trust password for new clients:
Again:
Do you want to configure a new local storage pool? (yes/no) [default=yes]:
Name of the storage backend to use (btrfs, dir, lvm, zfs) [default=zfs]:
Create a new ZFS pool? (yes/no) [default=yes]:
Would you like to use an existing block device? (yes/no) [default=no]:
Size in GB of the new loop device (1GB minimum) [default=15GB]: 100GB
Do you want to configure a new remote storage pool? (yes/no) [default=no]:
Would you like to connect to a MAAS server? (yes/no) [default=no]:
Would you like to configure LXD to use an existing bridge or host interface? (yes/no) [default=no]: yes
Name of the existing bridge or host interface: lxdbr0
Would you like stale cached images to be updated automatically? (yes/no) [default=yes]
Would you like a YAML "lxd init" preseed to be printed? (yes/no) [default=no]:
15.3. Configure the second node
$ sudo lxd init
Would you like to use LXD clustering? (yes/no) [default=no]: yes
What name should be used to identify this node in the cluster? [default=lxd-cluster-2]:
What IP address or DNS name should be used to reach this node? [default=172.21.248.7]:
Are you joining an existing cluster? (yes/no) [default=no]: yes
IP address or FQDN of an existing cluster node: 172.21.248.24
Cluster fingerprint: ea9d4e6ce521885d8720002cef360f2009619ff9edc45997d3fbba76e7cbb256
You can validate this fingerprint by running "lxc info" locally on an existing node.
Is this the correct fingerprint? (yes/no) [default=no]: yes
Cluster trust password:
All existing data is lost when joining a cluster, continue? (yes/no) [default=no] yes
Choose "source" property for storage pool "local":
Choose "zfs.pool_name" property for storage pool "local":
Choose "size" property for storage pool "local": 100GB
Would you like a YAML "lxd init" preseed to be printed? (yes/no) [default=no]:
15.4. Configure the third node
Would you like to use LXD clustering? (yes/no) [default=no]: yes
What name should be used to identify this node in the cluster? [default=lxd-cluster-3]:
What IP address or DNS name should be used to reach this node? [default=172.21.248.63]:
Are you joining an existing cluster? (yes/no) [default=no]: yes
IP address or FQDN of an existing cluster node: 172.21.248.24
Cluster fingerprint: ea9d4e6ce521885d8720002cef360f2009619ff9edc45997d3fbba76e7cbb256
You can validate this fingerprint by running "lxc info" locally on an existing node.
Is this the correct fingerprint? (yes/no) [default=no]: yes
Cluster trust password:
All existing data is lost when joining a cluster, continue? (yes/no) [default=no] yes
Choose "size" property for storage pool "local": 100GB
Choose "source" property for storage pool "local":
Choose "zfs.pool_name" property for storage pool "local":
Would you like a YAML "lxd init" preseed to be printed? (yes/no) [default=no]:
15.5. Check
$ lxc cluster list
+---------------+----------------------------+----------+--------+-------------------+--------------+
|    NAME       |             URL            | DATABASE | STATE  |     MESSAGE       | ARCHITECTURE |
+---------------+----------------------------+----------+--------+-------------------+--------------+
| lxd-cluster-1 | https://172.21.248.24:8443 | YES      | ONLINE | fully operational | x86_64       |
+---------------+----------------------------+----------+--------+-------------------+--------------+
| lxd-cluster-2 | https://172.21.248.7:8443  | YES      | ONLINE | fully operational | x86_64       |
+---------------+----------------------------+----------+--------+-------------------+--------------+
| lxd-cluster-3 | https://172.21.248.63:8443 | YES      | ONLINE | fully operational | x86_64       |
+---------------+----------------------------+----------+--------+-------------------+--------------+
15.6. Certificates
A common authentication method in LXD is the use of certificates, and this subsection will focus on the preparation of the certificates to be ready. Basically, we need to first create a certificate and trust it in the LXD Cluster.
All the commands in this section are executed in the first LXD node.
15.6.1. Create certificate
mkdir ~/.osm
openssl req -nodes -new -x509 -keyout ~/.osm/client.key -out ~/.osm/client.crt -days 365 -subj "/C=FR/ST=Nice/L=Nice/O=ETSI/OU=OSM/CN=osm.etsi.org"
cat .osm/client.crt    # Print client certificate
cat .osm/client.key    # Print client key
15.6.2. Trust client certificate
lxc config trust add local: ~/.osm/client.crt
15.6.3. Get LXD server certificate
sudo cat /var/snap/lxd/common/lxd/server.crt # Print server certificate