6. OSM platform configuration
6.1. Role-based Access Control (RBAC)
Role-Based Access Control (RBAC) is available in OSM to bring different users and projects a controlled access to resources. Authorization is granted if a user has the necessary role to perform an action. For achieving this, two backends are available:
Internal: handles identity and assignment resources locally by NBI.
Keystone (default): external component to handle identity and assignment resources, together with out-of-the-box integrations (i.e. LDAP) and more advanced use RBAC cases.

Similar to other platforms like OpenStack, in OSM there are default policies (that can be modified) that apply to a combination of user-project-role. That means that, in order to obtain privileges to do something in OSM, you should have a user, belonging to a project, with a specific role or roles over the project.
By default, OSM starts with the following users, projects and roles pre-created:
Users:
admin, assigned to projectadminwith rolesystem_admin(system-wide privileges).Projects:
admin.Roles:
system_admin: allows all operations. This role cannot be deleted.account_manager: allows administrative operations, as management of users, projects and roles; but not onboarding packages or instantiate.project_admin: allows all operations inside the belonging project, but not outside the scope of the projects, neither administrative operations.project_user: allows package onboarding and instantiation inside the belonging project, but not creation of VIMs, WIMs, etc.
The configuration can be extended to cover more users, projects and role combinations, following the next sections.
6.2. User management
Users can be managed through the UI, by selecting Admin –> Users on the menu to the left, or using the OSM CLI:
  osm-user-create                creates a new user
  osm-user-delete                deletes a user
  osm-user-list                  list all users
  osm-user-show                  shows the details of a user
  osm-user-update                updates user information
Most of the commands are intuitive, but options can be checked by using ‘–help’. For example:
osm user-update --help
Usage: osm user-update [OPTIONS] USERNAME

  Update a user information

  USERNAME: name of the user
  PASSWORD: new password
  SET_USERNAME: new username
  SET_PROJECT: creating mappings for project/role(s)
  REMOVE_PROJECT: deleting mappings for project/role(s)
  ADD_PROJECT_ROLE: adding mappings for project/role(s)
  REMOVE_PROJECT_ROLE: removing mappings for project/role(s)

Options:
  --password TEXT             user password
  --set-username TEXT         change username
  --set-project TEXT          create/replace the project,role(s) mapping for this project: 'project,role1,role2,...'
  --remove-project TEXT       removes project from user: 'project'
  --add-project-role TEXT     adds project,role(s) mapping: 'project,role1,role2,...'
  --remove-project-role TEXT  removes project,role(s) mapping: 'project,role1,role2,...'
  -h, --help                  Show this message and exit.
6.3. Project management
Projects can be managed through the UI, by selecting Admin –> Projects on the menu to the left, or using the OSM CLI:
  osm-project-create             creates a new project
  osm-project-delete             deletes a project
  osm-project-list               list all projects
  osm-project-show               shows the details of a project
  osm-project-update             updates a project (only the name can be updated)
Most of the commands are intuitive, but options can be checked by using --help. For example:
osm project-update --help
Usage: osm project-update [OPTIONS] PROJECT

  Update a project name

  :param ctx: :param project: id or name of the project to modify :param name:  new name for the project :return:

Options:
  --name TEXT  new name for the project
  --quotas TEXT  change quotas. Can be used several times: 'quota1=number|empty[,quota2=...]' (use empty to reset quota to default

  -h, --help   Show this message and exit.
6.3.1. Quotas
Projects can contain quotas to limit the number of elements that can be added in this project. By default there is a quota of 500 for each element type, but this can be changed with the --quotas option.
The keywords used for quotas are: vnfds, nsds, slice_templates, pduds, ns_instances, slice_instances, vim_accounts, wim_accounts, sdn_controllers, k8sclusters, k8srepos, osmrepos, ns_subscriptions
6.4. Role management
Roles can be managed through the UI, by selecting Admin –> Roles on the menu to the left, or using the OSM CLI:
  role-create                creates a new role
  role-delete                deletes a role
  role-list                  list all roles
  role-show                  show specific role
  role-update                updates a role
Most of the commands are intuitive, but options can be checked by using --help. Roles contains permissions with a boolean value of True (granted) or False (denied). If missing it applies the parent permission.
Global administrative permissions are:
default: applies by default in case permission is not set.force: allows to force operations (e.g. deleting with force without checking dependencies).admin: allows act on behalve of other project different than the one used for logging. It also allows the CLI option--all-projectsfor the commands.public: allows using public packages, and setting an added package as public.
The rest permissions are organized in a hierarchical tree with a colon separated list. The the last item in the list is the http method (post, put, patch, delete, get). For example:
nsds:           True   # grant all operations over nspkgs
nsds:get:       True   # grant listing nspkgs
nsds:id:get:    True   # grant showing a concrete nspkg
nsds:id:delete: False  # deny deleting a nspkg
See this file for a descriptive list of permissions
6.5. User authentication with external LDAP server
When using the Keystone back-end, an external LDAP server may be used for user authentication, whereas the assignment information (RBAC roles/projects) is always stored in the local mysql database. In this working model, two user and project domains are used.
The
defaultdomain, in which the external LDAP is not checked, mainly intended for administrative users (e.g. theadminuser).The the
ldapdomain, in which the validation of credentials is delegated to the LDAP server. User creation / deletion is also done in the external LDAP, and the GUI and osm client are used for configuring assignment only.
The name of ldap domain is configurable, and must be synchronized in the GUI, NBI and Keystone OSM modules.
6.5.1. LDAP Synchronization
For the ldap domain, Keystone will synchronize the user information between the LDAP server and the local mysql database. This is done at component startup time and periodically (in the cron), once a day, executing this command
keystone-manage mapping_purge --domain-name $LDAP_AUTHENTICATION_DOMAIN_NAME; keystone-manage mapping_populate --domain-name $LDAP_AUTHENTICATION_DOMAIN_NAME
If a user tries to authenticate but is not yet in the local database, the relevant data will be loaded to mysql automatically. For this reason is not crucial to execute synchronization too often. User deletion in LDAP will only be performed in mysql after the periodic synchronization. For this reason, it has to be taken into account that the user info shown by osm client may not be fully up to date until the next sync.
Keystone never deletes the assignment information, even if the LDAP user disappears. For this reason, if a new client is created in LDAP reusing the same identifier, the RBAC info associated will be the previous one.
The binding to the external LDAP may be:
Anonymous. The remote LDAP server must support anonymous BIND with read permissions over the user branch
Authenticated. A user account must exist in the LDAP server for Keystone, having read permissions over the user branch. This account should never expire.
The connection may be in clear (which is rarely used) or TLS.
6.5.2. Configuration
The Keystone component will configure itself at startup time using a few environment variables as follows:
LDAP_AUTHENTICATION_DOMAIN_NAME: name of the domain which use LDAP authenticationLDAP_URL: URL of the LDAP serverLDAP_BIND_USERandLDAP_BIND_PASSWORD: This is the user/password to bind and search for users. If not specified, the user accessing Keystone needs to have anonymous query rights to the dn_tree specified in the next configuration option.LDAP_USER_TREE_DN: This specifies the root of the tree in the LDAP server in which Keystone will search for users.LDAP_USER_OBJECTCLASS: This specifies the LDAP object class that Keystone will filter on within user_tree_dn to find user objects. Any objects of other classes will be ignored.LDAP_USER_ID_ATTRIBUTE,LDAP_USER_NAME_ATTRIBUTEandLDAP_USER_PASS_ATTRIBUTE: This set of options define the mapping to LDAP attributes for the three key user attributes supported by Keystone. The LDAP attribute chosen for user_id must be something that is immutable for a user and no more than 64 characters in length. Notice that Distinguished Name (DN) may be longer than 64 characters and thus is not suitable. An uid, or mail may be appropriate.LDAP_USER_FILTER: This filter option allow additional filter (over and above user_objectclass) to be included into the search of user. One common use of this is to provide more efficient searching, where the recommended search for user objects is (&(objectCategory=person)(objectClass=user)). By specifying user_objectclass as user and user_filter as objectCategory=person in the Keystone configuration file, this can be achieved.LDAP_USER_ENABLED_ATTRIBUTE: In Keystone, a user entity can be either enabled or disabled. Setting the above option will give a mapping to an equivalent attribute in LDAP, allowing your LDAP management tools to disable a user.LDAP_USER_ENABLED_MASK: Some LDAP schemas, rather than having a dedicated attribute for user enablement, use a bit within a general control attribute (such as userAccountControl) to indicate this. Setting user_enabled_mask will cause Keystone to look at only the status of this bit in the attribute specified by user_enabled_attribute, with the bit set indicating the user is enabled.LDAP_USER_ENABLED_DEFAULT: Most LDAP servers use a boolean or bit in a control field to indicate enablement. However, some schemas might use an integer value in an attribute. In this situation, set user_enabled_default to the integer value that represents a user being enabled.LDAP_USER_ENABLED_INVERT: Some LDAP schemas have an “account locked” attribute, which is the equivalent to account being “disabled.” In order to map this to the Keystone enabled attribute, you can utilize the user_enabled_invert setting in conjunction with user_enabled_attribute to map the lock status to disabled in Keystone.LDAP_USE_STARTTLS: Enable Transport Layer Security (TLS) for providing a secure connection from Keystone to LDAP (StartTLS, not LDAPS).LDAP_TLS_REQ_CERT: Defines how the certificates are checked for validity in the client (i.e., Keystone end) of the secure connection (this doesn’t affect what level of checking the server is doing on the certificates it receives from Keystone). Possible values are “demand”, “never”, and “allow”. The default of demand means the client always checks the certificate and will drop the connection if it is not provided or invalid. never is the opposite—it never checks it, nor requires it to be provided. allow means that if it is not provided then the connection is allowed to continue, but if it is provided it will be checked—and if invalid, the connection will be dropped.LDAP_TLS_CACERT_BASE64: CA certificate in Base64 format (if you have the PEM file, text inside-----BEGIN CERTIFICATE-----and-----END CERTIFICATE-----tags).
6.6. VIM management
TODO: Page in elaboration.
Some planned contents:
- Uses of availability zones
- Host aggregates
6.7. Physical Deployment Units
OSM can handle Physical Network Functions through managing the lifecycle, in particular Day-1/2 configurations, for the Physical Deployments Units (PDUs) that are part of a given PNF.
Some relevant concepts are:
NF: Network Function. Element ready to play a well-known role in a given Network Service, with well known Day-0/Day-1 procedures as well as Day-2 actions and metrics. Examples of NFs are EPC, IMS, BNG, PE, DNS, firewall, LB, etc.
VDU: Virtual Deployment Unit. It refers to a virtual machine that is part of a Network Function. In the context of a NF instance it will be a specific VM running in a specific VIM target.
PDU: Physical Deployment Unit. It refers to a HW box that is part of a Network Function. In the context of a NF instance it is connected to some well-known networks that can be related to VIM targets known by OSM.
VNF: Virtual Network Function. Network Function exclusively composed of VDUs (i.e. virtual machines).
PNF: Physical Network Function. Network Function exclusively composed of a unique PDU (i.e. a unique HW box).
HNF: Hybrid Network Function: Network function composed of both Virtual Deployment Units (VDUs) and Physical Deployment Units (PDUs), or a even a set of PDUs.
In OSM, there are no fundamental differences between modelling a VNF, a PNF or a Hybrid Network Function (HNF). In those cases where we want to define NS packages consisting of PNF packages or HNF packages, OSM needs to be instructed about the available PDUs.
Before instantiating an NF that includes PDUs (i.e. a PNF or an HNF), we would need to check that there are some PDUs of the appropriate type available in the target location and that they have been conveniently registered in OSM.
A PDU that is available can be registered in OSM through the UI (Instances –> PDU Instances). For example:

It can also be registered through the OSM CLI passing a YAML file similar to this one:
name:           router01
description:    router
type:           gateway
vim_accounts:   [ 0a3a0a79-a86c-4812-9409-7509ff78d778 ]
shared:         false
interfaces:
 -  name:       eth0
    ip-address: [external IP address with no brackets]
    vim-network-name: PUBLIC
    mgmt:       true
 -  name:       eth1
    ip-address: [internal IP address with no brackets]
    mgmt:       false
Then, using the OSM CLI, the YAML file is used to register the PDU:
osm pdu-create --descriptor_file PDU_router.yaml
On the other hand, the PDU should have been already included in the NF descriptor as if it were a VDU (with the applicable parameters) by setting pdu-type, and Day1/2 configurations can be applied to it. For example, a PDU could be modeled like this:
    vdu:
        -   description: gateway_pdu
            id: gateway_pdu
            interface:
            -   external-connection-point-ref: gateway_public
                name: eth1
                type: EXTERNAL
            pdu-type: gateway
            vdu-configuration:
              ...
At instantiation time, OSM looks for a free PDUs in the VIM target with:
the same type declared at
VNFD.vdu.pdu_type, andthat have at least all the interfaces declared at
VNFD.vdu, that is, eachVNFD.vdu.interfaces.namemust be present atPDU.interfaces.name.
6.8. Intra-VIM SDN management (for SDN Assist)
TODO: Page in elaboration.
6.9. WIM (Inter-VIM SDN) management
6.9.1. Introduction to the use of a WIM in OSM
WIM is the acronym for WAN Infrastructure Manager, which is a specialized system that allows to establish connectivity between different network endpoints at different NFVI-PoPs in the context of a multi-site service Wide Area Network (WAN).
For the establishment of the network connectivity, the WIM may rely on network controllers that handle the fulfilment of the connectivity at a lower level, potentially making use of different network technologies and protocols. The WIM offers to the consumers an abstraction of such network connectivity to ease the provisioning and monitoring of it.
6.9.2. WIM setup through OSM client
The following is the command needed to perform to setup the WIM in OSM. It must be filled with the appropriate parameters (e.g. site name: wim-demo, IP address: 10.10.10.10:8080, user: username, password: userpwd, wim_type: type port mapping: sample_port_mapping.yml)
osm wim-create --name wim-demo --url http://10.10.10.10:8080 --user username --password userpwd --wim_type type --description "Demo WIM" --wim_port_mapping sample_port_mapping.yml
6.9.2.1. WIM port mapping
The port mapping file indicated above should be adapted to the desired WIM configuration. It should be a .yml file that contains the information of the OpenStack where the WIM is going to be configured, following one of these schemas [1]
6.9.2.2. WIM types
ietfl2vpn: this type allows to manage L2VPN services from OSM using a WIM that exposes a Restconf Interface with the Yang L2SM model defined in RFC 8466.DynPaC: the DynPaC (Dynamic Path Computation Framework) WIM connector allows the creation (and deletion) of layer two services between two VNFs with given bandwidth requirements.
6.9.3. Network Service creation
In order to create a NS utilizing a WIM, the osm ns-create command is executed the following way:
osm ns-create --ns_name <ns_name> --nsd_name <nsd_name> --vim_account <vim-1-name> --config ' { vnf: [ {member-vnf-index: "1", vim_account: <vim-1-name>}, {member-vnf-index: "2", vim_account: <vim-2-name>} ] }'
Then, an available WIM capable of connecting those two datacenters will be used.
6.9.4. L2SM Plugin
The L2SM WIM Plugin is included in the RO component of the OSM version six that allows the management of WIM Services. Those WIMs should be created to support connectivity between VNFs running in different VIMs.
The L2SM WIM plugin allows connecting the OSM to handle the lifecycle of a layer 2 VPN service, request creation, modification and deletion, by utilizing the service delivery model defined in RFC 8466.
6.9.4.1. L2SM Plugin port mapping
As it was indicated, the port mapping should be adapted to the WIM configuration. In this case, to configure the WIM, the port mapping file .yml should be created following the wim_port_mapping_desc schema, as in the following example:
- datacenter_name:  "name1"
  pop_wan_mappings:
    - pop_switch_dpid: "openflow:1"
      pop_switch_port: 1
      wan_service_endpoint_id: "1"
      wan_service_mapping_info:
          mapping_type: direct-connect1
          site-id: '1'
          bearer:
               bearer-reference:'1a'
For each port of each site wanted to be added to the Network Service, it’s needed a port mapping like previous one. The parameters needed for each port mapping are:
datacenter_name: name of the desired site.wan_service_endpoint_id: UUID of the desired WAN endpoint.site-id: UUID of the desried site.bearer-reference: UUID of the desired port of the site to be added to the Network Service.
6.9.5. DynPaC
DynPaC needs to first be installed as an application in the ONOS controller managing the WIM infraestructure. The --url parameter of wim-create will then be typically http://<onos-ip>:8181/controller/wim.
When adding OpenStack VIMs to be used with the DynPaC OSM WIM, the following needs to be passed to the --config parameter of the osm vim-create command:
--config '{"user_domain_name": "<Openstack domain>", "project_domain_name": "<Openstack project>", "dataplane_physical_net": "<physical net>", "external_connections": [{"condition": {"provider:physical_network": "<physical net>", "provider:network_type": "vlan"}, "vim_external_port": {"switch": "<datacenter switch dpid>", "port": "<datacenter switch port>"}}]}'
<datacenter switch dpid> and <datacenter switch port> here are the same ones as pop_switch_dpid and pop_switch_port as will be seen later in the WIM port mapping example.
In order to add a DynPaC WIM to OSM that connects two datacenters (VIMs) with the wim-create command, the file passed to the --wim_port_mapping parameter should have the following structure. For example:
- datacenter_name: "VIM 1"
  pop_wan_mappings:
  - pop_switch_dpid: "DC 1"
    pop_switch_port: "P1A"
    wan_service_mapping_info:
     mapping_type: 'dpid-port'
     wan_switch_dpid: "WAN 1"
     wan_switch_port: "P1B"
- datacenter_name: "VIM 2"
  pop_wan_mappings:
  - pop_switch_dpid: "DC 2"
    pop_switch_port: "P2B"
    wan_service_mapping_info:
     mapping_type: 'dpid-port'
     wan_switch_dpid: "WAN 2"
     wan_switch_port: "P2A"
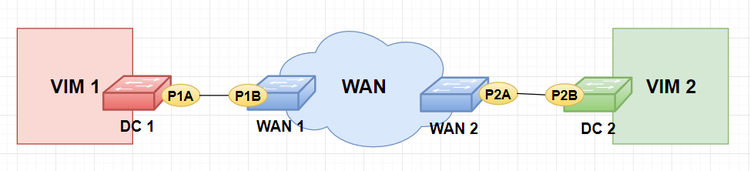
Where:
datacenter_nameare the names of the two VIMs (as displayed by osm vim-list)pop_switch_dpidis the datapath ID of the datacenter switch that provides the VIM connectivitypop_switch_portis the port of the datacenter switch that connects to the immediate WAN switchwan_switch_dpidis the datapath ID of the immediate WAN switchwan_switch_portis the port of the immediate WAN switch that connects to the datacenter switch
DPIDs are in of:xxxxxxxxxxxxxxxx format.
6.10. Platform configuration for Kubernetes
6.10.1. Management of K8s clusters
As previously discussed, OSM supports the deployment of CNFs/KNFs over existing K8s clusters. This case implies that:
The K8s cluster is created upfront by an external entity. This process will happen out-of-band and no interaction with OSM is actually expected.
NOTE: This also includes the case where OSM creates a K8s cluster using a specific VNF package for that purpose.
OSM is informed (administratively) that the cluster is available for use in a given location (actually, referring to a VIM target). This is the step covered in this section.
Later on, NS instantiation processes that require the use of a K8s cluster in that location (i.e. VIM target) will deploy their KDUs over that cluster.
In case more than one K8s cluster is made available in that location, OSM will choose one based on the labels specified in the descriptor and in the registration of the cluster or. In case of more than one cluster in the same VIM meet the VNF requirements, OSM will follow a default order of preference or, if aplicable, the preference indicated in the instantiation parameters (similarly to the cases covered in VIMs).
Hence, in other to support this case, OSM’s NBI provides a mechanism to be informed about existing K8s clusters. The corresponding CLI client command is the following:
osm k8scluster-add --creds <credentials_file.yaml> --vim <VIM_target> --version <ver=version> [--namespace "namespace_name"] [--cni "cni_plugin"] --k8s-nets '{(k8s_net1:vim_network1) [,(k8s_net2:vim_network2) ...]}' <name>
Where:
nameis the internal name that OSM will use to refer to the cluster.credentials_file.yaml: Credentials to access a given K8s cluster, i.e. a valid.kube/configinformation, including:Reference to the K8s cluster
server’s URL (
server)CA data (
certificate-authority-data)
User with sufficient privileges
User name
Secret
At least one context. In case more than one context is selected, an explicit
current-contextmust be defined.
namespace. By default, it will usekube-systemfor this operation.VIM_target: The VIM where the cluster would reside or be attached (the case of bare metal clusters is simply considered a particular case here).ver: K8s versionk8s-nets: list of VIM networks where the cluster is accessible via L3 routing, in (key,value) format, where:The key will be used to refer to a given cluster’s network (e.g. “mgmt”, “external”, etc.)
The value will be used to refer to a VIM network that provides L3 access to that cluster network.
Optionally:
cni: list of CNIs used in the cluster.
This call triggers several actions in OSM:
Save this information in the common database.
Trigger the
init_envcall in the cluster.If applicable, make the corresponding
repo_addoperations to add repositories known globally by OSM.
It is also possible removing a K8s cluster from the list of clusters known by OSM. In that case, the corresponding NBI call can be triggered by this command:
osm k8scluster-delete <name>
In case no CNFs/KNFs are running in the cluster, this call will trigger a reset operation and the entry will be removed from the common database. Otherwise, it will report an error.
6.10.2. Management of K8s repos
OSM may be aware of a list of repos for K8s applications, so that they can be referenced from OSM packages. This prevents from the need of embedding them in the VNF package and makes the use more convenient in most of the cases.
In order to add a repo, the user should invoke the following command:
osm repo-add <name> <URI> type:<chart|bundle>
Where the type of repo should be either chart for applications based on Helm Charts, or bundle for applications based in Juju bundles for K8s.
This call will trigger the following actions in OSM:
Save this information in the common database.
Invoke the
repo_addoperation with the known K8s clusters.
Conversely, a repo can be removed with:
osm repo-delete <name>
Likewise, this operation would:
Update the common database accordingly.
Invoke the
repo_removeoperation with the known K8s clusters
At any moment, it is also possible to get the list of repos known by OSM:
osm repo-list
6.10.3. Docker swarm build
6.10.4. Kubernetes build
6.11. OSM Repositories
The Network Services are described as network functions that can be composed, to provide more complex NaaS; several components describe the function as NSD, VNFD and VIM images. These are packaged encapsulating all necessary information in addition to the descriptor file:
A VNFs is the package that defines the resources needed to allocate the virtual network function described in the VNFD. Each VNFD has at least one VDU (Virtual Deployment Unit). Each VDU is referred to a VIM image that the VIM should host in order to deploy it there when a VNF is instanced.
The NS package defines, through its descriptor (NSD), how the set of VNFs that compose the service need to be interconnected using the Virtual Links (VL).
The image is the artefact that enables the deployment of the descriptors in the VDU that will provide the functionality of the service.
Based on this information, It is crucial to have a clear knowledge on how this information is stored and the mechanisms to retrieve it by OSM to onboard and instantiate the Service in the underlying infrastructure. Accordingly, and in contemplation of alleviate the consumption of the NS in a standardized way, a distribution mechanism and efficient packaging standard is introduced as a new feature to be published.
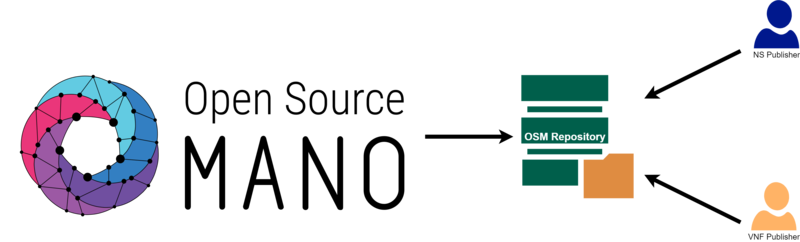
The OSM Repository brings several improvements on the management and consumption of Network Services and the interaction with the repository. This section defines a standardized model format to implement a consumption mechanism for a remote NS repository, that could be queried and managed by OSM abstracting from the actual storage mechanism; the interface will be exposed by HTTP requests.
This approach will allow other NS developers for publishing and onboard their services, pushing local artefacts and dependencies of the VNFs to the remote repository. The following figure depicts the interconnection between the OSM and the external standardized repository.
6.11.1. OSM repository: server side
Repositories can be hosted locally or exposed through internet. OSM is able to recognice them by HTTP(S). In both cases, the repository must have the following structure:
An
index.yamlfile wich is in charge of indexing the packagesA specific folder structure (trying to be self-explanatory)
One artifact’s version and its metadata per folder
6.11.1.1. Structure of the OSM repository
The OSM Repository has the following file structure:
repository/
  ├── index.yaml
  ├── ns/
  │   └── <ns_id>/
  │       └── <ns_version>/
  │           ├── metadata.yaml
  │           └── <ns_id>-<ns_version>.tar.gz
  └── vnf/
      └── <vnf_id>/
          └── <vnf_version>/
              ├── metadata.yaml
              └── <vnf_id>-<vnf_version>.tar.gz
The index.yaml is in charge of managing packages versions and has the following structure:
apiVersion: v1
generated: <date:String>
ns_packages:
  <ns_pkg_id:String>:
    <ns_pkg_version:String>:
      name: <ns_pkg_name:String>
      description: <ns_pkg_Description:String>
      vendor: <ns_pkg_vendor:String>
      path: <ns_pkg_relative_path_in_the_repository:String>
    latest: <ns_pkg_latest_version:String>

vnf_packages:
  <vnf_pkg_id:String>:
    <vnf_pkg_version:String>:
      name: <vnf_pkg_name:String>
      description: <vnf_pkg_Description:String>
      vendor: <vnf_pkg_vendor:String>
      path: <vnf_pkg_relative_path_in_the_repository:String>
    latest: <vnf_pkg_latest_version:String>
Here is an example of OSM Repository index file:
apiVersion: v1
generated: '2020-04-29T13:00:00.690915Z'
ns_packages:
  cirros_nsd:
    '1.0':
      name: cirros_ns
      description: Generated by OSM pacakage generator
      vendor: OSM
      path: /ns/cirros_nsd/1.0/cirros_nsd-1.0.tar.gz
    latest: '1.0'

vnf_packages:
  cirros_vnfd:
    '1.0':
      name: cirros_vnf
      description: Generated by OSM package generator
      vendor: OSM
      path: /vnf/cirros_vnfd/1.0/cirros_vnfd-1.0.tar.gz
    '2.0':
      name: cirros_vnf
      description: Generated by OSM package generator
      vendor: OSM
      path: /vnf/cirros_vnfd/1.0/cirros_vnfd-2.0.tar.gz
    latest: '2.0'
Finally, the last configuration file is the metadata.yaml. This file has the most valuable data of a package. This file is in the same root of the package that described and its content is the following:
Network Service Package
metadata.yamlexample:
vnfd-id-ref:
  - cirros_vnfd
  - cirros_vnfd
name: cirros_ns
id: cirros_nsd
description: Generated by OSM pacakage generator
vendor: OSM
version: '1.0'
path: /ns/cirros_nsd/1.0/cirros_nsd-1.0.tar.gz
checksum: ebe52f821b0cae896ac29a956da84477
Virtual Network Function Package
metadata.yamlexample:
images:
  - cirros034
name: cirros_vnf
id: cirros_vnfd
description: Generated by OSM package generator
vendor: OSM
version: '2.0'
path: /vnf/cirros_vnfd/1.0/cirros_vnfd-2.0.tar.gz
checksum: e7c9dec0efbab0986afe9e8d64c402f9
6.11.1.2. OSM repository generation
For generating an OSM Repository automatically, the OSM Client provides a useful command in charge of the ETL required to convert a directory containing packages and sources into an OSM repository. This command is the same as to create a repository or update the existing OSM Repository with more packages:
osm repo-index --origin <packages_folder> --destination <repository_folder>
Once it is executed we can find in the destination folder the directory to be exposed via HTTP.
With the following docker container it is pretty easy to expose a directory via http:
docker run -v <repository_path>:/repository -p 80:80 luisupm/repository_exporter
6.11.2. OSM repository: client side
From the OSM client, It is possible to manage the usage of the repositories in OSM. Through simple commands we can associate repositories, list the artefacts available in them and onboard packages from the repository. The following commands will describe in detail the functionalities that the OSM Client can deal with the OSM Repositories:
In order to add a new repo, the user should invoke the following command:
osm repo-add --description <repo description> <repo name> <repository_url>
This call will trigger the following actions in OSM:
Save this information in the common database.
Invoke the repo_add operation with the known OSM Repository.
Conversely, a repo can be removed with:
osm repo-delete vnfrepo
Likewise, this operation would:
Update the common database accordingly.
Invoke the repo_remove operation with the OSM Repository.
At any moment, it is also possible to get the list of repos known by OSM:
osm repo-list
Once there is a OSM Repository added in the system, it is posible list packages inside a repository, by VNF or NS packages:
VNF packages:
osm vnfpkg-repo-list
osm nfpkg-repo-list
These commands will retrieve a list with all the VNF packages available in the repository:
NS packages:
osm nsd-repo-list
osm nspkg-repo-list
These commands will retrieve a list with all the NS packages available in the repository.
To On-board a package from a repository to OSM it is possible to use the following commands:
VNF packages:
osm vnfpkg-create --repo vnfrepo <vnf>
osm nfpkg-create --repo vnfrepo <vnf>
NS packages:
osm nsd-create --repo vnfrepo <nsd>
osm nspkg-create --repo vnfrepo <nsd>
To show packages details available in the repository it is posible use the following commands:
VNF packages:
osm vnfpkg-repo-show --repo vnfrepo <vnf>

osm nfpkg-repo-show --repo vnfrepo <vnf>
NS packages:
osm nsd-repo-show --repo vnfrepo <nsd>

osm nspkg-repo-show --repo vnfrepo <nsd>
6.12. Distributed VCA
The VCA is the component in OSM in charge of the life cycle of charms, which are operators that allow integration, configuration, day-1 and day-2 operation of Network Functions. This OSM release offers the capability to register VCAs to projects, and associate VIM accounts to specific VCAs, allowing the VCA to be distributed and located in the same datacenter as the VIM.
A VCA is a Juju controller which has at least two clouds associated: k8s and lxd. This means that it will be capable of deploying and managing charms in both Kubernetes and LXD.
6.12.1. How to deploy a VCA
This subsection explains how to deploy a VCA in one machine. This is not recommended for production, just for testing and validation. Additionally, the IP of the machine in which the VCA will be installed, must be reachable by the OSM cluster.
./install_osm.sh --charmed --only-vca
This script will install Microk8s and LXD, bootstrap the Juju controller to Microk8s, and add the LXD cloud to the controller. That way the Juju controller will be able to deploy charms to both Kubernetes and LXD.
When the installation has finished, the script will print out at the end the command that should be executed in the OSM client in order to register it to OSM. Something similar to this:
Use the following command to register the installed VCA to your OSM:

  osm vca-add --endpoints 10.37.45.21:17070 \
         --user admin \
         --secret 15c775fa78da526f45e8aef34239dcf4 \
         --cacert LS0tLS1CRUdJTiBDRVJUSUZJQ0FURS0tLS0tCk... \
         --lxd-cloud lxd-cloud \
         --lxd-credentials lxd-cloud \
         --k8s-cloud microk8s \
         --k8s-credentials microk8s\
         angelic-iguanodon-vca
6.12.2. Managing VCAs
There are a few commands that will allow us to manage VCAs in OSM:
osm vca-add
osm vca-edit
osm vca-list
osm vca-show
osm vca-delete
The vca-add, vca-edit, and vca-delete commands can only be executed by users in a project with system-admin or project-admin roles.
6.12.2.1. Add
The osm vca-add command allows registering a VCA to OSM. The following options will be needed to perform the operation:
–endpoints TEXT: Comma-separated list of IP or hostnames of the Juju controller
–user TEXT: Username in the Juju controller with admin privileges
–secret TEXT: Password of the specified username
–cacert TEXT: Base64 encoded CA certificate
–lxd-cloud TEXT: Name of the cloud registered in Juju that will be used for LXD containers (LXD proxy charms)
–lxd-credentials TEXT: Name of the cloud credentials registered in Juju to be used for the LXD cloud
–k8s-cloud TEXT: Name of the cloud registered in Juju that will be used for K8s containers (K8s proxy charms)
–k8s-credentials TEXT Name of the cloud credentials registered in Juju to be used for the K8s cloud
–model-config TEXT: Configuration options for the Juju models. Both JSON and YAML files are accepted, or inline JSON. For the list of items that can be specified, please see this.
–description TEXT: human readable description
Example:
osm vca-add --endpoints 172.21.248.164:17070 \
            --user admin \
            --secret e7b253af37785045d1ca08b8d929e556 \
            --cacert LS0tLS1CRUdJTiBDRVJUSUZJQ0FURS0tLS0t... \
            --lxd-cloud lxd-cloud \
            --lxd-credentials lxd-cloud \
            --k8s-cloud microk8s \
            --k8s-credentials microk8s \
            vca
6.12.2.2. Edit
The osm vca-edit command allows editing an VCA in OSM. It accepts the same options as the osm vca-add command, but all of them are optional; only the specified values in this operation will be overridden.
6.12.2.3. List
The osm vca-list command allows to list the registered VCAs in the current project.
$ osm vca-list
+------+--------------------------------------+-------------------+
| Name | Id                                   | Operational State |
+------+--------------------------------------+-------------------+
| vca  | 2ade7f0e-9b58-4dbd-93a3-4ec076185d39 | ENABLED           |
+------+--------------------------------------+-------------------+
6.12.2.4. Show
The osm vca-show command allows to show the details of a registered VCA.
$ osm vca-show vca
+------------+-------------------------------------------------------+
| key        | attribute                                             |
+------------+-------------------------------------------------------+
| _id        | "2ade7f0e-9b58-4dbd-93a3-4ec076185d39"                |
| name       | "vca"                                                 |
| endpoints  | [ "172.21.248.164:17070" ]                            |
| ...        | ...                                                   |
+------------+-------------------------------------------------------+
6.12.2.5. Delete
The osm vca-delete command allows deleting a registered VCA.
$ osm vca-delete vca
6.12.3. Associate a VCA with a VIM account
As it was previously mentioned, adding VCAs to OSM is a privilege operation, and only system-admins and project-admins can do that. But then, regular users are able to list the VCAs that are available to them in their projects. Therefore a regular user will be able to add a VIM account, and select, from the list of VCAs available, which one it wants to use.
To do that, the osm vim-create command allows an optional parameter –vca <name or id of the VCA>
$ osm vca-list
+------+--------------------------------------+-------------------+
| Name | Id                                   | Operational State |
+------+--------------------------------------+-------------------+
| vca  | 2ade7f0e-9b58-4dbd-93a3-4ec076185d39 | ENABLED           |
+------+--------------------------------------+-------------------+

$ osm vim-create --name openstack \
               --user *** \
               --password *** \
               --auth_url http://***:5000/v3 \
               --tenant *** \
               --account_type openstack \
               --vca 2ade7f0e-9b58-4dbd-93a3-4ec076185d39
6.12.4. Associate a VCA with a K8s cluster
To associate the K8s cluster with a Distributed VCA, follow these steps:
Deploy a VCA and register it to OSM. For more details, see this section.
Associate the VCA with a VIM account. For more details, see this section.
Register your K8s cluster associating it to the VIM account added in step 2. For more details, see this section.
Note: if you are not using an actual VIM, in the step 2, set the VIM account type to dummy with the following flag: --account_type dummy.