Understanding the Workflow with OSM tools
Login to OSM portal
To be able to use all the tools required in the development cycle, you need to be authenticated in ETSI portal.
Go to OSM portal: https://osm.etsi.org/
Log in using your username and password
Note:
If you are contributing on behalf of your company, you should login with your ETSI Online Account (EOL).
If your company is not yet an OSM Member or Participant, you can check here how to join OSM as an organization
If your company has already joined OSM but you do not have an EOL account yet, you can request an EOL account
If you are an individual contributor, you can create your OSM account online.
If you need any help, contact us at OSMsupport@etsi.org
Reporting a bug on Bugzilla
Go to the OSM Portal and click on Bugzilla menu on the portal menu bar. Or simply go to OSM Bugzilla
Click on “new” on Bugzilla menu bar.
Choose the product, e.g. “OSM”.
Complete the bug form. If you know, choose the component, e.g. UI, SO, RO, Documentation/Wiki, etc.
Enter the bug summary, description, attachment, etc.
Click on the “Submit Bug” button to confirm.
A bug id is generated (e.g. Bug 6 -Small Error)
Contributing code
Clone your project (https)
Clone a git repository, for example:
git clone https://osm.etsi.org/gerrit/osm/RO.git
Enter your username
Enter you password
It is mandatory to install the Gerrit commit-msg hook for the cloned repository in order to automatically insert a Change-Id tag in commit messages. You can install it by entering the following command for RO repository
curl -Lo RO/.git/hooks/commit-msg http://osm.etsi.org/gerrit/tools/hooks/commit-msg
You then need to make the hook executable:
chmod u+x RO/.git/hooks/commit-msg
More information about the Gerrit commit-msg hook can be found here.
Note: You can find all the project repository URLs on Gerrit
Click on Gerrit menu on the portal menu bar.
Click on “Projects” menu on the Gerrit menu bar.
Click on “List” menu.
Select a product to see the available cloning URLs.
Clone your project (ssh)
Authenticate your local host with Gerrit
Create a SSH public-private key pair locally. Git offers this tool for linux and windows users (via Git Bash) ssh-keygen -o but you need to ensure that the user.name and the user.email picked up by the terminal matches the settings from Gerrit (Check with git config -l). Accept all the default settings that the prompt will ask until it finishes. By the end you should see a id_rsa file (private key) and a id_rsa.pub file (public key) created under your host’s .ssh/ folder.
Open the
id_rsa.pubfile with any text editor and copy its content.Login to Gerrit (ETSI account) and access the settings page https://osm.etsi.org/gerrit/#/settings/
Go to the SSH Public Keys tab and add the public key to the registered key lists
Access Gerrit and find the repository that you need. In this example, the Features repo is found here https://osm.etsi.org/gerrit/#/admin/projects/osm/Features
Copy the clone command choosing ssh and clone with commit-msg hook option.
Paste the command in your Git Bash terminal within the folder in which you want the repository.
git clone "ssh://$USERNAME@osm.etsi.org:29418/osm/Features" && (cd "Features" && curl https://osm.etsi.org/gerrit/tools/hooks/commit-msg > .git/hooks/commit-msg ; chmod +x .git/hooks/commit-msg)
Note: Replace $USERNAME with your ETSI username.
Configure your Git environment
Configure your git username globally:
git config --global user.name <username>
Configure your git email address:
git config --global user.email <email>
Check your git configuration:
git config --list
Note: Your email address will be visible on commits to Git. If you'd like to keep your email address private, you can mask your email as follows:

If your email is <name@company.com> you can set user.email to <hidden@company.com>. This allows other users to identify you as a contributor (with your user name) and Git Stats to keep track of your company's contributions (with the email domain)
In case you are using git in the same computer for other open source projects, you can restrict your git variables to the local folder:
git config --local user.name <username>
git config --local user.email <email>
Python 3
New Python contributions to Open Source Mano must support Python 3+. Python 2.7 reaches an End of Life status on 1 January 2020 and will no longer be supported with bug fixes or security patches.
License Headers
Newly contributed Source Code should be licensed under the Apache 2.0 license. A LICENSE file shall exist at the root of the repository and all source files should have the following LICENSE header:
# Copyright {yyyy} {name of copyright owner}
#
# Licensed under the Apache License, Version 2.0 (the "License");
# you may not use this file except in compliance with the License.
# You may obtain a copy of the License at
#
#    http://www.apache.org/licenses/LICENSE-2.0
#
# Unless required by applicable law or agreed to in writing, software
# distributed under the License is distributed on an "AS IS" BASIS,
# WITHOUT WARRANTIES OR CONDITIONS OF ANY KIND, either express or
# implied.
# See the License for the specific language governing permissions and
# limitations under the License.
Please update the template’s first line
# Copyright {yyyy} {name of copyright owner}
If you are adding a license header to an existing file, you can add
# Copyright 2020 ETSI
If you are adding a license header to a new file, you can add
# Copyright 2020 MyOrgName Inc
Commit changes to your local project
Go to the “RO” folder
cd osm/ROMake some changes on the source (e.g. add a line to the “example-file”)
Stage the change.
git add example-file
Commit the change to your local repository. You can add a bug id in your commit message to link the bug to your contribution
git commit -s -m "Bug 2 fixed!!"You can see your commit message and update it, if needed, using the following command:
git commit --amend
Developer’s Certificate of Origin
The
-sparameter enables to Sign the contribution. It adds the following line at the end of your commit message:
Signed-off-by: Random J Developer <random@developer.example.org>
The sign-off is a simple line at the end of the explanation for the patch, which certifies that you wrote it or otherwise have the right to pass it on as a open-source patch. The rules are pretty simple: signing a contribution means that you can certify the below:
        Developer's Certificate of Origin 1.1

        By making a contribution to this project, I certify that:

        (a) The contribution was created in whole or in part by me and I
            have the right to submit it under the open source license
            indicated in the file; or

        (b) The contribution is based upon previous work that, to the best
            of my knowledge, is covered under an appropriate open source
            license and I have the right under that license to submit that
            work with modifications, whether created in whole or in part
            by me, under the same open source license (unless I am
            permitted to submit under a different license), as indicated
            in the file; or

        (c) The contribution was provided directly to me by some other
            person who certified (a), (b) or (c) and I have not modified
            it.

        (d) I understand and agree that this project and the contribution
            are public and that a record of the contribution (including all
            personal information I submit with it, including my sign-off) is
            maintained indefinitely and may be redistributed consistent with
            this project or the open source license(s) involved.
Push your contribution to Gerrit
Push your contribution to Gerrit using git push
To avoid merge conflicts, it is recommended to do a pull with rebase before pushing your contribution in order to merge latest changes made by other users.
git pull --rebase
Note: you can force git to use always the
--rebaseoption with:git config --local pull.rebase truePush your commits to Gerrit for Code Review using the following command:
git push origin HEAD:refs/for/master #use 'v1.0' instead of 'master' for contributing to v1.0 branchNote: you can also configure git to push always to the desired branch.
git config --local remote.origin.push HEAD:refs/for/master
git config --local remote.origin.push HEAD:refs/for/v1.0
Enter your username.
Enter your password.
You can review your contribution on Gerrit web interface
Notes:
The following actions are executed automatically after pushing any contribution to Gerrit:
Gerrit reports the new contribution state to the corresponding bug in Bugzilla
Gerrit notifies Jenkins to build the new contribution.
Push your contribution to Gerrit using git review
Instead of using “git push”, you could use “git review”. Follow this guide (Using git-review to push and review changes) to install and configure git-review. You will also have to set the SSH URL for your remote and copy the commit-msg hook.
To avoid merge conflicts, it is recommended to do a pull with rebase before pushing your contribution.
git pull --rebase
Then, send your contribution to gerrit:
git review -c
Gerrit Notifications
Gerrit sends email notifications to:
Owner of the change
Reviewers of the change
Project watchers
Each user can configure his own watched projects and branches in the “settings/watched project” menu. Email notifications can be sent for New Changes, New Patch Sets, All Comments, Submitted Changes and Abandoned Changes.
Link: https://osm.etsi.org/gerrit/#/settings/projects (you can navigate there from the Gerrit console by clicking on the arrow by your login on the top right corner)
Continuous Integration
Jenkins builds, tests the new contribution, and reports the result on its web interface.
Jenkins votes on the contribution using “Code-Verif” (-1, +1) on Gerrit.
Jenkins is configured to relaunch the CI pipelines when a new patch is pushed to the review commit and by manually adding a comment with the keyword “retrigger” to the commit review UI.
Code Review
Other contributors and MDG Committers can comment the new contribution and vote using “Code-Review” (-1, 0, +1) on Gerrit.
The MDG Leader can comment the new contribution and votes using “Code-Review” (-2, -1, 0, +1, +2) on Gerrit.
Code Merging
Code submitted to Gerrit, will be merged only after getting
Code Review >= +2
Verified >= +1
For code changes belonging to a specific module,
The change will need a +1 from other committer
MDL will review and (if approved) will
provide
Code Review: +2,merge the change.
Approval from TSC
Explicit approval from TSC is required for code changes that affect:
the repositories in the modules controlled by the TSC, e.g. IM, NBI and SOL005 repos in the IM/NBI module
any other repositories under control of a module when there is no MDL (e.g. because the MDL stepped down and there is no interim MDL)
To get TSC approval for your changes, please
Get at least two +1 votes from other community members
Send an e-mail to
OSM_MDL@list.etsi.orgwith subject[TSC APPROVAL] {change summary}indicating in body
   1. **Change(s)**

      Link to the change(s) in gerrit.

   2. **Purpose**

      Purpose and benefits of the change (brief, one line is ok)

   3. **References**

      Including references to the related bug or feature.

   4. **Other modules impacted**

      Other modules that will/might be impacted (or None).

      This is not only for impact due to code dependencies,
      but any impact in OSM functionality.

      This is important to evaluate the risks of the change(s),
      communicate them and coordinate mitigation.
  NOTE:
  - Indicate if any other changes need to be merged **before** or **at the same time** than this one
  - Indicate if due to the complexity of the change (that might require coordinated work on different modules),
    a **dedicated branch** is recommended (this requires an extra process, therefore, use only when required)
  - Indicate If the change needs to be applied in other branches, and include the cherry-picks in the **Changeqs(s)** section
  - TSC **will not cherry-pick** to specific branches
    If you need the changes in several branches, include those in the Approval Request.
TSC wil review, and provide Code Review: +2 if approved.
Amending a contribution in Gerrit
Before amending, make sure that you have the commit-msg hook installed in your local repo. For instance, if your user is “user” and the repo is the “devops” repo, the command to install the commit-msg hook would be:
$ scp -p -P 29418 user@osm.etsi.org:hooks/commit-msg devops/.git/hooks/
In that way, all patches will use the same Change Id, thus guaranteeing that they will be associated to the same change.
NOTE: If you don’t setup your environment as above, and would like to update a gerrit review with your new/updated code, you MUST have the Change-Id (of the existing gerrit review) inside the commit message. If the commit update does not contain the Change-Id, the commit will will end up creating a new gerrit review, and your subsequent gerrit review will need to be abandoned (not ideal).
Amending your last change/commit pushed to Gerrit
Get the latest changes from the repo and rebase your changes on top.
git pull --rebase
Fix the code and any conflicts that might have appeared after pulling the code.
Add all updated files to the index.
git add <file>
Amend your commit. NOTE: Don’t use the -m flag to specify a commit message, since it will override the previous message and regenerate the Change-Id. Instead, use the text editor to change the commit message if needed, and keep the Change-Id line intact.
git commit --amend
Submit your change back to the repository. NOTE: use the appropriate branch instead of master, if you are working on a different branch.
git push origin HEAD:refs/for/master
Amending one of your changes which has dependencies on subsequent changes
This procedure will only work if you are the only person working on a set of commits and you don’t expect others to push commits and rebase them to be dependent on yours.
Run
git statuson the branch to know how many commits you are ahead of origin. NOTE: use the appropriate branch instead of master, if you are working on a different branch.git status On branch master Your branch is ahead of 'origin/master' by 3 commits.
Do an interactive rebase over the last X commits and specify which commit you want to amend by changing the command of the commit from
picktoedit. Usedropto abandon. Re-order the lines to put commits on a different order.git rebase -i HEAD~3 edit 0ab17ad Change in file1 pick 4995f46 Second change pick baa85bf Third changeFix the code in the commit, add the files, amend the commit, and continue rebasing:
vi file1.txt            #Fix the code
git add file1.txt
git commit --amend
git rebase --continue
In case of conflicts with subsequent commits, you will have to solve them, and continue rebasing
vi file1.txt            #Fix the conflict
git add file1.txt       #Add the files to the staging area; no commit is required.
git rebase --continue
Repeat step 4 as many times as required, until rebase finishes. You can cancel the whole operation at any moment with
git rebase --abortRebase your contribution before pushing
git pull --rebase
Push your changes to gerrit. NOTE: use the appropriate branch instead of master, if you are working on a different branch.
git push origin HEAD:refs/for/master
Amending a change of another author using git
When amending code from a different author, reviewer and original author should be coordinated in order to make sure that changes made by the reviewer are not reverted by the original author later. For that reason, it is recommended to avoid using the local copy of the branch. Instead, it is recommended to create a new local branch to work on every specific change, following the procedure below:
Get the last code from the repository:
git fetch origin
Create a new branch to work on the code from the remote branch. You can use the review number and patchset as name. NOTE: use the appropriate branch instead of master, if you are working on a different branch.
git checkout -b <review-number>-<patchset> origin/master
Pull the patch on the created branch. (To find the command to execute you can open the corresponding change page on Gerrit UI, click on download menu, then copy the “pull” command.)
git pull <url> <ref>
Fix the code.
Add all updated files to the index.
git add <file>
Amend the commit. NOTE: Don’t use the -m flag to specify a commit message, since it will override the previous message and regenerate the Change-Id. Instead, use the text editor to change the commit message if needed, and keep the Change-Id line intact.
git commit --amend
Rebase your contribution before pushing
git pull --rebase
Submit your change back to the repository. NOTE: use the appropriate branch instead of master, if you are working on a different branch.
git push origin HEAD:refs/for/master
Amending a change of another author using git-review
Follow the instructions in this link to install and configure git-review.
Download the change with
git-review$ git review -d 1280 Downloading refs/changes/80/1280/1 from gerrit Switched to branch "review/garciadeblas/1280"
This will download the change, put it in a branch called review/AUTHOR/change (if the change has no tag, the sequence number will be used instead), and switch to that branch.
After that, you can amend the downloaded change to improve it. Finally, push it again:
#$ git add                                                        # add the changes
#$ git commit --amend                                             # do not touch the Change-Id. The Change-Id is the way for gerrit to keep track what belongs to what development stream as a new patch set.
#$ git commit --amend --author="username \<email@email.com\>"**   # The username and email must contain the exact names from your ETSI account (the <> notation around the email is compulsory)
#$ git review -c -R                # The -R is important, since it tells git-review to not rebase    your change against master.
NOTE: Don’t use the -m flag to specify a commit message, since it will override the previous message and regenerate the Change-Id. Instead, use the text editor to change the commit message if needed, and keep the Change-Id line intact. NOTE: If the original author appears as uploader and assignee in gerrit you will need to request support to osmsupport@etsi.org asking for permission to change the assigned user to the commit. Once confirmed, you should be able to amend the user from the commit and push.
Delete the branch once you have finished:
$ git branch -D review/garciadeblas/1280
Merging the contribution
The MDG Leader can “Submit” the change only if +1 “Code-Verif” (from Jenkins) and at least one +2 “Code-Review”.
Gerrit reports the result of the code review to the corresponding bug in Bugzilla
Fixing the author name / email
Did you commit your changes with a wrong user name? Don’t panic, see how this can be fixed.
Proposing a new Feature
Project Features go trough a discussion and approval process. To propose a new Feature, OSM uses Gitlab.
Go to https://osm.etsi.org/gitlab/osm/features/-/issues/new. You need to be authenticated.
Create a new Issue for your feature
Title: A high level description of your feature (see some other examples in Gitlab)
Type: Issue
Description: The feature description, following the auto-generated template.
A feature request is about functionality, not about implementation (that is the design)
Describe WHAT you are proposing, and WHY it is important.
DO NOT describe HOW to do it.
Pick Labels If you foresee the OSM modules that might be affected by the feature, pick labels for them. Otherwise, leave it empty.
PLEASE: Do not set the following:
EPIC
Asignee
Milestone
Weight
Due Date
Submit Issue
Interact with the TSC and the Community through the issue. TSC will review your Feature. If it makes sense and its purpose is clear, it will be approved. Otherwise, TSC will provide questions for clarification.
Funnel of a feature
Once approved, the feature could transition through the following steps
Aproved: Approved by TSC to be included in OSM
Design: In the design phase, where HOW do to it will be discussed
Development: It is being implemented
Testing: Developer is testing it
Review: Community s reviewing it
Completed: It is completed, and merged
Abandoned: It was abandoned
An approved features is not a guarantee for implementation. Implementing a feature requires resources, and resources come from the companies integrating the Community, which might have prioritized the development of other features instead base on their own interests and the interests expressed by the EUAG and the TSC.
Once a Feature is accepted for inclusion in a specific Release, the ticket will be included in the respective EPIC
Release 1
…
Release 10
Release 11
…
For instance, to see Features included in Release11, check EPIC Release11
Designing a feature
Once a feature has been approved, the design phase starts. A design pad can be created in ETSI etherpad. The name of the pad must be “featureXXXX” where XXXX is the number of change in Gitlab. Once created, it is good practice to add the link as a comment to the feature in Gitlab.
For writing the design, you can check one of the previous designs, e.g. feature 10593, or use the design template below.
# XXXX FEATURE NAME

## CLARIFICATIONS TO EXPECTED E2E BEHAVIOUR

...

## REFERENCES

...

## ASSUMPTIONS

...

## IMPACTED MODULES

List of impacted modules: IM, RO, LCM, NBI, N2VC, common, MON, POL, NG-UI, osmclient, etc.

## MODULE1 IMPACT

...

## MODULE2 IMPACT

...

## TESTING

...
The design is expected to be socialized with the relevant stakeholders (e.g. MDLs and TSC). Dedicated slots can be allocated in the TECH calls on a per-request basis.
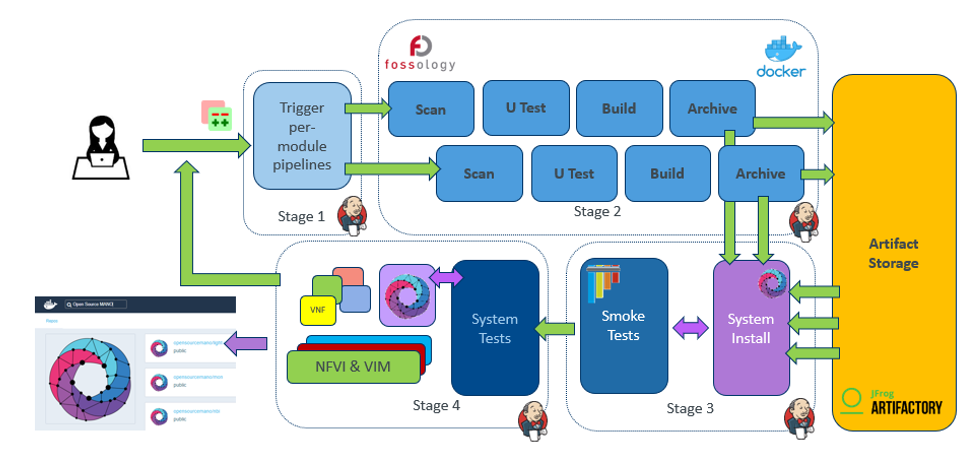
OSM CI/CD
Join the Community
Join the OSM Community Slack Workspace
Subscribe the OSM TECH mailing list
Get your organisation / project listed in the OSM Ecosystem