VIM emulator
Vim-emu: A NFV multi-PoP emulation platform
This emulation platform was created to support network service developers to locally prototype and test their network services in realistic end-to-end multi-PoP scenarios. It allows the execution of real network functions, packaged as Docker containers, in emulated network topologies running locally on the developer's machine. The emulation platform also offers OpenStack-like APIs for each emulated PoP so that it can integrate with MANO solutions, like OSM. The core of the emulation platform is based on Containernet.
The emulation platform vim-emu was previously developed as part of the EU H2020 project SONATA and is now developed as part of OSM's DevOps MDG.
Cite this work
If you plan to use this emulation platform for academic publications, please cite the following paper:
- M. Peuster, H. Karl, and S. v. Rossem: MeDICINE: Rapid Prototyping of Production-Ready Network Services in Multi-PoP Environments. IEEE Conference on Network Function Virtualization and Software Defined Networks (NFV-SDN), Palo Alto, CA, USA, pp. 148-153. doi: 10.1109/NFV-SDN.2016.7919490. (2016)
Scope
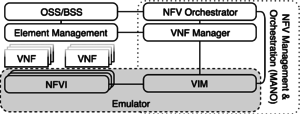
The following figure shows the scope of the emulator solution and its mapping to a simplified ETSI NFV reference architecture in which it replaces the network function virtualisation infrastructure (NFVI) and the virtualised infrastructure manager (VIM). The design of vim-emu is based on a tool called Containernet which extends the well-known Mininet emulation framework and allows us to use standard Docker containers as VNFs within the emulated network. It also allows adding and removing containers from the emulated network at runtime which is not possible in Mininet. This concept allows us to use the emulator like a cloud infrastructure in which we can start and stop compute resources (in the form of Docker containers) at any point in time.
Architecture
The vim-emu system design follows a highly customizable approach that offers plugin interfaces for most of its components, like cloud API endpoints, container resource limitation models, or topology generators.
In contrast to classical Mininet topologies, vim-emu topologies do not describe single network hosts connected to the emulated network. Instead, they define available PoPs which are logical cloud data centers in which compute resources can be started at emulation time. In the most simplified version, the internal network of each PoP is represented by a single SDN switch to which compute resources can be connected. This can be done as the focus is on emulating multi-PoP environments in which a MANO system has full control over the placement of VNFs on different PoPs but limited insights about PoP internals. We extended Mininet's Python-based topology API with methods to describe and add PoPs. The use of a Python-based API has the benefit that developers can use scripts to define or algorithmically generate topologies.
Besides an API to define emulation topologies, an API to start and stop compute resources within the emulated PoPs is available. Von-emu uses the concept of flexible cloud API endpoints. A cloud API endpoint is an interface to one or multiple PoPs that provides typical infrastructure-as-a-service (IaaS) semantics to manage compute resources. Such an endpoint can be an OpenStack Nova or HEAT like interface, or a simplified REST interface for the emulator CLI. These endpoints can be easily implemented by writing small, Python-based modules that translate incoming requests (e.g., an OpenStack Nova start compute) to emulator specific requests (e.g., start Docker container in PoP1).
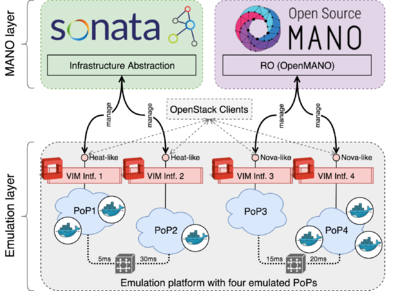
As illustrated in the following figure, our platform automatically starts OpenStack-like control interfaces for each of the emulated PoPs which allow MANO systems to start, stop and manage VNFs. Specifically, our system provides the core functionalities of OpenStack's Nova, Heat, Keystone, Glance, and Neutron APIs. Even though not all of these APIs are directly required to manage VNFs, all of them are needed to let the MANO systems believe that each emulated PoP in our platform is a real OpenStack deployment. From the perspective of the MANO systems, this setup looks like a real-world multi-VIM deployment, i.e., the MANO system's southbound interfaces can connect to the OpenStack-like VIM interfaces of each emulated PoP. A demonstration of this setup was presented at IEEE NetSoft 2017.
Example: OSM using vim-emu
This section gives an end-to-end usage example that shows how to connect OSM to a vim-emu instance and how to on-board and instantiate an example network service with two VNFs on the emulated infrastructure. All given paths are relative to the vim-emu repository root. The same example is also available for the classic build of OSM: vim-emu classic build walkthrough.
Example service: pingpong
Source descriptors
- Ping VNF (default ubuntu:trusty Docker container):
vim-emu/examples/vnfs/ping_vnf/ - Pong VNF (default ubuntu:trusty Docker container):
vim-emu/examples/vnfs/pong_vnf/ - Network service descriptor (NSD):
vim-emu/examples/services/pingpong_ns/
Pre-packed VNF and NS packages
- Ping VNF:
vim-emu/examples/vnfs/ping.tar.gz - Pong VNF:
vim-emu/examples/vnfs/pong.tar.gz - NSD:
vim-emu/examples/services/pingpong_nsd.tar.gz
Walkthrough
Step 1: Install OSM and vim-emu
Install OSM together with the emulator.
$ ./install_osm.sh --vimemu
Step 1.1: Start the emulator
Check if the emulator is running:
$ docker ps | grep vim-emu
If not, start it with the following command:
$ docker run --name vim-emu -t -d --rm --privileged --pid='host' --network=netosm -v /var/run/docker.sock:/var/run/docker.sock vim-emu-img python examples/osm_default_daemon_topology_2_pop.py
Step 1.2: Configure environment
You need to set the correct environment variables, i.e., you need to get the IP address of the vim-emu container to be able to add it as a VIM to your OSM installation:
$ export VIMEMU_HOSTNAME=$(sudo docker inspect -f '{{range .NetworkSettings.Networks}}{{.IPAddress}}{{end}}' vim-emu)
Step 2: Attach OSM to vim-emu
 # connect OSM to emulated VIM
 $ osm vim-create --name emu-vim1 --user username --password password --auth_url http://$VIMEMU_HOSTNAME:6001/v2.0 --tenant tenantName --account_type openstack

 # list vims
 $ osm vim-list
 +----------+--------------------------------------+
 | vim name | uuid                                 |
 +----------+--------------------------------------+
 | emu-vim1 | a8175948-efcf-11e7-94ad-00163eba993f |
 +----------+--------------------------------------+
Step 3: On-board example pingpong service
The example can be found in the vim-emu git repository: https://osm.etsi.org/gitweb/?p=osm/vim-emu.git;a=summary.
 # Clone the vim-emu repository containing the pingpong example
 $ git clone https://osm.etsi.org/gerrit/osm/vim-emu.git
 # VNFs
 $ osm vnfd-create vim-emu/examples/vnfs/ping.tar.gz
 $ osm vnfd-create vim-emu/examples/vnfs/pong.tar.gz

 # NS
 $ osm nsd-create vim-emu/examples/services/pingpong_nsd.tar.gz

 # You can now check OSM's GUI to see the VNFs and NS in the catalog. Or:
 $ osm vnfd-list
+-----------+--------------------------------------+
| vnfd name | id                                   |
+-----------+--------------------------------------+
| ping      | 2c632bc7-15f6-4997-a581-b9032ea4672c |
| pong      | e6fe076d-9d1f-4f05-a641-44b3e09df961 |
+-----------+--------------------------------------+

 $ osm nsd-list
+----------+--------------------------------------+
| nsd name | id                                   |
+----------+--------------------------------------+
| pingpong | 776746fe-7c48-4f0c-8509-67da1f8c0678 |
+----------+--------------------------------------+
Step 4: Instantiate example pingpong service
$ osm ns-create --nsd_name pingpong --ns_name test --vim_account emu-vim1
Step 5: Check service instance
 # using OSM client

 $ osm ns-list
+------------------+--------------------------------------+--------------------+---------------+-----------------+
| ns instance name | id                                   | operational status | config status | detailed status |
+------------------+--------------------------------------+--------------------+---------------+-----------------+
| test             | 566e6c36-5f42-4f3d-89c7-dadcca01ae0d | running            | configured    | done            |
+------------------+--------------------------------------+--------------------+---------------+-----------------+
Step 6: Interact with deployed VNFs
 # connect to ping VNF container (in another terminal window):
 $ sudo docker exec -it mn.dc1_test-1-ubuntu-1 /bin/bash
 # show network config
 root@dc1_test-nsi:/# ifconfig
 eth0      Link encap:Ethernet  HWaddr 02:42:ac:11:00:03
           inet addr:172.17.0.3  Bcast:0.0.0.0  Mask:255.255.0.0
           UP BROADCAST RUNNING MULTICAST  MTU:1500  Metric:1
           RX packets:8 errors:0 dropped:0 overruns:0 frame:0
           TX packets:0 errors:0 dropped:0 overruns:0 carrier:0
           collisions:0 txqueuelen:0
           RX bytes:648 (648.0 B)  TX bytes:0 (0.0 B)

 ping0-0   Link encap:Ethernet  HWaddr 4a:57:93:a0:d4:9d
           inet addr:192.168.100.3  Bcast:192.168.100.255  Mask:255.255.255.0
           UP BROADCAST RUNNING MULTICAST  MTU:1500  Metric:1
           RX packets:0 errors:0 dropped:0 overruns:0 frame:0
           TX packets:0 errors:0 dropped:0 overruns:0 carrier:0
           collisions:0 txqueuelen:1000
           RX bytes:0 (0.0 B)  TX bytes:0 (0.0 B)

 # ping the pong VNF over the attached management network
 root@dc1_test-1-ubuntu-1:/# ping 192.168.100.4
 PING 192.168.100.4 (192.168.100.4) 56(84) bytes of data.
 64 bytes from 192.168.100.4: icmp_seq=1 ttl=64 time=0.596 ms
 64 bytes from 192.168.100.4: icmp_seq=2 ttl=64 time=0.070 ms
 --- 192.168.100.4 ping statistics ---
 2 packets transmitted, 2 received, 0% packet loss, time 999ms
 rtt min/avg/max/mdev = 0.048/0.059/0.070/0.011 ms
Step 7: Shut down
 # delete service instance
 $ osm ns-delete test
(optional) Step 8: Check vim-emu and its status
 # connect to vim-emu Docker container to see its logs ( do in another terminal window)
 $ sudo docker logs -f vim-emu

 # check if the emulator is running in the container
 $ sudo docker exec vim-emu vim-emu datacenter list
 +---------+-----------------+----------+----------------+--------------------+
 | Label   | Internal Name   | Switch   |   # Containers |   # Metadata Items |
 +=========+=================+==========+================+====================+
 | dc2     | dc2             | dc2.s1   |              0 |                  0 |
 +---------+-----------------+----------+----------------+--------------------+
 | dc1     | dc1             | dc1.s1   |              0 |                  0 |
 +---------+-----------------+----------+----------------+--------------------+
 # check running service
 $ sudo docker exec vim-emu vim-emu compute list
 +--------------+----------------------------+---------------+------------------+-------------------------+
 | Datacenter   | Container                  | Image         | Interface list   | Datacenter interfaces   |
 +==============+============================+===============+==================+=========================+
 | dc1          | dc1_test.ping.1.ubuntu     | ubuntu:trusty | ping0-0          | dc1.s1-eth2             |
 +--------------+----------------------------+---------------+------------------+-------------------------+
 | dc1          | dc1_test.pong.2.ubuntu     | ubuntu:trusty | pong0-0          | dc1.s1-eth3             |
 +--------------+----------------------------+---------------+------------------+-------------------------+
Build & Installation
There are multiple ways to install and use the emulation platform. The easiest way is the automated installation using the OSM installer. The bare-metal installation requires a freshly installed Ubuntu 16.04 LTS and is done by an ansible playbook. Another option is to use a nested Docker environment to run the emulator inside a Docker container.
Automated installation (with OSM)
The following command will install OSM as well as the emulator (as a Docker container) on a local machine. It is recommended to use a machine with Ubuntu 16.04.
$ ./install_osm.sh --vimemu
Manual installation (vim-emu only)
Option 1: Bare-metal installation
- Requires: Ubuntu 16.04 LTS
$ sudo apt-get install ansible git aptitude
Step 1: Containernet installation
$ cd
$ git clone https://github.com/containernet/containernet.git
$ cd ~/containernet/ansible
$ sudo ansible-playbook -i "localhost," -c local install.yml
Step 2: vim-emu installation
$ cd
$ git clone https://osm.etsi.org/gerrit/osm/vim-emu.git
$ cd ~/vim-emu/ansible
$ sudo ansible-playbook -i "localhost," -c local install.yml
Option 2: Nested Docker Deployment
This option requires a Docker installation on the host machine on which the emulator should be deployed.
$ git clone https://osm.etsi.org/gerrit/osm/vim-emu.git
$ cd ~/vim-emu
# build the container:
$ docker build -t vim-emu-img .
# run the (interactive) container:
$ docker run --name vim-emu -it --rm --privileged --pid='host' --network=netosm -v /var/run/docker.sock:/var/run/docker.sock vim-emu-img /bin/bash

# alternative: run container with emulator in service mode
$ docker run --name vim-emu -t -d --rm --privileged --pid='host' --network=netosm -v /var/run/docker.sock:/var/run/docker.sock vim-emu-img python examples/osm_default_daemon_topology_2_pop.py
Additional information and links
- Main publication: M. Peuster, H. Karl, and S. v. Rossem: MeDICINE: Rapid Prototyping of Production-Ready Network Services in Multi-PoP Environments. IEEE Conference on Network Function Virtualization and Software Defined Networks (NFV-SDN), Palo Alto, CA, USA, pp. 148-153. doi: 10.1109/NFV-SDN.2016.7919490. (2016)
- Containernet
- SONATA NFV
- SONATA wiki (more documentation)
- Demo Video on YouTube
Contact
If you have questions, please use the OSM TECH mailing list: OSM_TECH@LIST.ETSI.ORG
Direct contact: Manuel Peuster (Paderborn University) <manuel@peuster.de>

