# OSM Quickstart
[](https://osm.etsi.org/wikipub/index.php/8th_OSM_Hackfest)
Open Source MANO (OSM) is an ETSI-hosted open source community delivering a production-quality MANO stack for NFV, capable of consuming openly published information models, available to everyone, suitable for all VNFs, operationally significant and VIM-independent. OSM is aligned to NFV ISG information models while providing first-hand feedback based on its implementation experience.
Release SIX brings a number of improvements over previous releases. For the full list of new features, please refer to the [Release SIX Documentation](index.md). For a comprehensive overview of OSM functionalities, you can also refer to the [OSM Scope and Functionality White Paper](https://osm.etsi.org/images/OSM_EUAG_White_Paper_OSM_Scope_and_Functionality.pdf) or to the release notes of previous OSM releases ([ONE](https://osm.etsi.org/images/OSM-Whitepaper-TechContent-ReleaseONE-FINAL.pdf), [TWO](https://osm.etsi.org/images/OSM-Whitepaper-TechContent-ReleaseTWO-FINAL.pdf), [THREE](https://osm.etsi.org/images/OSM-Whitepaper-TechContent-ReleaseTHREE-FINAL.pdf), [FOUR](https://osm.etsi.org/images/OSM-Whitepaper-TechContent-ReleaseFOUR-FINAL.pdf), [FIVE](https://osm.etsi.org/images/OSM-Whitepaper-TechContent-ReleaseFIVE-FINAL.pdf)).
**OSM in Practice**
## Assumptions about interaction with VIMs and VNFs
The following figure illustrates OSM interaction with VIMs and VNFs:
- OSM talks to the VIM for the deployment of VNFs and VLs connecting them
- OSM talks to the VNFs deployed in a VIM to run day-0, day-1 and day-2 configuration primitives.

In order for OSM to work, it is assumed that:
- Each VIM has an API endpoint reachable from OSM
- Each VIM has a so called management network which provides IP address to VNFs
- That management network is reachable from OSM
## Installing OSM
### Default installation procedure
All you need to run OSM is a single server or VM with the following requirements:
- MINIMUM: 2 CPUs, 4 GB RAM, 20GB disk and a single interface with Internet access
- RECOMMENDED: 2 CPUs, 8 GB RAM, 40GB disk and a single interface with Internet access
- Base image:
- [Ubuntu18.04 (64-bit variant required)](http://releases.ubuntu.com/18.04/), or
- [Ubuntu16.04 (64-bit variant required)](http://releases.ubuntu.com/16.04/)
Once you have prepared the host with the previous requirements, all you need to do is:
```bash
wget https://osm-download.etsi.org/ftp/osm-6.0-six/install_osm.sh
chmod +x install_osm.sh
./install_osm.sh
```
**TIP:** In order to facilitate potential trobleshooting later, it is recommended to save the full log of your installation process:
```bash
wget https://osm-download.etsi.org/ftp/osm-6.0-six/install_osm.sh
chmod +x install_osm.sh
./install_osm.sh 2>&1 | tee osm_install_log.txt
```
You will be asked if you want to proceed with the installation and configuration of LXD, juju, docker CE and the initialization of a local docker swarm, as pre-requirements. Please answer "y".
Then, some dialog messages related to LXD configuration will be shown. This is what you have to answer:
- Do you want to configure the LXD bridge? **Yes**
- Do you want to setup an IPv4 subnet? **Yes**
- *<< **Default values** apply for next questions >>*
- Do you want to setup an IPv6 subnet? **No**
If you want to run docker commands, you will also need to either reload the shell or run the following command to add your user to the 'docker' group:
```bash
newgrp docker
```
#### Installation including optional components
You can include optional components in your installation by adding the following flags:
- **VIM Emulator:** `--vimemu` (more information [here](06-06-how-to-vim-emulator.md)
- **Performance Management additional stack (Grafana only):** `--pm_stack` (more information [here](06-03-01-performance-management.md)
- **Fault Management features with ELK:** `--elk_stack` (more information [here](06-03-02-fault-management.md)
Example:
```bash
./install_osm.sh --elk_stack --pm_stack --vimemu
```
#### Other installation options
- You can also run OSM using a pre-built [vagrant](https://app.vagrantup.com/osm/boxes/releasesix) image: [How_to_run_OSM_on_Vagrant](04-01-running-on-vagrant.md)
- For other special installation options, please refer to the [release documentation](04-04-advanced-install.md).
### Checking your installation
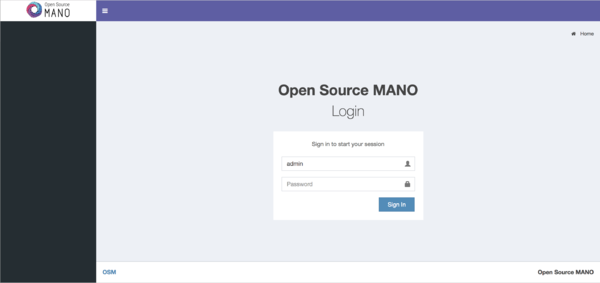
After some time, you will get a fresh OSM installation with its latest, pre-built docker images which are built daily. You can access to the UI in the following URL (user:`admin`, password: `admin`): [http://1.2.3.4](http://1.2.3.4/), replacing 1.2.3.4 by the IP address of your host.

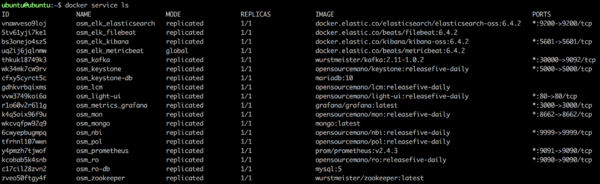
As a result of the installation, thirteen docker containers are created in the host (without considering optional stacks). You can check they are running by issuing the following commands:
```bash
docker stack ps osm |grep -i running
docker service ls
```
At any time, you can quickly relaunch your deployment by using the pre-built docker images, like this:
```bash
docker stack rm osm && sleep 60 # The sleep is for making sure the stack removal finishes before redeploying
docker stack deploy -c /etc/osm/docker/docker-compose.yaml osm
```
To check the logs of any container:
```bash
docker service logs osm_lcm # shows the logs of all containers (included dead containers) associated with LCM component.
docker logs $(docker ps -aqf "name=osm_lcm" -n 1) # shows the logs of the last existant LCM container
```
OSM client, a python-based CLI for OSM, will be available as well in the host machine. Via the OSM client, you can manage descriptors, NS and VIM complete lifecycle.
## Adding VIM accounts
Before proceeding, make sure that you have a site with a VIM configured to run with OSM. Different kinds of VIMs are currently supported by OSM:
- **OpenVIM.** Check the following link to know how to install and use openvim for OSM: [OpenVIM installation](10-00-openvim-install.md). Openvim must run in 'normal' mode (not test or fake) to have real virtual machines reachable from OSM.
- **OpenStack.** Check the following link to learn how to configure OpenStack to be used by OSM: [Openstack configuration](05-02-openstack-configuration.md)
- **VMware vCloud Director.** Check the following link to learn how to configure VMware VCD to be used by OSM: [Configuring VMware vCloud Director](11-vcd-configuration.md)
- **Amazon Web Services (AWS).** Check the following link to learn how to configure AWS (EC2 and Virtual Private Cloud) to be used by OSM: [Configuring AWS for OSM](12-aws-configuration.md)
- **Eclipse fog05** Check the following link to learn how to configure Eclipse fog05 to be used by OSM: [Configuring Eclipse fog05 for OSM](13-fog05-configuration.md)
OSM can manage external SDN controllers to perform the dataplane underlay network connectivity on behalf of the VIM. See [EPA and SDN assist](05-01-how-to-epa-sdn-assist.md)
### Adding VIMs through OSM client
#### OpenVIM site
Execute the following command, using the appropriate parameters (e.g. site name: "openvim-site", IP address: 10.10.10.10, VIM tenant: "osm")
```bash
osm vim-create --name openvim-site --auth_url http://10.10.10.10:9080/openvim --account_type openvim \
--description "Openvim site" --tenant osm --user dummy --password dummy
```
#### Openstack site
Execute the following command, using the appropriate parameters (e.g. site name: "openstack-site", IP address: 10.10.10.11, VIM tenant: "admin", user: "admin", password: "userpwd")
```bash
osm vim-create --name openstack-site --user admin --password userpwd \
--auth_url http://10.10.10.11:5000/v2.0 --tenant admin --account_type openstack
```
For advanced options, please refer to the [OpenStack Setup Guide](05-02-openstack-configuration.md#add-openstack-to-OSM).
#### VMware vCloud Director site
- Execute the following command, using the appropriate parameters (e.g. site name: "vmware-site", IP address: 10.10.10.12, VIM tenant: "vmware-tenant", user: "osm", password: "osm4u", admin user: "admin", admin password: "adminpwd", organization: "orgVDC")
```bash
osm vim-create --name vmware-site --user osm --password osm4u --auth_url https://10.10.10.12 \
--tenant vmware-tenant --account_type vmware \
--config '{admin_username: user, admin_password: passwd, orgname: organization, nsx_manager: "http://10.10.10.12",
nsx_user: user, nsx_password: userpwd,"vcenter_port": port, "vcenter_user":user, "vcenter_password":password,
"vcenter_ip": 10.10.10.14}'
```
For advanced options, please refer to the [vCloud Director Setup Guide](11-vcd-configuration.md#add-vcloud-using-osm-client).
#### VMware Integrated Openstack (VIO) site
Execute the following command, using the appropriate parameters (e.g. site name: "openstack-site-vio4", IP address: 10.10.10.12, VIM tenant: `admin`, user: `admin`, password: `passwd`)
```bash
osm vim-create --name VIO --user admin --password passwd --auth_url https://10.10.10.12:5000/v3 --tenant admin \
--account_type openstack --config '{use_floating_ip: True, insecure: true, vim_type: VIO, APIversion: v3.3,
dataplane_physical_net: dvs-46, "use_internal_endpoint":true,"dataplane_net_vlan_range":["31-35","37-39"]}'
```
With respect to Openstack, the additional configuration for VIO is the following:
- **vim_type**: Set to "VIO" to use VMware Integrated openstack as VIM
- **use_internal_endpoint**: When true it allows use of private API endpoints
- **dataplane_physical_net**: The configured network_vlan_ranges at neutron for the SRIOV (binding direct) and passthrough (binding direct-physical) networks, e.g. 'physnet_sriov' in the above configuration. In case of VMware Integrated Openstack (VIO) provide moref ID of distributed virtual switch, e.g 'dvs-46' in above configuration.
- **dataplane_net_vlan_range**: In case of VMware Integrated Openstack (VIO) provide vlan ranges for the SRIOV (binding direct) networks in format ['start_ID - end_ID']
For common options, you may refer to the general [OpenStack Setup Guide](05-02-openstack-configuration.md#add-openstack-to-osm).
#### Amazon Web Services (AWS) site
- Execute the following command, using the appropriate parameters (e.g. site name: "aws-site", VIM tenant: "admin", user: "XXX", password: "YYY")
```bash
osm vim-create --name aws-site --user XXX --password YYY --auth_url https://aws.amazon.com --tenant admin \
--account_type aws --config '{region_name: eu-central-1, flavor_info: {t2.nano: {cpus: 1, disk: 100, ram: 512},
t2.micro: {cpus: 1, disk: 100, ram: 1024}, t2.small: {cpus: 1, disk: 100, ram: 2048},
m1.small: {cpus: 1, disk: 160, ram: 1741}}}'
```
For advanced options, please refer to the [AWS Setup Guide](12-aws-configuration.md#add-aws-to-osm).
#### Eclipse fog05 site
- Execute the following command, using the appropriate parameters (e.g. runtime supported: "hypervisor", cpu architecture: "arch", user: "XXX", password: "YYY")
```bash
osm vim-create --name fos --auth_url :8080 --account_type fos --tenant osm --user dummy --password dummy --config '{hypervisor: LXD}'
```
For advanced options, please refer to the [Eclipse fog05 setup guide](13-fog05-configuration.md#add-eclipse-fog05-to-osm).
### Adding VIMs through GUI
Just access the *VIM Accounts* tab, click the *New VIM* button and fill the parameters accordingly.

## Deploying your first Network Service
In this example we will deploy the following Network Service, consisting of two simple VNFs based on CirrOS connected by a simple VLD.

Before going on, download the required VNF and NS packages from this URL:
### Onboarding a VNF
The onboarding of a VNF in OSM involves adding the corresponding VNF package to the system. This process also assumes, as a pre-condition, that the corresponding VM images are available in the VIM(s) where it will be instantiated.
#### Uploading VM image(s) to the VIM(s)
In this example, only a vanilla CirrOS 0.3.4 image is need. It can be obtained from the following link: http://download.cirros-cloud.net/0.3.4/cirros-0.3.4-x86_64-disk.img
If not available, it would be required to upload the image into the VIM. Instructions differ from one VIM to another:
- In Openstack:
```bash
openstack image create --file="./cirros-0.3.4-x86_64-disk.img" --container-format=bare --disk-format=qcow2 cirros034
```
- In OpenVIM:
```bash
#copy your image to the NFS shared folder (e.g. /mnt/openvim-nfs)
cp ./cirros-0.3.4-x86_64-disk.img /mnt/openvim-nfs/
openvim image-create --name cirros034 --path /mnt/openvim-nfs/cirros-0.3.4-x86_64-disk.img
```
#### VNF package onboarding
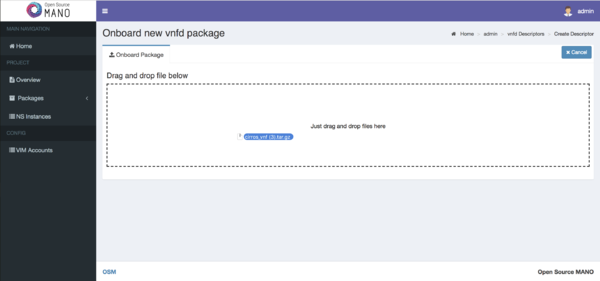
- From the UI:
- Go to Projects --> Admin --> VNF Packages (*Open List*)
- Click on the Onboard VNFD button
- Drag and drop the VNF package file cirros_vnf.tar.gz in the importing area.
- From OSM client:
```bash
osm vnfd-create cirros_vnf.tar.gz
osm vnfd-list
```
### Onboarding a NS
- From the UI:
- Go to Projects --> Admin --> NS Packages (*Open List*)
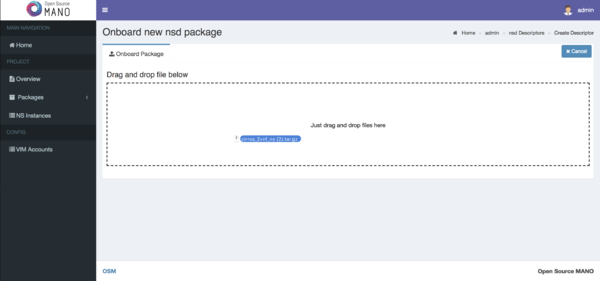
- Click on the Onboard NSD button
- Drag and drop the NS package file cirros_2vnf_ns.tar.gz in the importing area.
- From OSM client:
```bash
osm nsd-create cirros_2vnf_ns.tar.gz
osm nsd-list
```
### Instantiating the NS
- From the UI:
- Go to Projects --> Admin --> NS Packages (*Open List*)
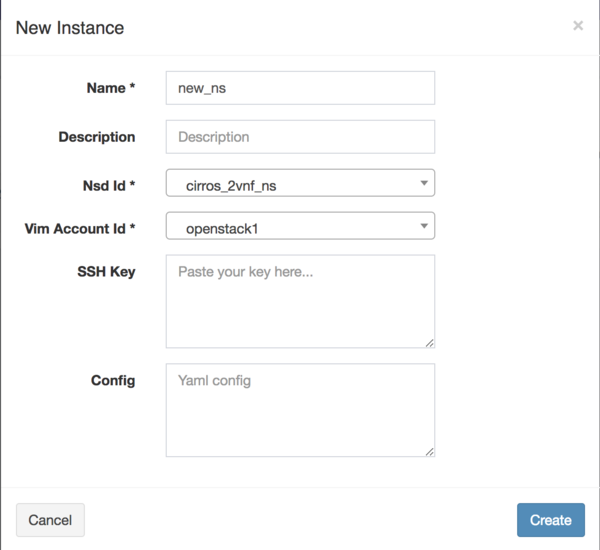
- Next the NS descriptor to be instantiated, click on Launch

- Fill in the form, adding at least a name and selecting the VIM
- From OSM client:
```bash
osm ns-create --nsd_name cirros_2vnf_ns --ns_name --vim_account
osm ns-list
```
**Instantiation parameters can be specified using both CLI and UI. You can find a thorough explanation with examples in this page: [OSM instantiation parameters](05-osm-usage.md#advanced-instantiation-using-instantiation-parameters).**
## What's next?
If you want to learn more, you can refer to the rest of **[OSM documentation](index.md)**.